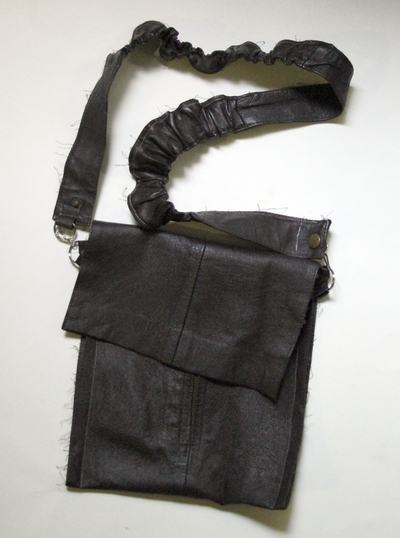
How to Make the Indiana Jones Satchel:
A note about supplies for this project: like I said on the previous page, you can sub any non-fraying fabric for the leather in this project. Or, if you use fraying fabric, use pinking shears to cut the edges so they won’t fray (or zigzag stitch around the edges). As with all my projects, I recommend using what you have and modifying the project to fit your budget, materials, and taste. Improvisation is encouraged!
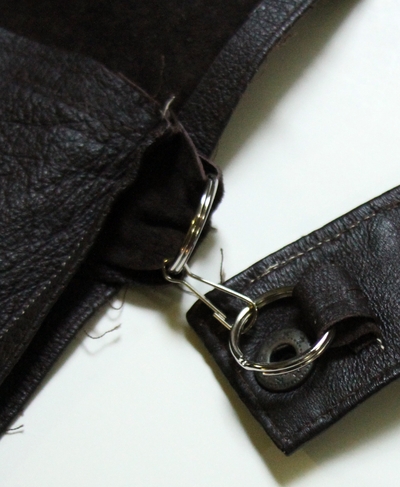
I had a package of summer camp-style metal findings that I used to attach the strap to the bag. I used split rings (like for keychains) on the ends of the straps and the edges of the bag, and a clip to hold the rings together. I am a huge fan of removable/adjustable straps, so I have a hard time just sewing the strap to the bag; I want it to be able to grow with the kid. You can skip the hardware, though, and just sew the straps to the bag.
To Make:
Note: if the measurements in the instructions stress you out, don’t worry. You’re basically just folding the leather in thirds, sewing up the sides, and leaving the remaining part for the flap. You’ll add straps in there too. That’s it. If you don’t understand what I mean for any of this, just ask in the comments and I’ll clarify and/or add additional diagrams.
Cut the following pieces:
- rectangle, about 8×24″
- strap, about 1×30 (measure your child first, see below for how to determine strap length)
- (optional, if making the hardware-style adjustable strap): two tabs of leather, about .5×4″
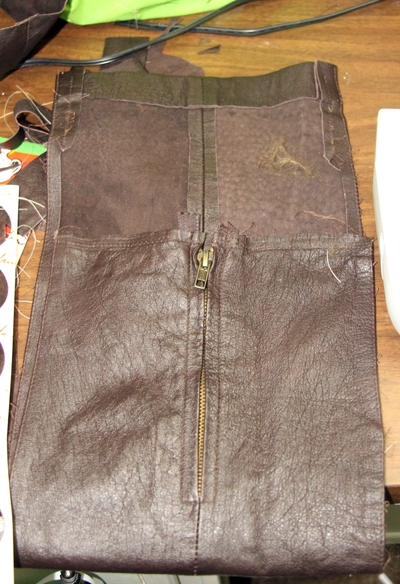
1. Start with a rectangular panel of leather, about 8″ wide and 24″ long. I left the zipper from the skirt in my panel because I thought it was kind of a cool detail for Indy’s satchel. (Check page 3 for instructions on disassembling leather garments)
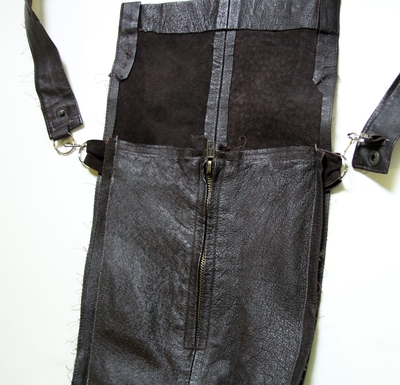
2. Fold rectangle up about 8″. You should have a remaining section of about 8″ at the top, which will become the satchel flap. Clip the leather together (use binder clips or clothespins instead of pins — see next page for more notes on this).
3. Adding straps: I added two loops with rings on them at the top of the folded section (loop and ring sticking out of the side of the bag) and clipped them in place. If you are adding straps (no rings/adjustability), add them the same way, so they are sticking out of the side of the bag.
4. Sew up the edges of the bag, making sure you get the loop/straps securely sewn in there. Backstitch for reinforcement where the pieces meet.
I just sewed on the outside of the satchel, which is the simplest possible option. If you want a more finished look, just fold the leather right sides together and sew, then turn right side out. Make sure the loops/strap are sandwiched between the right sides together when you sew them so when you turn it right side out, the loops/straps are on the outside of the bag.
To determine the length of strap needed: measure across your child’s chest from hipbone, over opposite shoulder, and then to rear hipbone. If you are adding hardware, subtract about four inches from this measurement to account for the length of the hardware.
5. Finishing the strap: If you are using leather for the strap, you don’t need to finish it in any way, other than adding rings to the end (if you are doing the adjustable thing). To add rings, you can just slip a ring onto the end of the leather and fold over, sewing across the edge. If your leather is too thick (like mine, because I just used the skirt waistband as my strap), just add a small loop to the end and sew it onto the strap. Add clips to the loops, and then clip the two loops together.
The beauty of working with leather is that you don’t have to finish any of the pieces, and it will look beautiful and work great.
If you don’t have enough leather for a strap, use whatever you have that will work: polyester strap material, an old strap from a purse, braided fabric or ribbon, etc.


8 Comments
Kathy V.
What a great idea! I can see Lewis running around with this on. Now he needs an Indy hat.
Samantha
Thanks for the info. I have a big piece of thrifted leather. Not sure what I’m going to make yet, but thanks for the tip on not sticking pins in it.
Dana
I got a leather jacket at a yardsale a few weeks ago for $.25! Yep, a brown leather jacket for a quarter! I bought it knowing I’d take it apart and make something else out of it. Haven’t found the perfect project yet, but, thanks to you, have an idea of how to take it apart and use the pieces.
Blessings–
Dana
Mich L.
Such a cool one! I think it looks really fancy and finished, even though you say it’s quick and dirty. Good tips on working with leather, thanks, Heather!
Katherine Anderson
Hello,
Are you telling us to sew the leather with a sewing machine or by hand? Many years ago I found a BUNCH of different color, pattern and width leather that a store going out of business was going to throw away! I grabbed it. The problem is that I have tried to 2 leather pieces together with a sewing machine but it stitches didn’t hold.
What should I do.
Thank you,
Katherine Anderson