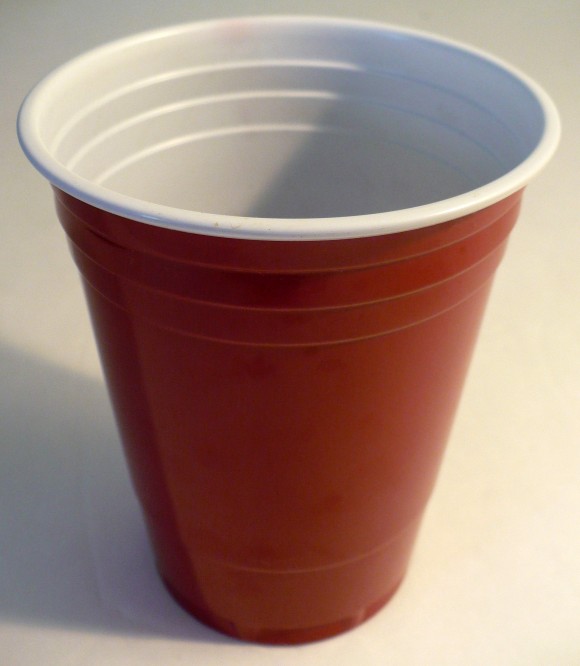
A few days ago I went to a little party, one of those fun get-togethers where someone comes and does product demonstrations and all of the guests plow through catalogs wishing their husbands had let them leave the house with more cash. My friend who hosted the party served a lovely little buffet of snack foods and made some delicious punch which she served in red plastic party cups.
Ever the good hostess, she wandered the room gathering empty plates and cups from her guests. When she asked me if I was done using my cup, I told her that I was planning to keep it. She gave me an odd look. “What are you going to do with it?” she inquired.
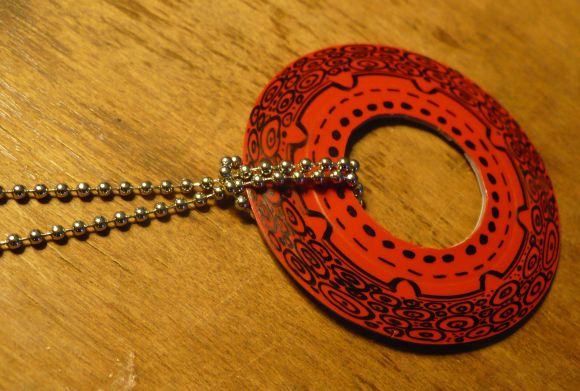
“I think,” I replied, “that I am going to turn it into a necklace.
Every eye in the room was suddenly cast sideways at me. I could see the concern on their faces. They were thinking, “is this it? Has she finally gone completely ’round the bend?” Call me crazy, but I think it came out fabulous!
Project estimate:
- Plastic cup (#6 plastic), on hand
- Permanent marker, on hand
- Oven, on hand
- Baking sheet or cake pan, on hand
- Parchment paper, on hand or $1 and up
- Flat-bottom drinking glass, on hand
Total: Free and up
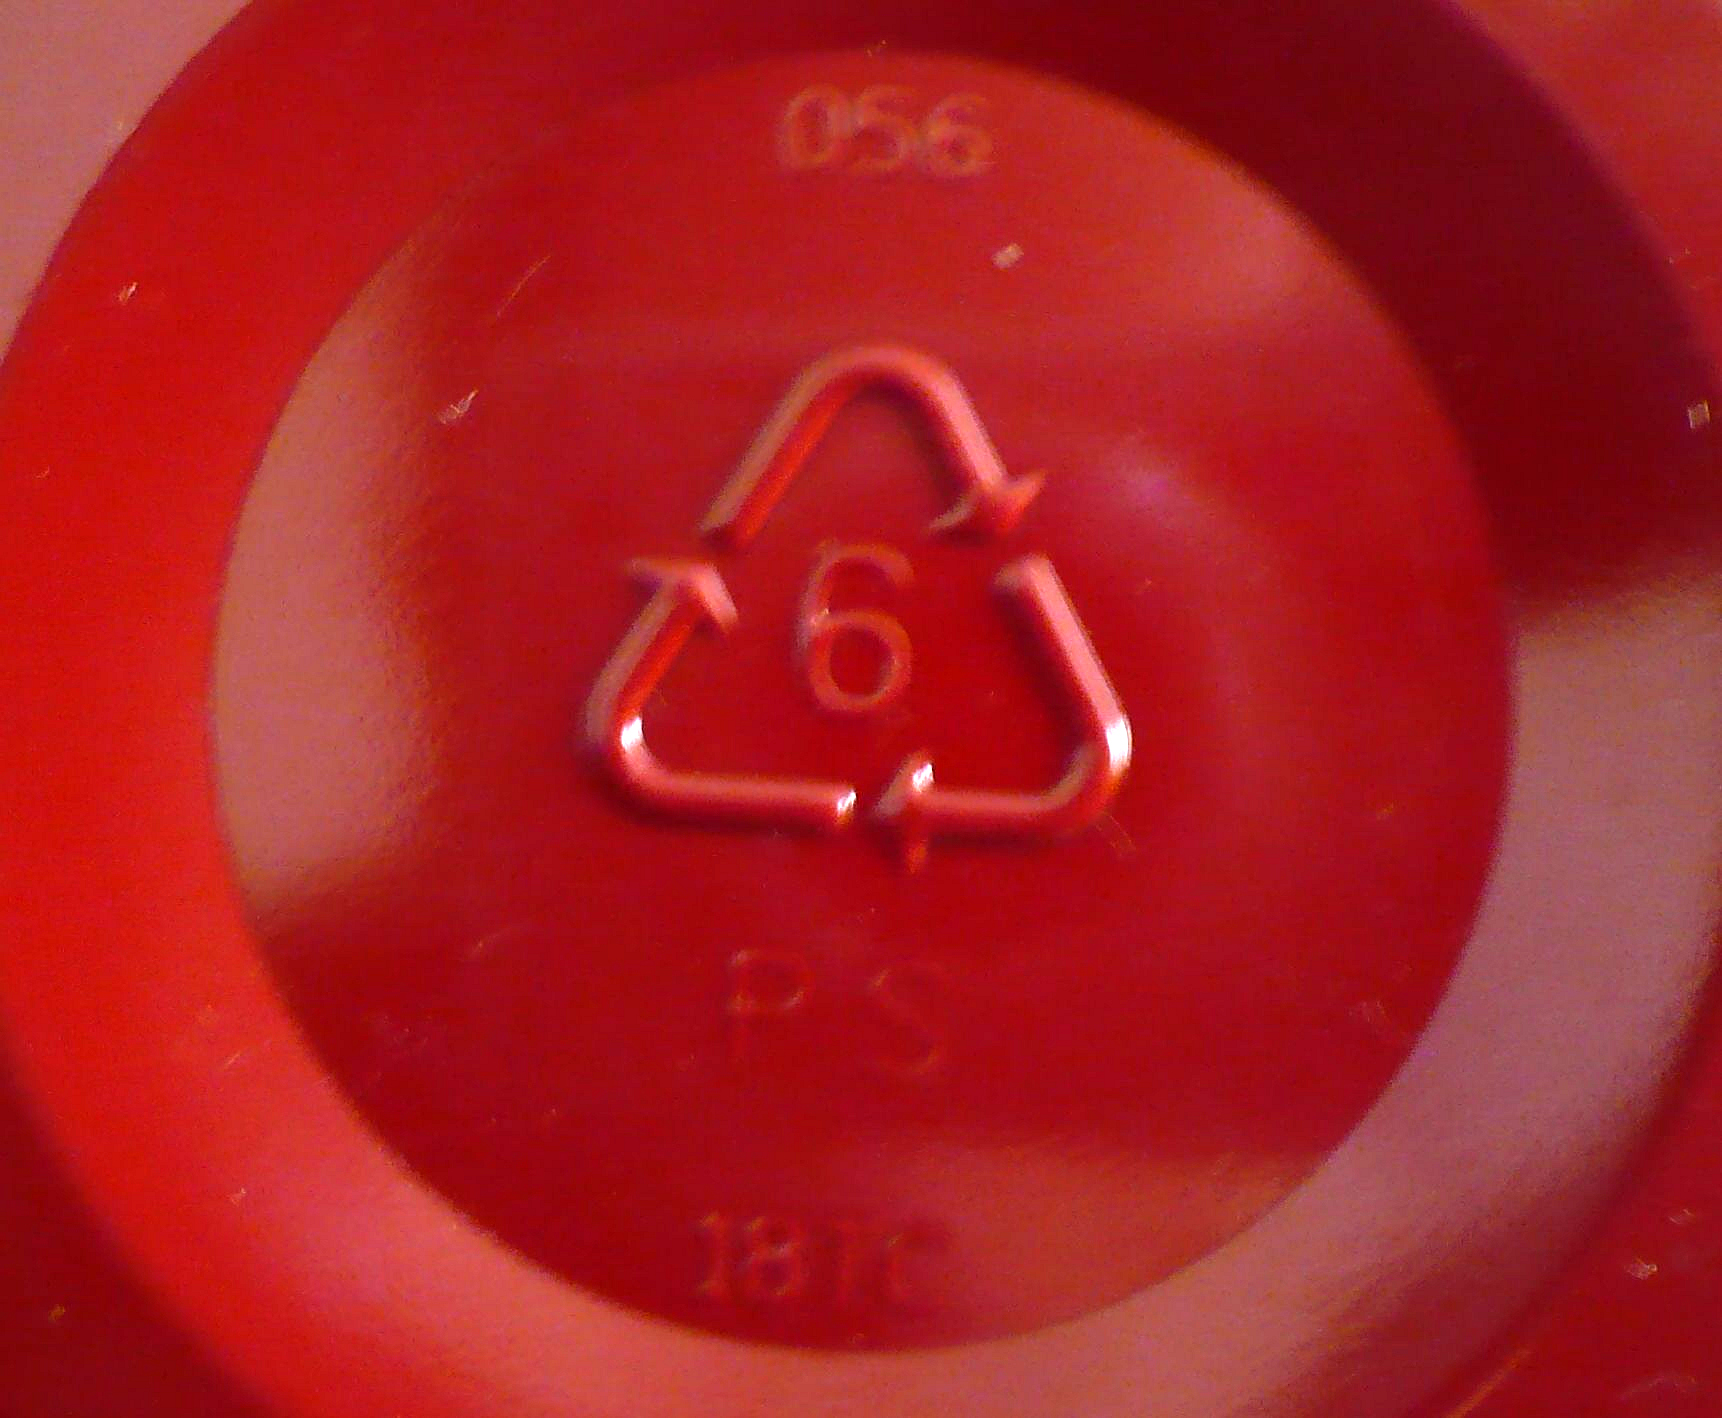
Make sure the plastic cup you are using is made of #6 plastic. (This is the same type of plastic that Shrinky Dinks are made from.) Most plastic cups have ridged rings around them, which you can use a s a guide for cutting and decorating in straight lines.
Cut the bottom off of the cup.
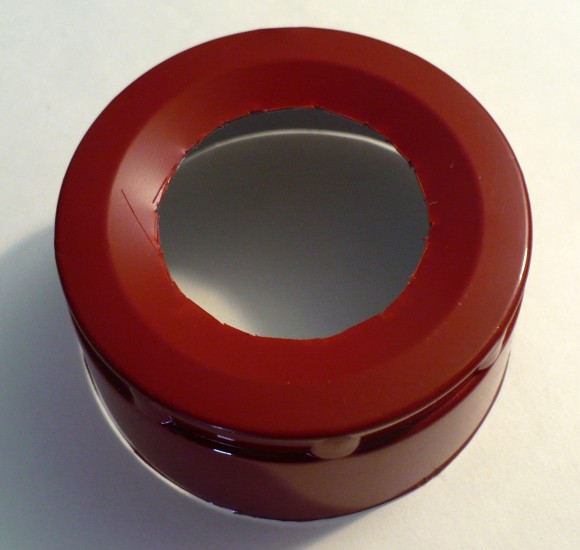
Use an Xacto or utility knife to cut out the center of the bottom of the cup.
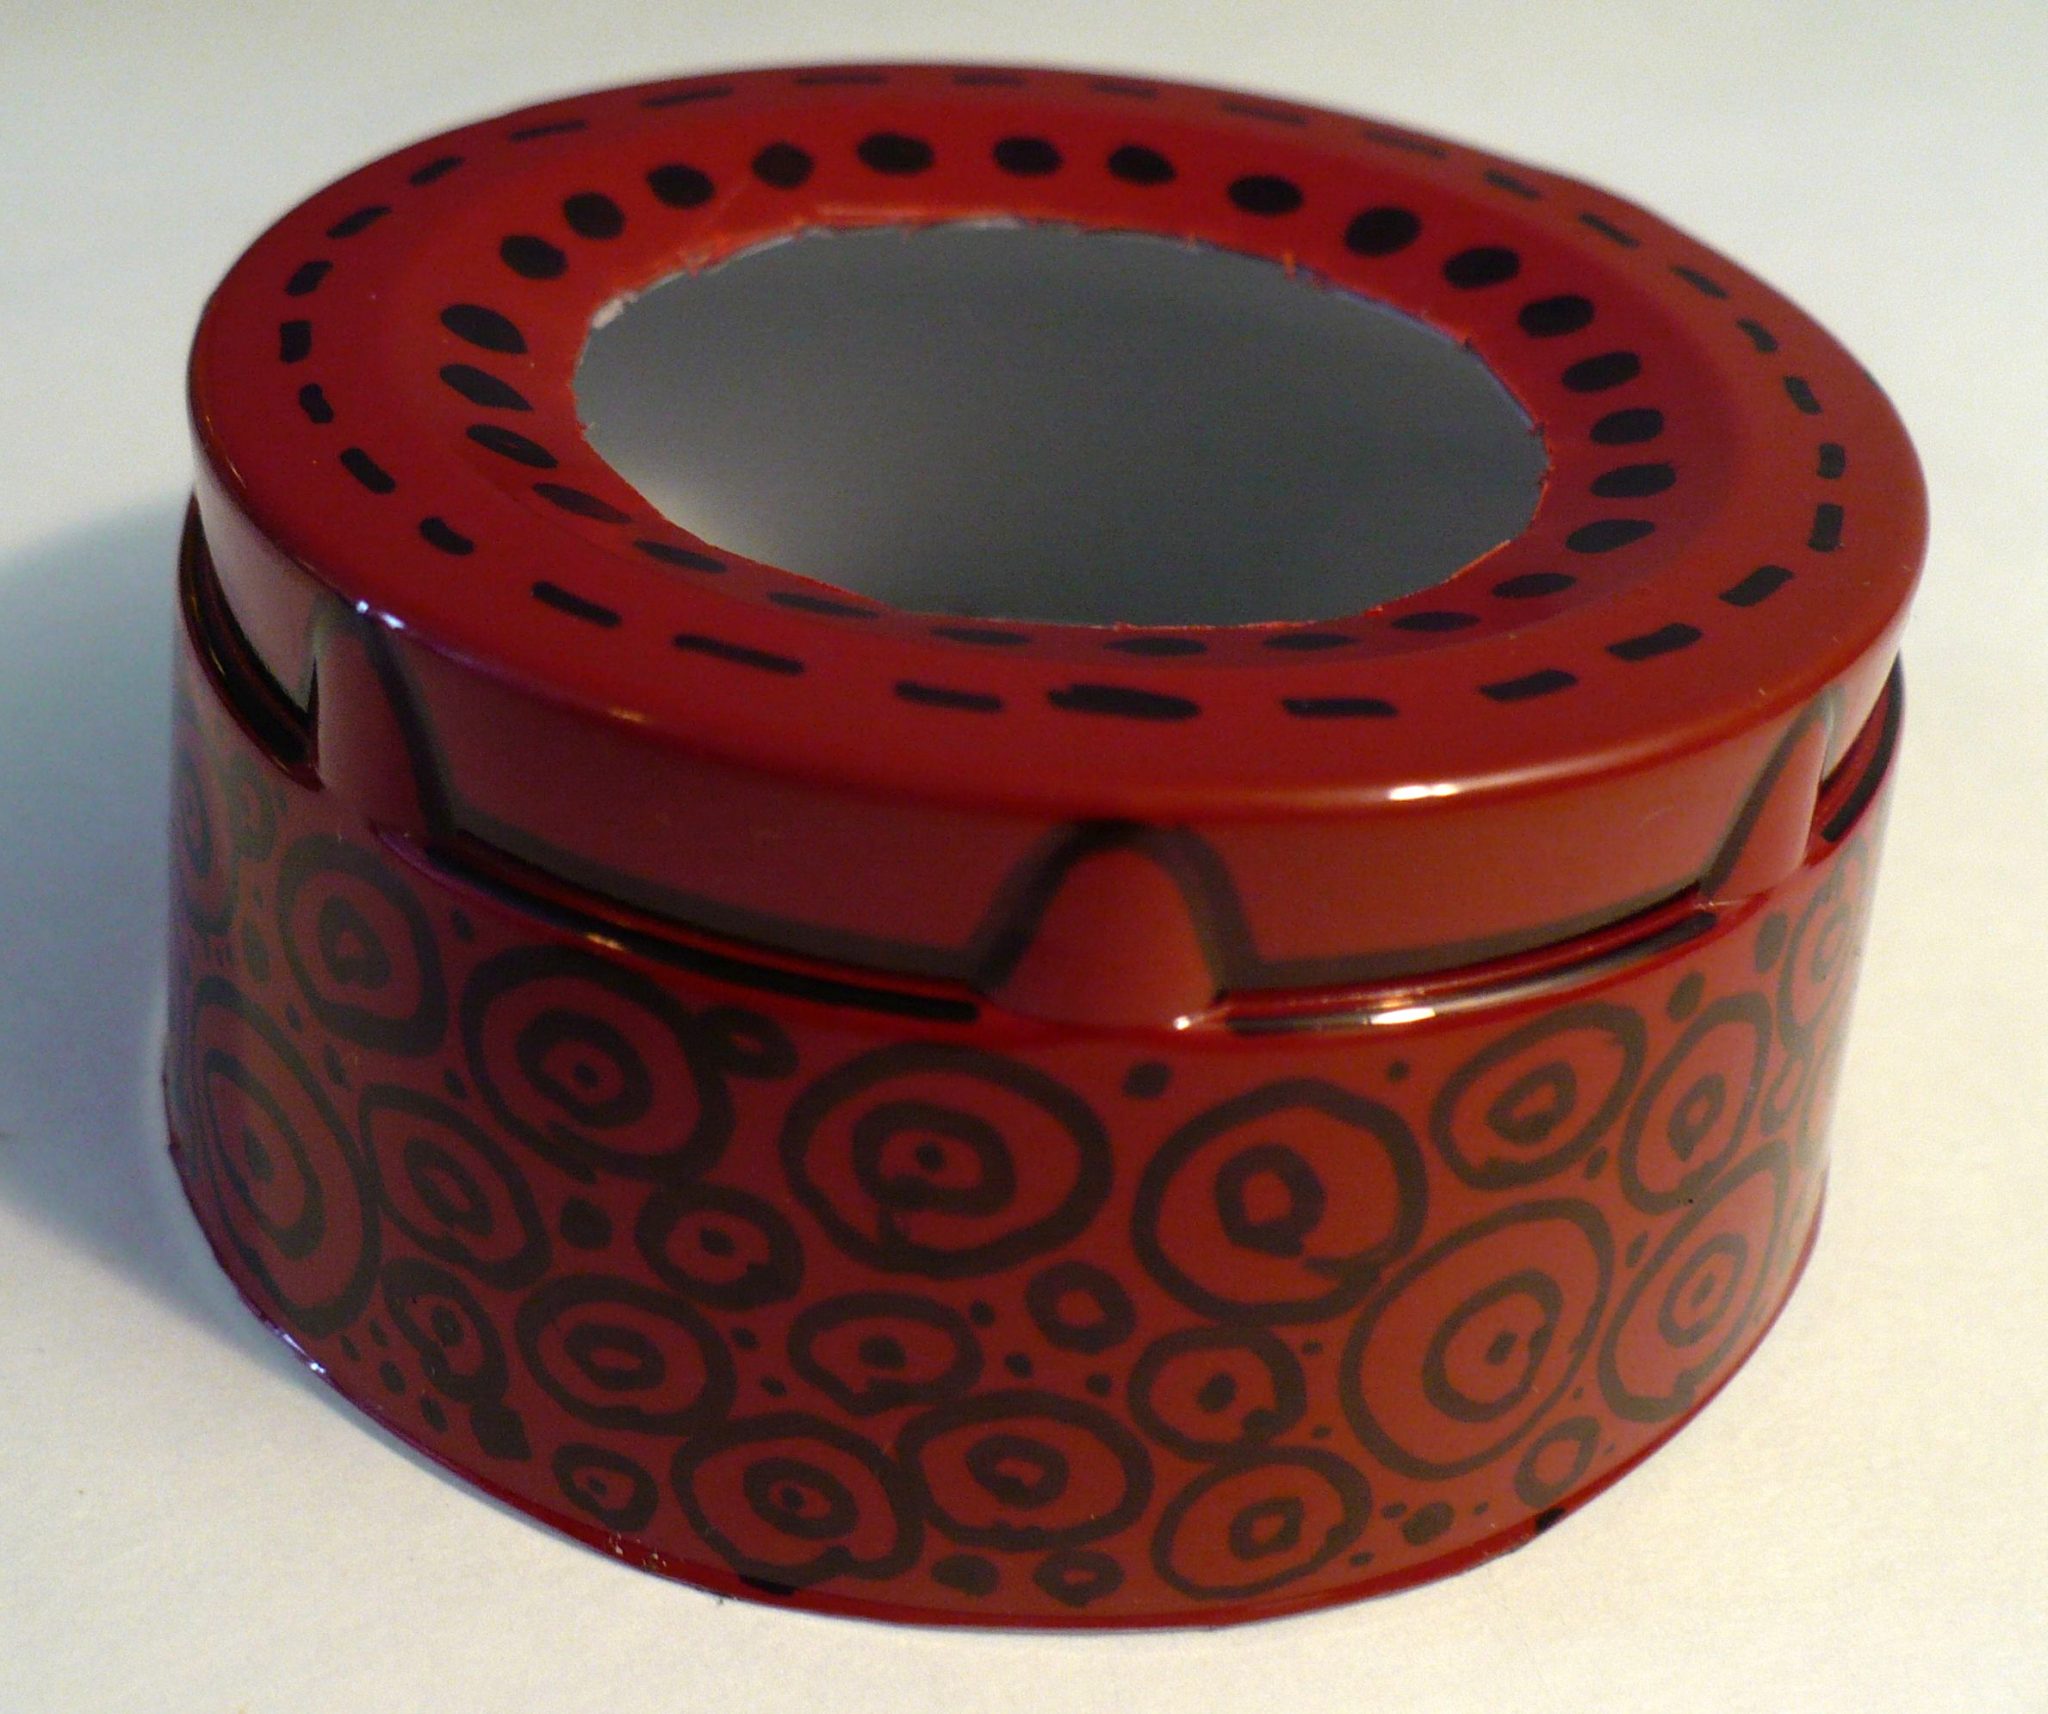
With a permanent marker, draw a design on the cup.
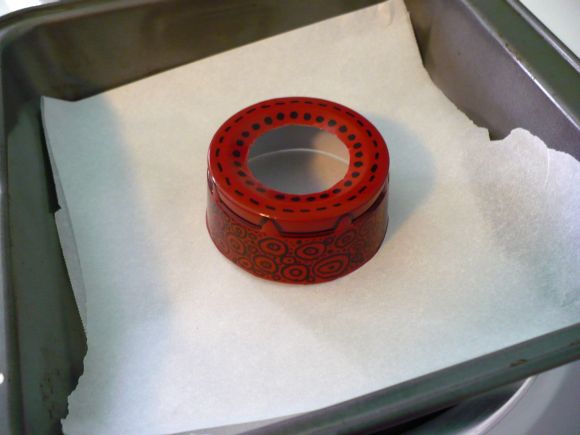
Place the cup upside down on a baking sheet or cake pan lined with parchment paper. Preheat your oven to 225 degrees F.

Once you put the cup in the oven, keep a very close eye on it. It should start to melt within 30 to 60 seconds; the time will vary with different cups. The cup with shrivel and flatten out. Leave it in the oven until it is laying almost completely flat and has stopped moving. Immediately upon removing it from the oven, press it completely flat with the bottom of a drinking glass. Press and hold with the glass for about 15 seconds. Allow it to sit for a couple of minutes to cool completely.
When it has cooled, loop a chain through the center of the charm. No one will believe you when you tell them what you used to make it!


64 Comments
Beth Eaton
AMAZING!! How in the world did you ever come up with that?!?! I have a million of these cups around my house so I am seriosuly going to have to try it out today when it’s naptime! Thanks soooo much for sharing! I’ll do a post on it and link it back to you!
Kelly
that is sooooo cool!!!! I was just thinking you could use colored markers on the white inside and use that side also. what would happen if you punched a hole in the side of the cup, would it shrink too small to use for a jump ring?
Scatter
Now that is absolutely brilliant!!
Kelly H
To the other Kelly: You could always punch the hole after you melt it down and it cools. Just a paper hole-punch or a crop-a-dile.
This is such a great idea and would be fun for those stuck in home with the snow.
rhonda
I would actually recommend making the hole first. When the plastic shrinks it gets a lot thicker and harder, so a hole punch wouldn’t work on it afterward; you’d probably need to use a drill.
rhonda
You could always punch a hole in a scrap of the part of the cup that gets cut off and shrink it to see how big it will be afterward. That way you can experiment to find the right size hole without mucking up all the work you put into the finished product.
Elaine
Wow. One of the most ingenious things I’ve seen in a very long time! Bookmark. Book. Mark. :)
somedaycrafts
Love it! I’ve seen something like this before, but I love your design. I am featuring this at somedaycrafts.blogspot.com.
Christine
Oh, my God, how did you know how to do this? looks like a lot of fun. I hope that you will link it with my Show and Share linky party, going on all week. http://craftygeordi.blogspot.com/2011/02/show-and-share-sunday.html
Angelia
That is the coolest thing! I’m going home and trying this tonight!
Kaysi @ Keeping It Simple
That is awesome!! I have to try this, thanks!!
Liz Anderson
OK – that’s brilliant!
I’m attending a hoity-toity Bridal Shower in a few months. They like to look down their noses at “the crafty sister.” Just wait until I pull this gem out of my sleeve! Thank you every so much for sharing! I’m now looking forward to that darned shower!
Melanie Bacom
I tried but mine did not melt. I left in in about 20 minutes at 225. Does it need to be a Solo cup. Mine had a 6 on the bottom.
Connie Huntington
OH MY HECK! I am thinking that I will be making these for Valentine’s day!! Thank you sooooo much!
Michele
Brilliant! I can’t wait to try it!
Stephanie
This is neat. Came over here from One Pretty Thing.
Stephanie
Not one Pretty Thing…Dollar Store Crafts…sorry
Condo Blues
I remember doing something similar with my Grandmother as a kid with a plastic lid from a spray can type container. We didn’t decorate ours, just melted them in the oven.
Yours is MUCH nicer.
I Stumbled your post and shared it with my Facebook and Twitter followers.
Lacie
I love that!! I totally want to try this with my daughter! Thanks for sharing :)
crunchy domestic goddess (amy)
this is so cool! i think i might experiment w/ these cups to make other shrinky-dink things w/ the kids. :)
Abigail
I tried this tonight and it didn’t melt flat!! How do you do it?!
heather
@Abigail, check the instructions – they say to use a drinking glass to press the plastic flat as soon as you get it out of the oven.
Tabitha
That. Is. Awesome!!! I’m definitely trying this out. Thanks a bunch for sharing.
Brandi Scardina
i loved this idea so much i tried it immediately! but for some reason mine aren’t coming out a pretty circle like yours, more like triangles. any idea what i’m doing wrong?
mary
Bravo!
Abigail
I saw that it would shrivel then flatten, mine just shriveled. I was using a different type of cup, which is a thinner plastic, but still the recycle 6 type.
I’ll try again, got tons of the cups!
rhonda
For anyone having problems getting there cups to melt properly, it’s important to remember that a lot of ovens don’t heat to the exact temperature they say. (My old oven was a full 20 degrees off!) If your cups aren’t shrinking, try turning the oven up a few degrees; if they’re shriveling too much, try turning it down a bit.
Sheri
I love this idea, thanks for sharing it! I’ve always liked shrinky dinks–so anything along that line is cool.
Mary
This is a great idea, I’ve made many different shrinkies including plastic forks, that make great Christmas tree ornaments. BUT be very careful with the toxic fumes from the melting plastic. Perhaps not the best activity to do with children.
Sharon
What a great idea! I’ve got to try it!
Tristin @ Two Girls Being Crafty
First of all, Rhonda, thanks for checking out the toothbrush bracelet on my blog. It’s cool to get a comment from someone like you!
Second, I tried this craft twice today–once in my convection oven and once in my traditional oven. Both times, I had issues with the plastic curling under instead of just “melting”. The cups I used were #6, but they’re cheapies from the dollar store. I think in this case, just knowing how Solo cups feel heavier duty than the dollar store ones, I think they’d melt more evenly because they have better weight. (Am I making sense?) Anyhoo–I am going to go pick up some Solo cups and give it another go. I’m determined to make this work–because even my “flop”s looked awesome!
Plus, the red color is awesome! The cups I had on hand are clear–that may cause some differences, too.
Regardless of how mine come out though–yours is awesome!!!
Dawn
Absolutely love it. Who would’ve thunk it. Can’t wait to try this out ;o)
Jenean
OMG! This is why I can’t throw anything away. I never know what you’re going to come up with next. This is really clever.
glimmer62
You’re a genius!!
Tristin @ Two Girls Being Crafty
Ok, I’m back to report that Solo brand cups worked like a charm (how ’bout that pun?!)
The clear #6 dollar store cups I had on hand melted in a fashion that suggested they couldn’t bear their own weight… but the Solo cups melted beautifully and flattening them with the cup made them perfect.
What was a flop yesterday is a success today!
Miki
I was looking for a cool easy craft to do at my daughter’s 9th birthday sleepover this weekend and this is perfect! I did a trial run last nite and also used the cheapie #6 red cups. I started the oven out at 225 and after 6 minutes it wasn’t making much progress so I turned up the oven to 300 and within a few minutes my charm was perfect! We are going to use colored sharpies on the inside of the cup so we can have a 2 for 1 necklace :) Thanks for the great idea!
Jenny B
This is really cool! Hmm… I think there is a stack of red cups in the staff room kitchen. I wonder how strangely my husband would look at me if I told him I needed to go get one before we went home.
Messy Missy
So cool!! Love the design you created on the cup….has a henna tattoo feel to it!!
Marianne
This is the coolest idea I have ever seen. I am so going to try this even though I just decided that Shrinky Dink is to difficult for me to work with. Thanks for sharing.
Rachel Ramey
That is awesome! I have noted before that the side of a cup warps as it shrinks, but it never occurred to me that the “warpage” would be consistent around the circumference of the cup. And red jewelry is not always easy to find. ;)
These things shrink about 50%, so you would need to punch a hole about twice as big as you want it to end up – and keep in mind that the side of the cup will not shrink evenly around the hole. But if all you need is to get a jump ring through it, a hole punch would probably work.
Sue
I don’t know how you think these things up!!! SO COOL!
Karen
What did you use to seal them with? I was all excited about this project and then I ruined a white jacket when I wore mine. The black marker and the red cup color both rubbed off onto the fabric.
jengd
That is TOTALLY awesome!!! I read this and immediately started looking for plastic cups … which may be hard since I don’t normally like to keep disposable plastic in the house. Grrr. :)
Andrew Cheng
My wife and I have weekly art projects with our son. We made several of these last weekend and it came out perfectly. Of course, instead of telling him we were making necklaces, I told him these were UFOs.
Monty
This is a fabulous tutorial–thanks! But, “wishing their husbands had let them leave the house with more cash”?! Seriously? You’re grown women!
Christa
That is AMAZING!!! I am going to have to give this a try soon :)
Michelle L.
Amazing! Gotta go do one right now – it’s beautiful, Rhonda!
Brittany
I just did this after reading the post. So much fun and a great project for kids if you precut the cups! Had a little trouble getting the edges straight with exacto knife so I filed the edges a little. My kids just enjoy playing with them ;)
Emily
@Karen – I haven’t made this yet, but off the top of my head I would say coat the whole thing front & back with Mod Podge! That is my go-to sealer for everything.
I’m going to try this myself, with the Mod Podge after it cools and let you know!
Susan McAdams
I see this has been up for over a year, but was just lucky enough to come across it today! I love the idea and it has really sparked my creativity. Thanks for the great idea and inspiration!
Annie
Can’t wait to try this!
A friend from high school used to make shrinky dinks with her mother’s old vinyl albums – she turned them into fruit bowls.
Barbara
Oooooh… so awesome! I cannot wait to try this. Thank you for sharing.
Haruka Sugita
Thank you so much for sharing this. I needed something unique for a creative project at school and this gave me an idea! Awesome! :D
Joni Giarratano
Just happened to stumble on your site… Was really excited to see that you were using “Red solo cups ” ! Twenty years ago I was selling a ” Hobby Product”…..and we used to bake ” Liver Lids”.. you know the little plastic lids that covered liver and potato salad in a Deli ! We used the paint that I was selling… an oil based paint in a tube….. but now I think you can used any type of marker.. ( obviously ) to decorate them ! We also used a hole puncher to make a hole so we could connect them with jump rings… Everything OLD is NEW again ! HOORAY ! Joni in Pueblo, Colorado
Shannon
I just made this, and like the others I tried making it with the cheapie cups from Dollar Tree. You need to use brand name and crank it up to 300. Hefty has cool colors and I made mine neon pink (cup) and black (Sharpie).
Cheryl
My daughter, grand daughter and I did this they turned out very cute but they just didn’t get quite flat enough I think I took them out a little too soon.