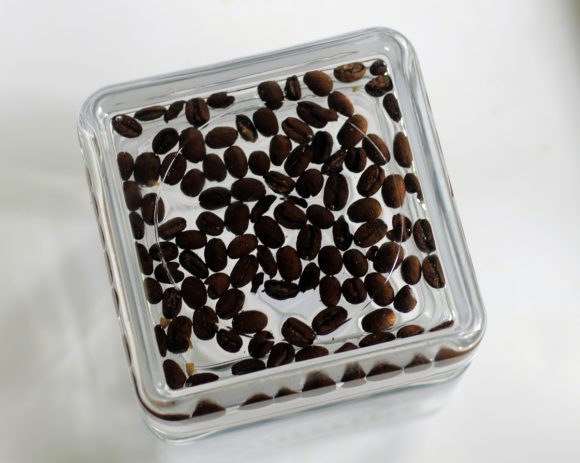
Resin has always been on my crafting bucket list, and I was so excited this week when I finally got to try my hand at resin crafting, courtesy of ETI Environmental Technology, the makers of Envirotex Lite Resin. I’m a huge coffee fan, so I made a coffee bean storage jar with real coffee beans embedded in resin in the lid. Don’t worry if you’re not a fan of coffee beans – this technique would make the cutest storage for all your craft supplies. Simply embed bits of whatever you are going to store inside the jar – beads, buttons, candy sprinkles, etc.
This is a great beginner resin project because you are using a small amount of resin on a small object, and you just have to pour the resin in and not worry about unmolding (like with resin jewelry).
Resin Embedded Coffee Bean Storage Jar
Project Materials:
- Glass storage jar with glass lid, $1 and up (I bought mine at Michael’s for about $5)
- Envirotech Lite 2 part resin
- Whole coffee beans (about 1/4 cup)
Resin mixing supplies:
- 2 mixing cups, flat bottomed and smooth-sided
- Flat wooden mixing stick, like a large popsicle stick
- Paintbrush (that you will never use again)
- Disposable gloves, latex or nitrile
- Contact paper to protect your work surface
If you will need to move your project out of the way while it cures (which I did because I have three curious little boys!), you might want to prepare a movable work surface that you can keep your project on. I used an old cutting board covered in freezer paper. I read somewhere that Contact paper is a great surface protector, and that resin peels right off the surface after it dries.
To Make:
1. Make sure jar is clean and dry. My jar was a square-topped Anchor Hocking jar. The lid has a slight indent at the top, which is perfect for holding embedded items. Pour coffee beans onto the top of the lid to determine how many to use. You want them to be relatively flat and spread out because the top of the lid is pretty shallow. Remove the beans from the lid and put aside. (Oh, and THEN make sure the lid is clean again!)
2. Get all supplies ready to use so they will be easy to reach while you work. You will just be working with the lid, so put the jar aside.
3. Mix resin according to package directions. You will need about 1-2 ounces of resin for this project, depending on the size of your lid.
The instructions for Envirotech Lite tell you to mix equal parts of the resin, and mix in one cup for a full minute, scraping the sides and bottom to be sure they get very well mixed. Then transfer to a second mixing cup and mix for an additional minute.
4. Put coffee beans in first mixing cup, and pour a bit of resin over them. Stir to coat, making sure each bean is coated in resin. Then transfer resin-coated beans to lid and spread out.
5. Top beans with remaining resin. Be sure you don’t overfill the lid, or the resin will leak out and potentially ruin your project.
6. Make sure every bean is coated with resin. It’s all right if the beans are poking up out of the resin, as long as they are completely coated. If necessary, use a paintbrush to spread resin over beans that aren’t coated. You can also move the beans around with the paintbrush or a bamboo skewer to make sure they are evenly spread around.
The resin instructions say to remove bubbles that rise to the surface with a propane torch or heat gun. I skipped this step for this project because I didn’t know how the flame would interact with the coffee beans, and also, I didn’t see any major bubbles.
7. Let the resin cure for 24 hours or according to package directions.
Tips for Using Resin
I have always heard that resin is a challenging craft material, so I tried to read up on using resin successfully. Of course, no amount of reading up compares with jumping in and experiencing a craft for yourself! A few things you must do when working with resin:
- Use proper ventilation (open window, fan, etc.)
- Treat resin with respect – it is a potentially harmful chemical
- Follow all instructions that come with the resin
- Mix as directed. Mix at least two minutes, and scrape sides of mixing cup while mixing
- Mix in small amounts. You can always mix more later.
Because resin is a finicky craft supply, you can never quite be sure how it will turn out until the next day (especially if you are molding and unmolding it). And waiting for 24 hours to find out can be pure torture! Be sure you have something else to occupy your mind during the waiting period.
I had a few mis-steps before I finally had a resin project turn out, so be sure to read as much as you can about using it before you jump in. Don’t freak out, though, you will do fine! It just takes a bit of experience working with resin to get a feel for it. You can’t always get everything perfect the first time! Here’s a resource that will help you learn the right way to do things:
 After I did all my resin crafting, I found this ebook by Jenny Skinner: Getting Started With Resin Jewelry. It’s $5 and it has a lot of good information. I probably would have avoided a lot of trouble if I would have read the book before I started! It’s well worth the $5, especially because resin is not a cheap craft supply and a craftfail could mean wasting more than $5 worth of resin. [no compensation for this link, just good info!]
Additional Resin Resources:
- Lots of Cheap Resin Mold Ideas at craftlog
- Let’s Talk Resin at crafty minx – good tips & links for resin
- Using Unconventional Molds for Resin at Two Crafty Mules
About ETI
The use of resin in jewelry making, mixed media and paper arts continues to grow in popularity. Today, artists are using ETI’s products in many crafty ways and they will be showcasing these works of art on their new blog “Resin Crafts”.
Check ETI out on:
Resin Crafts Blog
ETI on Facebook
ETI on Twitter
Other crafters who have resin tutorials this week:
disclosure: ETI provided the resin & paid me for doing this project. Opinions are mine, of course.


14 Comments
Carmi Cimicata
I have yet to embed coffee beans in resin….but I will now!
This really looks fantastic!
Amanda @ Serenity Now
Love this idea!!! I’m a huge mocha fan…I bet espresso beans would look just as cool. ;) You did a great job! Thanks for sharing all the other ETI projects today too. :)
Angie @ The Country Chic Cottage
Aaaaccckkk!! That is amazing!! :)
Michelle
I LOVE how this turned out! It would be really fun to do with beads or buttons to hold craft supplies!
Beckie
Heather I am loving this! My husband would die for this
Michelle L.
So cool! Great storage idea!
mikeasaurus
The results look really professional! (resin has also been on my bucket list)
Mod Podge Amy
I love this project:
1) Because I love coffee
2) Because I’m thinking of what other food product I can embed in resin
3) Because someone used the term “bucket list” in the comments
amanda
Sorry if this seems obvious… but I can’t figure out how the lid now sits on the jar properly. Is the lid still functional?
heather
@Amanda, if you embed the coffee beans in the TOP of the lid where the small indentation is, the lid is functional. If you embed them inside the lid, it won’t maintain it’s seal (so it won’t work if it needs to be airtight).
amanda
Thanks for your help. I like how it looks under the glass. But seeing the texture on top of the lid would be cool too! Guess I’ll have to do it both ways now :)