
This is an entry in the Living With Lindsay Five Dollar Challenge! The challenge was to make a home decor item for $5 or less. My project is inspired by Lasse Klein’s conceptual Alien Abduction Lamp. The lamps are still being developed and are not available for sale yet.* (update 2010: oh yes, the lamp is now available). I thought it would be fun to make one for my own personal use out of materials I found at the dollar store.
When I was shopping for materials, I couldn’t find any toy cows (a cow has to be the one being messed with by the aliens, right?), so I bought a plastic “Noah’s Ark” set that contained a pig (although there were only one of each animal in the set, so I hardly see how that qualifies as a Noah’s Ark set!) After everything was done, I found a farm set
that had a cow in it at Target’s dollar spot, so I had to get it to make the lamp perfect!
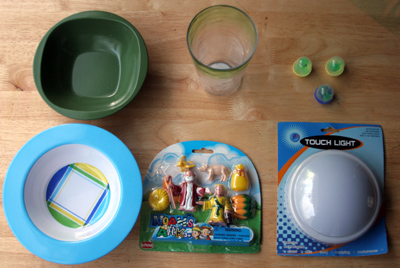
Project Materials:
- Large-lipped bowl, $1
- Smaller bowl, $.25 (mine was marked down)
- Acrylic drinking glass, $1
- Touch light, $1
- Package of farm animals, $1
- 3 Aliens I happened to find in the coin-op machines on the way out, $.75
Total cost: $5
You will also need, from on hand:
- Glue (E6000
recommended, but hot glue will probably work)
- Cutting implements to cut hole in one bowl and the top of the glass, such as a Dremel,
drill, or tin snips (we used the latter two–a pain)
- Batteries to operate the light
- Paint (we used black spray paint and silver craft acrylic, if you don’t have them, cost less than $3 for both)
To make:

1. Dismantle touch light so it will fit inside larger bowl, facing down. You will either discard all the white parts, or you might need to trim the plastic rim down so the smaller bowl will fit snugly on top of everything.
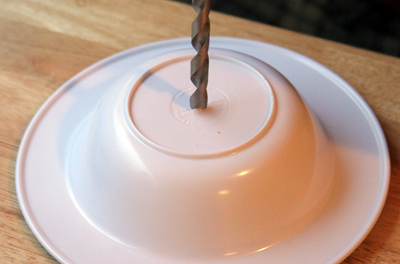
2. Cut a hole in the larger bowl about the size of the bottom of the acrylic glass. We used a drill and tin snips because we don’t have a Dremel, and it was kind of a mess. Hopefully you have better tools!
3. Cut a hole in the bottom of the acrylic glass.
4. Put the acrylic glass upside down on the table, put the large bowl right side up on top of the glass to test for fit. You won’t want to glue them together now because when it’s all set up nicely, you’ll paint the bowls flying saucer color.
5. Put the touch light face down into the larger bowl.
6. Place smaller bowl on top of everything, face down.
7. How does it look? If good, then paint the bowls black and/or silver.
8. When everything’s painted, glue the appropriate parts together. Leave the top bowl unglued so you can turn the lamp on and off, and change batteries when needed.
9. Set it up and enjoy!
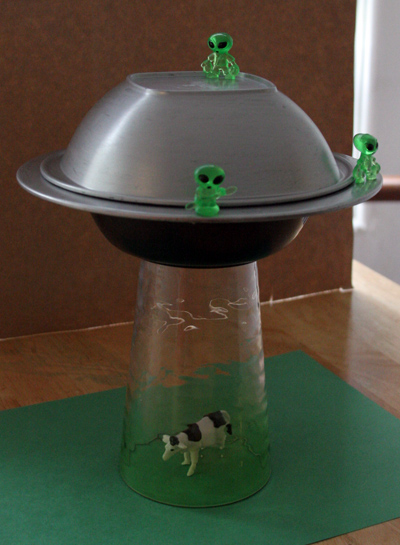
Here’s the lamp in the daytime.
*It goes without saying that I made this for personal use and am giving instructions on how I made mine only for your personal use. Please don’t make copies to sell–that’s bad! It’s unethical to rip off independent designers, and it’s not great to rip off mass-market designers for selling purposes, either! Be original in your Etsy shop!


86 Comments
Bridget B.
Wow – I think I actually like your version better!! (Is that sacrilege?!)
Beryl
Very cool! I really like it!
craftydame
ha! this is fabulous! i agree with bridget, i like yours better too! i think it’s the rounded shape of the UFO and the waveyness of your plastic glass, they’re both great touches!
Kathryn
This is awesome!
songbirdtiff
This is great! How fun for a kids room.
Sandra
What little boy wouldn’t want this lamp. Very cute!
Have a good day.
Sandra
Kathy V
So adorable! Well done!!
Becca Brant
Yours is WAY better! My husband wants one for his office. We will be making one soon. :) Thanks for making me laugh today.
thea
brilliant!
Kim
Oh My GOSH!!!
This is by far one of the cutest things I’ve ever seen, and you made it for only $5?!?!?! You are truly talented, and I’m going to have to make one too… thanks for the laugh, and the AWESOME Idea :)
jen
AMAZING!!!!!!!!!!!!!!
James
This is really cool!
Shannon
This is AWESOME! Thanks for a great idea, H! Me and the boy will be making one soon.
mub
I’m sure I like yours better, what a funny idea!
Rachel
NO WAY! This is SOOO creative, I’m blown away. Wow. I love it and I’m super, super impressed! The cow made me laugh so hard! I’ll be linking.
april
this came out so well! So very, very clever. thanks so much for sharing!
Chrissy
Oh, you’re too good! Love this!
living with lindsay
Oh, this is so much fun that I can’t hardly stand it! Love it!!
Satsuki
I know I’m not the only to spot this and love it- another great creation. My hat goes off to you. ^^
Nikki
Hilarious! I’ve gotta make that!
Marie {Make and Takes}
Can I just tell you that I love how your brain works! What you come up with is amazing!! Love this lamp!
Sandy Toe
That is just too too cute!
sandy toe
Kathryn
This post inspired me to make an Alien Abduction Nite Lite with dollar store items.
http://craftsandcreationswithkathy.blogspot.com/2009/05/alien-abduction-nite-lite.html
My son thinks this is one of the coolest things I have ever made. Thank you so much for sharing this idea with all of us!
smoke juice
What a creative use of dollar store items. At Christmas my family exchanges home made gifts and we try to keep the cost @ $5.00. This is too perfect for my uncle.
Za
Poor cow. I’d rather put a baby in there.
Karl
Fantastic! The uneven thickness of the glass you picked, has a lot to do with its overall goosebumpishly eerie effect which is superior to that of the original.
dorela
It’s amazing! thanks for share
jer
I found an inexpensive way to make these for the kids at kids camp. I used two paper bowls, and a clear platic throw away glass. I painted the bowls black and cut windows out in the top bowl. I painted the insides of the bowl bright yellow. I used a small dollar store touch light for $1.00 and three AAA bateries for $.34. The windows show up green and the light shines down through the glass. It cost only $1.50 for this project per child and they loved it!
JHIll
LOVE this lamp! I have been looking for a cute small lamp for my son’s space themed room (that didn’t cost $50!).
I found that you can get small samples of green outdoor rugs (the ones that look like grass) for free at home improvement stores. When I make this lamp for my son’s bedroom, I think I will use one for underneath the cow, unless it makes the lamp too tippy.
jade
this is soooo awesome i think its pretty cool that by looking at something u can figure out how 2 make it
Therese
Hi!
Just wanted to let you know that I saw this page and decided to make my own. A picture plus a link to here is published on my blog.
Your version is waaaay better than mine :)
peevsie77
This is so AWESOME! I am so making one for my boyfriend’s dorm. :)
heather
Here’s Therese’s Alien Abduction Lamp: http://thingsivemade.wordpress.com/2009/07/19/alien-abduction-lamp/
Poze
Very nice tutorial, i love the lamp. Thank you.
Marisa
I think it’s awesome but I would have bought a solar led light (like those cheap ones for the garden) and put the solar panel on top drilled more holes so the light shines out the sides and put little pieces of clear colored plastic glued over the side holes then used a square scrap piece of wood, glued indoor out door fake grass and some mini trees around and used that as a base. Set it by a bright window and enjoy. My step son will LOVE putting this together! He loves aliens! Thanks for the idea!
April Mitchell
So cute! I love your creativity!
Beverly
What a fun project for kids!!
theresa
I’m going to have to make one for myself. I’m a big sci fi fan especially of the aliens and i have ton of those little quarter machine aliens that I’ve collected and this will be a cool way to put them to use.
Jessica H.
I linked to this idea from my blog. I have made a few versions of this lamp, but can’t seem to get it right! :P
madincrafts.blogspot.com
LoRaeAussie
great X-MAS GIFTS
Young Wife
How very clever! Thanks for sharing.
BW
We saw a link to this project on our friend’s site (www.graciousrain.com) and decided to give it a try. A set of drip pans for an electric stove works wonderfully as a UFO. They brought the price of the project slightly over $5 but were well worth it. We didn’t have to drill anything or buy spray paint. And with some celophane, we made the hole in the side of the drip pan into a window with alien pilot inside. Also, Walmart has a happy face touch light for $1 that gives off an eerie yellow glow. Thanks for this idea!
stefanie
Brilliant! Literally and figuratively
BBC
I get alot of attention when I have my garage sales or town and country flea market sales…..I get alot of grown up (Rosewell)lovers!! Good job my friend….oh..and thanks :D
Nibiru Planet X
Awesome! i made one and mine looks great! Thank you for such an easy project!
Jennifer
This is so funny! Love it!
Pedestal Table
last year we bought two electric stoves that we use on our kitchen, they are nice because they do not generate smoke ;*~
amy
Such a cute idea!! LOVE it!!
Dawn
I love this idea! Thanks for sharing. I finally tried it and love how it turned out. Here’s a blog post about it: http://notjustmacaroniart.blogspot.com/2011/01/alien-abduction-lamp.html
Janis
Awesome. The cow is what does it, you know. WAY better than a police car.
Ursula
Brilliant!!
Crystal
That is so cool my little brother would love that! I will make that for him for his birthday!THANKS FOR THE IDEA!
Per Olav Hofstad
Very nice! :-) Art dont need to cost much.
Want to show you my lamp to. Made with a IKEA flower glass vase, green doormat, uplight lamp, reflector from a lamp, bottom from a sealing lamp, LED-light from IKEA, Aliens made of cernit, cow from a toy store. a lens, etc..
http://www.hofstad.biz/42423729
Jessica
OMG!!! That is amazing! I’m doing my daughter’s room in cows, and was wanting to find a lamp but I came across this and I have to do this for her room lol. It is just sooo neat. Thank you.
Kevin - DIY Dork
This IS a cool idea! …and I know just the person who would like to make one of these. He’s gonna love it!
Shannon
I will DEFINITELY be making this soon….it’s awesome :)
sandy
Only thing I’d change is I’d tie a fish line around the cow and pull the cow up and down so it’s getting kidnapped by the UFO.
Patrick
This was an Awesome tutorial. I had seen the original lamp MANY times and wanted one but couldn’t justify paying almost $100.
Instead of using a touch light I rigged an old lamp fixture up with a nightlight. Used the same idea of the bowls, plastic cup, etc. etc. Only this way I can choose to turn it on and off without having to remove the bowls. 3 Tiny screws hold the bowls in place so I can change the bulb at a later date (to any color too!). Used plastic apoxy to hold the UFO at a slant.
http://tinypic.com/r/2r5uxl1/7
I’m still looking for the cow, but bowl, plastic glass, aliens, the grass pad, and paint ran me less that $7. The lamp fixture was on hand but runs about $10 at a hardware store.
Pic for lit up here
http://tinypic.com/r/9qhbg8/7
I’m thinking about cutting holes in the top and trying to find something to give it some green windows, but that will have to be at a later time.
(As I’m typing this) I just received a request to make a much larger one with salad bowls and large flower vase as beam, and a normal light bulb as well. If I decide to make this I will post pics as well.
Krystal
OKAY. I wasnt looking for anything like this But now I MUST make it! Thank you!! Im gonna head out today and get myself all the materials! Maybe for a matching set =)
Lia
This is amazing, thank you so much! I’m very excited to make it for myself! Happy new year!
Terri
I’ve got an added idea, if someone wants to spend a little more money: buy an electric cord [or use an old one from a lamp], take a strand of old christmas lights, use approximately 10-11(?) of them, drill spaceship designs into the bowls, top or bottom, or around it, drill a slightly larger hole in the bottom upright bowl to feed the cord thru; put the christmas bulbs thru the drilled holes, dab of hot glue to hold in place, put a white or yellow light poking out the bottom (or green), electrical tape one end of christmas lights (to keep from getting shocked), then on the other end of the christmas lights, twist each wire strand to the electric cord, electrical tape each, and for safety put a wire tie around them, pull in the cord and your spaceship comes alive with different lights ~ coming to the get the cow….of course drill holes, paint bowls, wire up, hot glue, etc….what do you think of that idea?
Terri
Someone was looking for cows, Michaels Arts & Crafts Stores has cows if you can’t find one @ a Dollar Tree.
spinndiva
OMG! Hysterical!!!! I need to make one for my husband! Thanks so much for sharing your brilliance!
Joe
Brilliant, I can’t see how I am not going to have to make one of these [looks for dremel tool I know it’s around here somewhere]
Caren
I just thought I would share the lamp I made for my son. Thanks for the inspiration. http://mom22evs.blogspot.com/2012/05/just-wanted-to-share-my-latest-creation.html Take a look and let me know what you think.
Annette
this is will be in my cubicle at work on Monday morning!!!!! love it! Thanks for sharing!