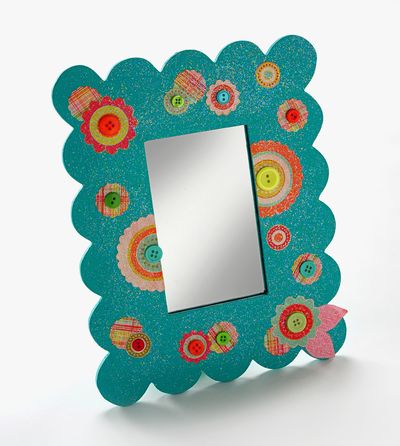
Thanks again to Amy, who has done a whole series of guest posts for us! She truly does rock! This would be a fun personalized gift for a tween or teen in your life… have you already started your Holiday crafting? – Heather
This is Amy from Mod Podge Rocks, and I recently decided that I needed a mirror after looking around Mod Podge Command Central and realizing that I didn’t have one (at least besides the bathroom). A fashionable craft diva never wants to leave the house with toothpaste on her face or her hair askew, so I headed by the dollar store and picked up this mirror:

Imagine how delighted I was . . . a mirror just for me! I’m a brunette though, and the mirror was blonde, so I had to change it. Plus lavender doesn’t go with my decor. I realized when contemplating the re-do that this size would be perfect for a kid’s room. Considering that I am a child at heart, it worked for me. If you’ve seen me here before, you know that I’m a big stash user, and this project is no exception. It cost me just $1 to make.
Project Estimate:
- “Diva” mirror, $1
- Scrapbook paper – 1 sheet, on hand
- Sparkle Mod Podge, on hand
- Scalloped circle punch, on hand
- Turquoise acrylic craft paint, on hand
- Buttons – 12 coordinating, on hand
- Craft glue, on hand
- Paint brush, on hand
- Sandpaper, on hand
- Scissors, on hand
- Tools to remove hardware, on hand
Total cost: $1 and up
Time Needed: 2.5 hours
To Make:

- Remove all hardware and the mirror from your frame. Start sanding – you don’t need to rough it up too much, just enough so that the paint will stick. Yes, since you asked, it did make me sad to sand the word “Diva.”

- Paint your frame. Depending on the color, you may need several coats. Paint, allow to dry, flip over and repeat. It took me three coats for full coverage. Allow to dry completely.

- While your frame is drying, grab your sheet of scrapbook paper. It’s time to get creative! I cut out shapes with my scissors, and then I punched some shapes out with my craft punch.
- TIP: Get a piece of double-sided scrapbook paper. You get twice the designs and they are almost always coordinating.

- Begin placing shapes. This is serious business! Okay, not really. Lay everything out until you are happy with the design.

- Once your shapes are laid out, begin Mod Podging them down. Glue each piece separately and smooth with fingers. This is nice because you won’t get wrinkles if you smooth thoroughly because the pieces are so small. I overlapped some pieces too – have fun with it! Allow to dry for 15 – 20 minutes.

- Now you are ready to go Mod Podge nuts-o. Cover the entire frame with Mod Podge, front and back. Give it two coats. I opted for the sparkly finish to retain some of the original “diva-ness” of the piece.

- To complete your frame, add some craft buttons with craft glue. Raid your stash for brads, ribbons, stickers or anything else that might compliment your wonderful project. Don’t be afraid to glue it down.
Let the frame dry for 24 hours before replacing the mirror piece and all of the hardware. I don’t know about you, but I think it would be really fun to do a wide variety of these in different shapes to spice up a wall. I could do a whole wall of these for $10. I’m bursting with ideas, and I hope you are too.


4 Comments
amy
This would be cute for picture frames too!
Marrisa
Super cute! Crafts like these really show me out to think outside the box :-)
pam
Amy ROCKS! This is beautiful and a great reminder to me that I need to take a second look at things I might reject upon initial “contact”!
erin @ the little apartment
THAT is a great makeover.