
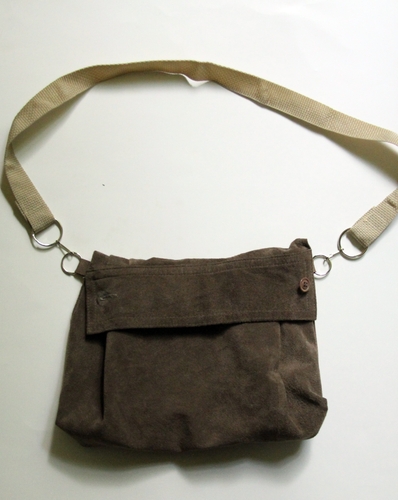
I bought a suede shirt at the thrift store several years ago and have been hoarding it until the right project came along. A couple months ago, I realized that was silly — there will always be another unwanted leather garment to be found at a thrift store, so I might as well use this one. In the spirit of stashbusting, I decided to cut the leather shirt up and make a purse. This purse design makes use of the details already present in the shirt: the cuff (with seaming, as well as a button and button hole), the pleating on the cuff, and the nature of leather: it doesn’t fray!
If you don’t have a leather shirt available, you can easily add a lining to the purse design to add body to the purse and conceal any unfinished edges. I didn’t add finishing details for this purse because I made it as a play satchel (in the style of Indiana Jones) for my younger son. I really like the shape of the purse, though, and I think it would be a nice accessory for a woman! If I made a purse like this for myself, I would add a lining and one or two inside pockets (gotta keep track of the keys and phone), but keep the shape of the purse the same.
Key tips for working with leather:
- Buy a leather needle for your sewing machine (less than $2)
- Don’t use pins (use binder clips instead)
- Sew slowly
Project Materials:
- Leather or suede shirt, $5 or so at a thrift store
- 4 rings (about 1″ in diameter), 2 lanyard hooks, $1 or on hand
- Leather sewing machine needle, $2 or on hand
- Thread, sewing machine, on hand
Total: $5 and up

A note about the metal findings: The metal rings and lanyard hooks were just part of a large package of metal findings I bought at the craft store, so I just used what I had on hand. You can do different kinds of straps depending on what you have available.
To Make:
First, cut the sleeve carefully from your leather shirt, then cut up the underarm seam. Lay flat to see the shape of the sleeve. Cut two small rectangles (about half an inch by 3″) to use as loops on the sides of the purse. You can also use any scraps from the shirt for this (for example, if you cut off the underarm seam from the shirt, a piece of the seam makes a great loop).

Fold shirt along any pleats to bring side seams in. You want to make the sides of the fabric as straight up and down as possible. Also consider how the pleats are laying at the top of the sleeve. This will be the inside front of your purse. I tried to make my pleating as symmetrical as possible, so I added a second pleat on the left top side. Clip pleats in place with binder clips.

Sew a straight line across top to secure pleats in place. Trim excess fabric above the sewn line. If desired, fold over and sew again to create a finished edge.

Fold the purse up to see how it’s going to look when it’s sewn together. You will fold it roughly in thirds, with the cuff being the front flap of the purse. The top of the shirt sleeve will become the front inside of the purse. Make a note of where you folded, and fold it inside-out in the same way. Insert ring onto loop, then tuck loops between fabric on each side – they should face inward toward the good side. Sew up the sides. When you turn the purse right-side out, the loops should be sticking out on the outside edges of the purse. You can attach a strap to these rings.

For straps, I just used a piece of nylon webbing and sewed each edge to another metal ring by folding the webbing over the ring, then sewing a square where the two layers of webbing meet. Then I attached the rings to each other with a small metal lanyard hook. I like detachable straps so you can adjust the length if desired.

Other strap ideas: Make a nicer strap out of leather. Sew a tube of leather, turn it right-side out and topstitch it, and then fold it around the ring and sew a square where the two layers of leather meet. Alternately, buy a couple of canvas belts at the dollar store and use the metal rings on the belts for your purse and the belt for a strap.


6 Comments
Ammie
<3 <3 <3
What a fabulous idea! It turned out beautifully, from its pleats to its cuff-flap.
Michelle L.
I love how this has the pleating intact! Great idea, Heather! I am inspired to think about sleeves.
Ilse
this is so cool. Great idea, will try it with a denim shirt.