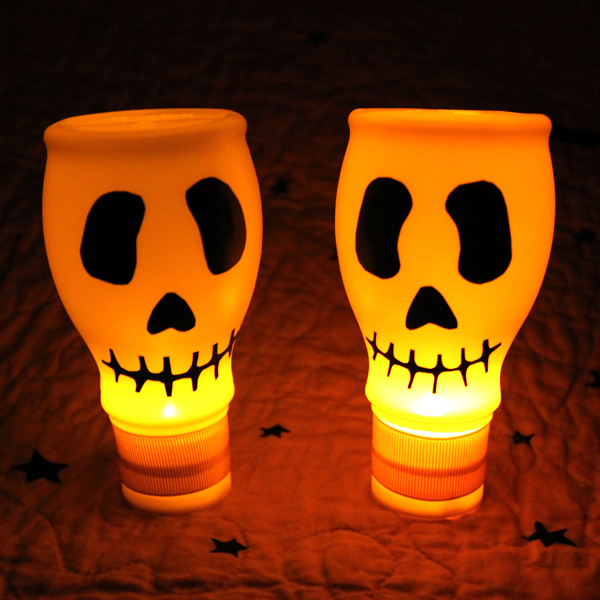
My boys are completely obsessed with skulls this Halloween, so when my mom suggested this project I jumped right on it! She’s had this idea since just after last Halloween, and it’s finally time to get it made. Have you ever looked at those milk bottles that come in kids’ meals and noticed their unique shape? Well, that’s what our little skull friends are made from — all you need are those empty bottles, a battery-operated tea light, and one other super cheap material you most likely have on hand!
Project Estimate:
- empty milk bottles, on hand
- electrical tape, on hand
- battery-operated tea lights, 2/$1
- ribbon, optional
- wax paper: not vital but helpful, on hand
Total: About $0.50 each!
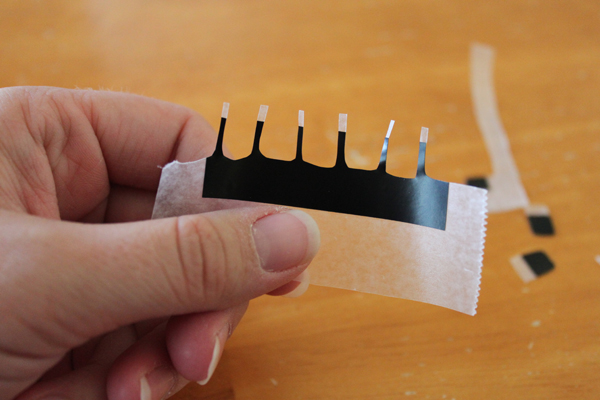 STEP ONE: Cut a 2″ piece of electrical tape (I like to call it “poor man’s vinyl!”) and place it on a small rectangle of wax paper. The wax paper prevents the tape from sticking to your scissors as you cut, making it much easier to handle. Cut tooth shapes from one side of the tape, as shown. Next, carefully remove your tape and reposition it on another rectangle of wax paper. (This makes it so much easier to remove from the wax paper when it comes time!) Cut teeth away on the opposite side.
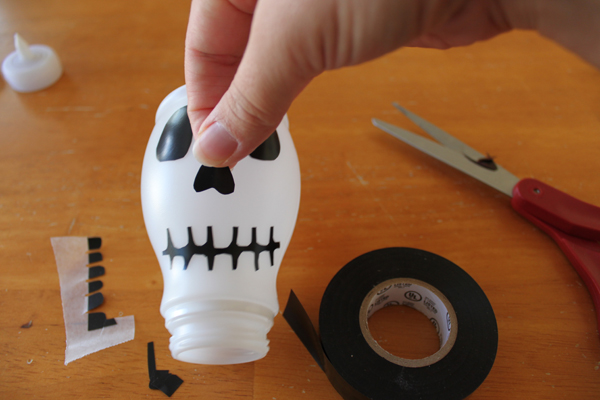 STEP TWO: Cut eye and nose shapes from smaller pieces of electrical tape. This is where you can get creative and make whatever kind of skull face you like — grumpy, happy, jolly, scary, etc. Position your skull face on your milk bottle, as shown. You can play with the placement as much as you like; it’s very easy to remove and reposition the electrical tape.
 STEP THREE: Remove the cap, place your milk bottle over the top of a battery-operated tea light, and tape the two components together. I used some white electrical tape I had on hand, but there’s no reason you can’t just use black.
 STEP FOUR: If desired, cover the taped seam with a piece of ribbon or fabric.
 I originally wanted to add a little bowtie to my jolly skull friend, but decided it looked too weird… Personal preference, I suppose!
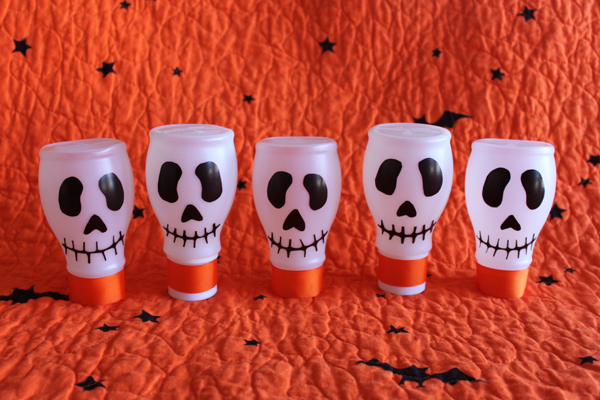 That’s it! Your little friends are done!
They are a cute decoration that look just as good in the daylight as they do at night with the tea lights turned on. In fact, you could skip the tea lights completely for a FREE project!
If you’re interested, I’ve got a little bonus project over on my blog. Come check it out!
Caroline Sanchez (Care) has been sewing since her mom taught her the basics at around six years old. She has always been driven to CREATE, even from a very young age. She is mommy to two little boys and one baby girl, and almost every spare moment she has is spent in her sewing room or working on her blog, Obsessively Stitching.


28 Comments
Megan
LOVE it! This is so cute. Thanks so much, can’t wait to try!
heidi wendland
This is a great idea…I may make these but use them as the lights the kids carry as we walk around trick-or-treating.
heather
Those are great!! I love “the poor man’s vinyl” – ha ha! :) Great project, thank you so much for sharing it with us!
Jennifer
This is the most adorable and inexpensive craft project – I love it!
Rachel
Those are so creative, I love it! Thanks so much for the project, I’ll be linking.
Alison@howdoesshe
HA! Love it! Very creative.
Anna M.
These are so cool. And I think they look cute with bow ties, and maybe if there were a few with hair bows it’d great.
Kathryn
Great idea!
Anel
these are the most adorable things every!!!! Iam soooo making these ASAP
Cheryl
So clever!! Way cuter than something bought and better price too!
Sarah
these are super cute! Might have to get some kids meals just for the mini milk jugs!
Lizy
Hi,
Pretty cute I’m going to try next year!!!
Glory's Mischief
I’ve been saving those bottles ever since I saw this. I MAY have made a couple special trips to get some, but I’ll never admit to it.
Amanda
These are awesome Heather! Just stopping by to let you know that I have featured your project on Fun Family Crafts today! You can see it here
http://funfamilycrafts.com/lighted-skulls/
If you have other kid friendly crafts, I’d love it if you would submit them :) If you would like to display a featured button on your site, you can grab one from the right side bar of your post above.
Toqua's Crafts
Ha! Poor man’s vinyl! I love it!
These are adorable! Now if I were only close enough to my grandsons so I could get some of these bottles… I may have to come up with something else to use.
Tiffany
These are SO cute!! The only problem is my daughter and I are both lactose intolerant so we can’t get the milks that come with meals! I keep hoping they’ll make a lactose-free kind. I guess I’ll have to start begging friends to give me their children’s empties.
Conni
You can also us the Coffee Creamer Bottles! THANK YOU for sharing with us!