Box: a small package or container
Boxes are useful things, they can keep all your treasures safe or help you stay organized.
Collapsible: to fold up; put away; pack up; fold down; or to minimize
Having collapsible items minimizes space when not in use, and can provide a tidy solution to bulky items.
So, what happens when you combine them? A collapsible box, of course!
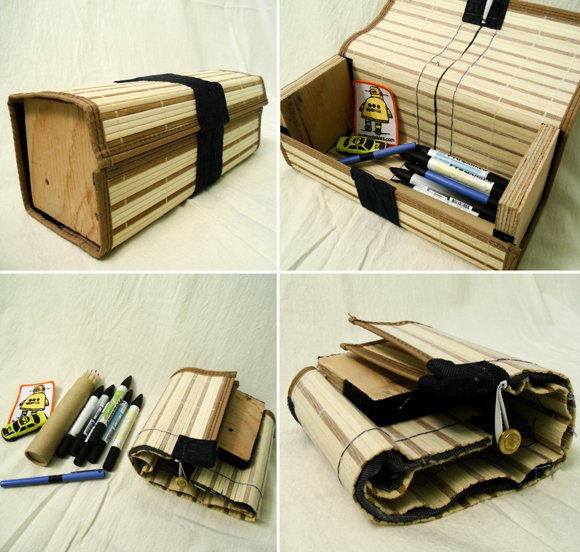
This box uses a bamboo placemat as the rigid outer shell, with scrap wood for the sides. The box retains its shape with the use of hook & loop fasteners (Velcro), which also allows it to be collapsed when not in use.
Enough talk, let’s collapse some boxes!
Project Estimate
Tools:
|
Materials:
|
Total cost: $1
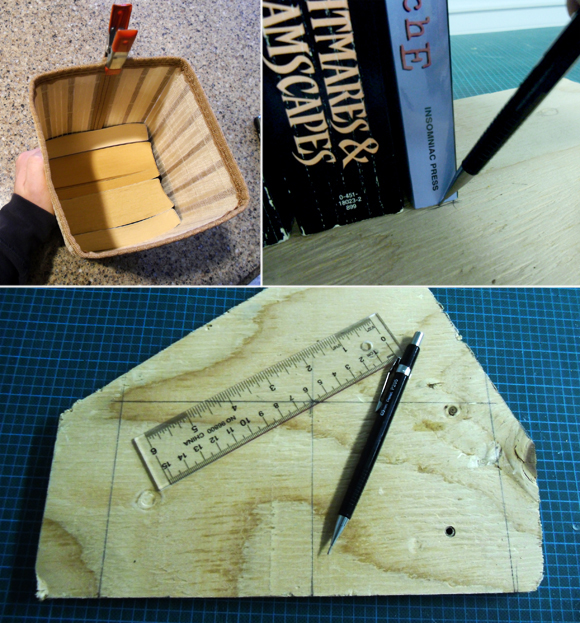
 This bamboo placemat has thin slits of bamboo oriented in the same direction abutting each other at their sides; this gives the placemat flexibility and allows it to be coiled up lengthwise. The idea is that the placemat will wrap around each end piece and double back on itself creating an enclosed space, a box. As such, the lengthwise distance measurement will match the sum of each side’s perimeter.
A simple method to create a square-ended box would be to measure the length of the placemat and divide by four, giving a box which has equal depth and height. However I chose a design which created a box slightly higher than it is wide. To complete this I wrapped the placemat around several paperback books until I found the right combination to allow the placemat to be wrapped once with a slight overlap where the ends met. Then, I traced the dimensions of the books to a scrap piece of ½” plywood and cut each end out.
 Bisect placemat lengthwise. This bamboo placemat had a fabric mesh on the underside to hold together the bamboo slats, along with a decorative thread on the topside. The mesh underside allowed the placemat to be cut in half and hold together.
Gently sand the sharp edges created from cutting the placemat, giving additional attention to sanding the ends of the placemat. When box is collapsed the ends will stress against the fabric applied later, to minimize the chance of tearing the fabric make sure there are not sharp edges and the ends have a small radius curve.
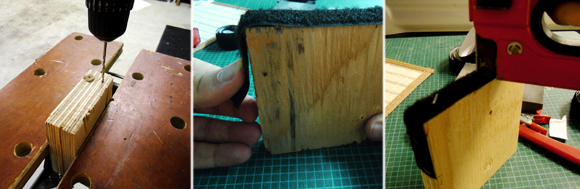 With the end blocks cut out it’s time to attach the loop side of the hook & loop strips. As shown in the picture, the strip needs to be placed in strategic positions to allow the box to have an operable lid when in box form, yet not inhibit collapsing when desired.
The strips I used had an adhesive backing, but that will not be enough to keep them attached to the surface of the wood and bamboo. Using a staple gun the loop strips were attached to the end blocks, and the hook strips were attached to the underside of the bamboo mat with strong thread.
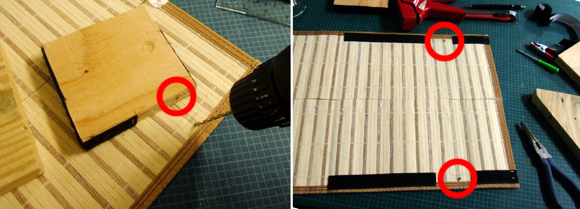 To allow the end blocks to be tucked in when collapsing the box, they need to be able to pivot and lie flat. Each end block has a hole which corresponds to a hole in the bamboo mat, a short large-diameter nail will act as the pin on which the end blocks turn. Using a 3mm [1/8″] drill bit , drill a pilot hole through the placemat, and drill about ½” into each end block.
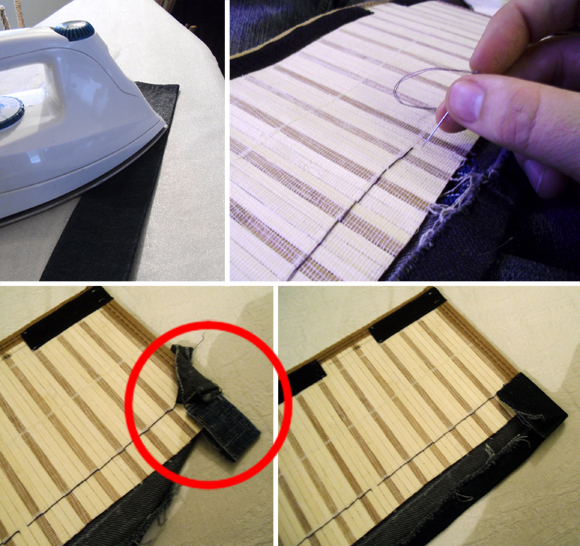 Time to join the bisected bamboo mat with a flexible membrane which will allow the placemat to be folded over while remaining joined together. I chose denim, as it is durable and has a pleasant finish once applied. I used a strip of denim about 1.5” wide.
The denim will need to be hemmed on both sides to stop the fabric from fraying. Start with a hot iron to create the edge, and then sew the denim to each side of the placemat where it was cut. As mentioned earlier the ends will be stressed more than the rest of the mat, so an additional scrap of denim was placed over the joined ends for additional protection (as highlighted in picture).
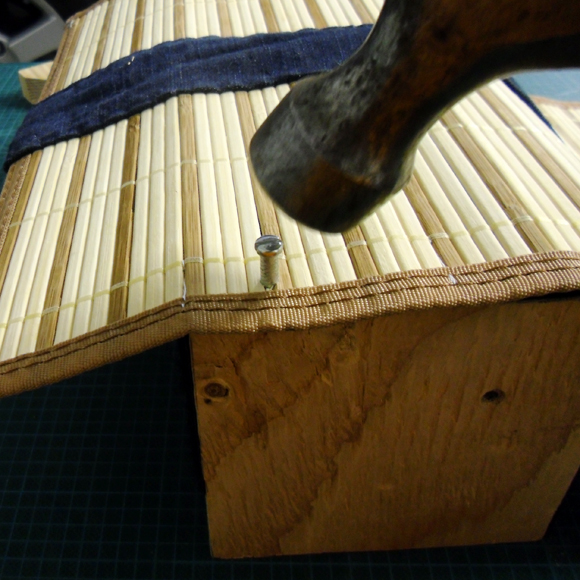 The end blocks are attached to the bamboo placemat with short large-diameter nails. Line up the pre-drilled holes in the end blocks with the placemat, then gently hammer in the nails. Do not hammer nails home, leave about 5mm of each nail head exposed. This will give the box some space to expand when collapsing and reduce stress at pivot points. When assembled each nail head will act as a front foot for the box.
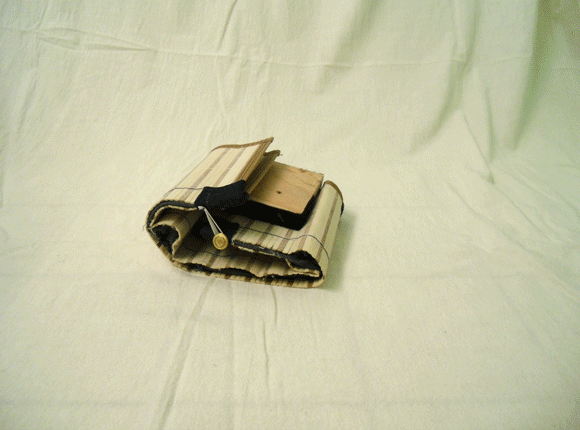 To keep the box from springing open when collapsed, a small button was sewn into the inside of one of the denim ends with an elastic loop sewn into the other denim end. The elastic loop fits around the button and keeps the package tight and collapsed. Also, each nail head was coated with sugru (or hot glue) so the metal feet do not damage surfaces the box may be placed on.
Have fun!


9 Comments
TRU @ TRU TALES FEATS
Very cool! I love it. Sharing with my kids.
heather
Cool project! I like the animation at the end!
rhonda
Mikeasaurus, you’re a crafty engineering genius! I’m in awe!
Tabitha
That is seriously cool.
Rachel
That’s incredible, what a genius idea!
Liz
Great idea, but what about using cork or wood coasters instead of plywood? For those of us who don’t have scrap wood around ;D
Velorna
So cool I love it…. I will give this one a try