Last week’s Iron Craft challenge was to create something with the theme “Lucky.” Since there’s some Irish in my blood, I decided to continue the St. Patrick’s theme and create a four leaf clover headband. It turned out very classy, so I can wear it any time of year, not just on St. Patrick’s Day!

Project Estimate:
- Felt in dark green, light green and cream/white, on hand or up to $2
- Ribbon and 1/4″ elastic, on hand OR pre-made headband, on hand or $1
- Beads, on hand
- Fabric glue (I used Aleene’s Original Tacky Glue), on hand
- Notions: measuring tape, safety pins, thread/embroidery thread and other general sewing supplies
Total: Free, or up to $3
Instructions:
(Click the pictures next to each step to see a bigger version.)
| 1. | Print out the Four Leaf Clover Headband template [PDF], use template to cut out felt pieces. | 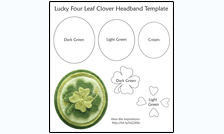 |
|
|
||
| 2. | Glue the medium oval to the large oval, centering them. Then glue the clover to the cream/white oval. On top of that, glue the heart shapes onto the clover. Do not glue these parts together – leave them as two pieces. If you are using a pre-made stretchy headband, skip ahead to step 6. |
 |
|
|
||
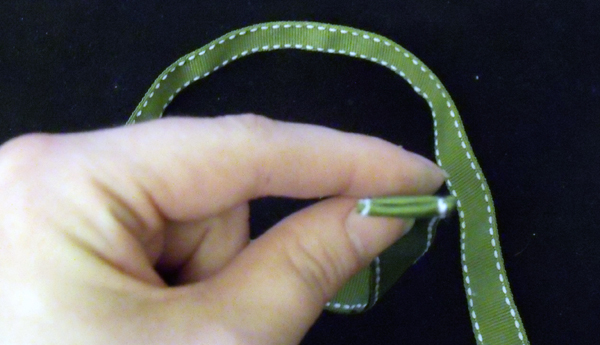
| 3. | If you are using ribbon, measure around your head where you will be wearing the headband. Cut two lengths of ribbon that are 3.5 inches shorter than the measurement taken. On each piece of ribbon, fold each short end over about 1/4 inch and iron. Then sew the two pieces of ribbon together along the edge, creating a tube. (By folding and ironing the short ends in first, you don’t have to try to turn them in after you made the tube.) Note: My ribbon already had the stitching marks on the side, so I just sewed over them to make my tube. You can create this look by using a contrasting color to your ribbon. Or, you can sew it with a sewing machine, then turn the tube inside out. |
 |
|
|
||
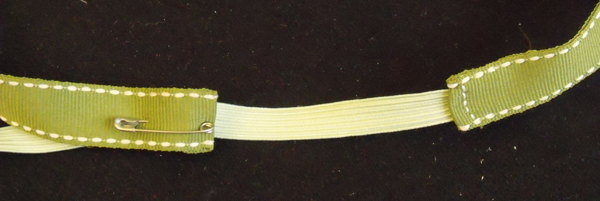
| 4. | Cut a piece of elastic around 4 inches long. This will be a bit longer than you need, but it helps with sizing. You can’t tell in the pictures, but instead of using the white elastic as-is, I dyed mine light green with RIT dye. If you want to cover up the elastic, check out the tutorial at Notes From a Very Red Kitchen. Put one end of the elastic about 1/4″ into one end of the tube, and sew the tube shut, sewing in the elastic. Safety pin the other end of the elastic to the other side of the band, and try on your headband. Keep pulling the elastic tighter until it feels snug, but doesn’t cut off the blood to your head. |
 |
|
|
||
| 5. | Once you find a good spot, mark where it should be, cut off the extra length, and put the end of the elastic about 1/4″ into one end of the tube, and sew the tube shut, sewing in the elastic. |  |
|
|
||
| 6. | Put on your headband, and using a mirror, see where you want the clover medallion to go. Pin the bottom piece to the headband, then stitch in place using a color that matches. | 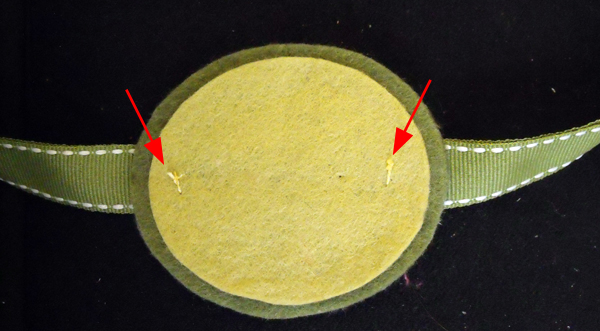 |
|
|
||
| 7. | On the top piece, add your embellishments. I used some embroidered swirls, seed beads and a french knot in the middle. |  |
|
|
||
| 8. | Then use your fabric glue to attach the top and bottom pieces together. Push down firmly to make sure it’s glued evenly, then let it dry for a few hours. | 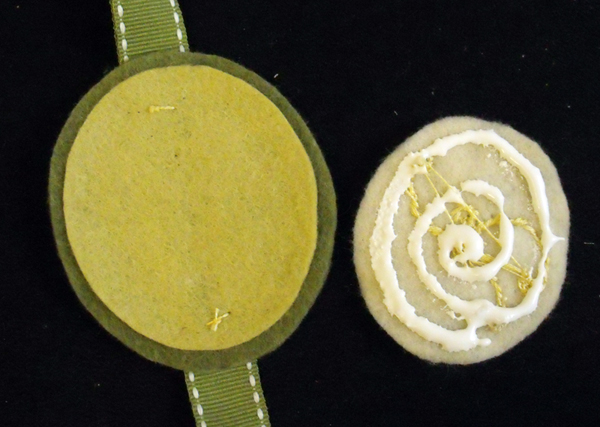 |
|
|
||
| 9. | Wear proudly! | 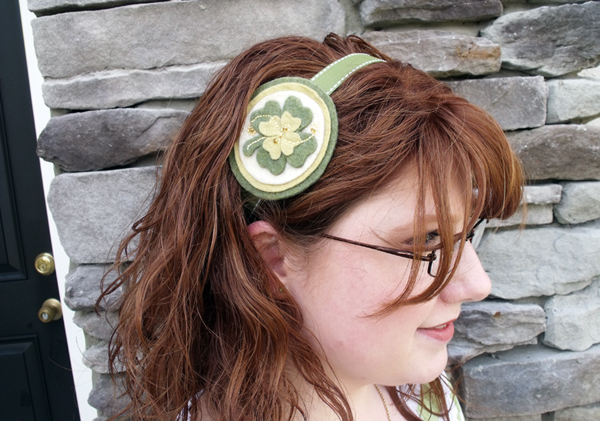 |


6 Comments
Rachel
That is so pretty! Thanks so much for sharing the template, I’ll be linking.
heather
That’s so pretty and it looks so awesome in your hair. Ginger power!
Andie
So super cute! Love that ribbon!
CJ
This could be modified to incorporated a shamrock, the THREE leaf clover associated with St. Patrick and teaching on the trinity. FOUR leaf clover is more strongly associated with superstitious luck than with St. Patrick. Love your site.
Lima
Hi there Melinda, thanks for sharing the tutorial of this cute headband.
I linked it in a serie I’m writing for my blog (http://rock-n-roll-stops-the-traffic.blogspot.com/2012/03/diy-from-head-to-toe-3-special-edition.html), I hope you don’t mind! :)