
I recently shared some kids Christmas ornaments on my local morning TV show, More Good Day Oregon. I had a lot of fun sharing some great low-cost (and very easy!) crafts that make beautiful Christmas ornaments, and great keepsakes. Here’s the video:
[youtube http://www.youtube.com/watch?v=Bo63FJbyiA8&hl=en_US&version=3]
Top photo by: The V Spot Blog
6 Kids Christmas Ornaments to Make:
1. Shrinky Plastic Kid Drawing Ornament
These shrink plastic ornaments are simple to make, and create great keepsakes that immortalize your child’s drawing or writing forever. Don’t forget to write the child’s name and the year on the ornament before you bake it!
Project Materials:
- Sheet of shrinky plastic cut into six pieces, about $1 per sheet (or use #6 plastic)
- Permanent markers, on hand
- Hole punch, on hand
- Ribbon, on hand or $1
Total: $1 and up
To Make:
- Cut sheet of shrinky plastic in half, and then each half piece into thirds.
- Let child draw or write on the shiny side with the permanent markers.
- Punch a hole in the top of the drawing BEFORE baking according to package directions.
- If you are using #6 plastic, bake on a piece of brown kraft paper at 325 degrees F for five minutes, or until shrunken flat.
- When cool, tie a ribbon onto the ornament, and you’re done.
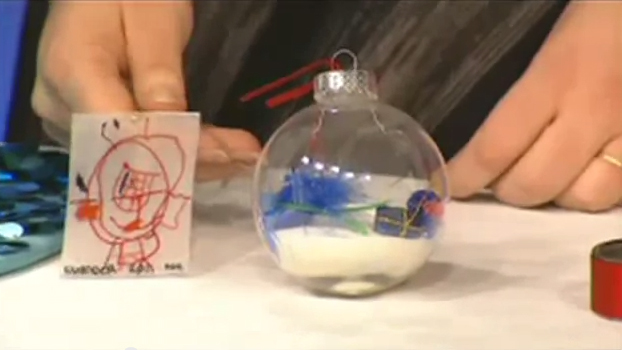
2. I-Spy Bulb Ornament
I-Spy a great ornament idea! This glass-like ornament is filled with small trinkets to find. Children love to look through the “snow” to find trinkets and even the letters of their own name!
Project Materials:
- Clear plastic ornament, about $1
- Salt, on hand or $1
- Small trinkets (presents, plastic Christmas lights, etc), on hand or $1 and up
- Letter beads, $1 and up
- Hot glue, on hand
- Ribbon, on hand or $1
- Optional: Funnel, on hand
Total: $2 and up
To Make:
- Remove ornament lid and set aside.
- Have child choose some trinkets to put inside the ornament.
- Put several trinkets and letter beads with the letters of your child’s name inside the ornament.
- Put about 1/3 cup of salt inside the ornament with the funnel.
- Hot glue top of ornament and quickly put the ornament lid back on. Because the salt makes the ornament somewhat heavy, this step is important. Make sure the lid is securely glued.
- Thread ribbon through ornament lid.
3. Kid Photo Tin Ornament
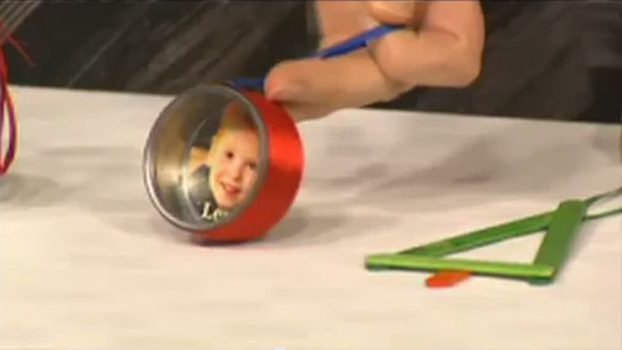
I made these photo tin ornaments a few years ago with those little metal favor tins you can get in the wedding section of the Dollar Tree. Find full article and instructions here: [make photo tin ornament]
Project Materials:
- 3 pack of tins, $1
- Photos, color copies, or printouts of photos from your computer, on hand
- Ribbon (3/4″ and 1/8″), on hand or $1
- Glue (craft glue and/or hot glue), on hand
Total: $1 for 3 ornaments
4. Modern Popsicle Stick Ornaments
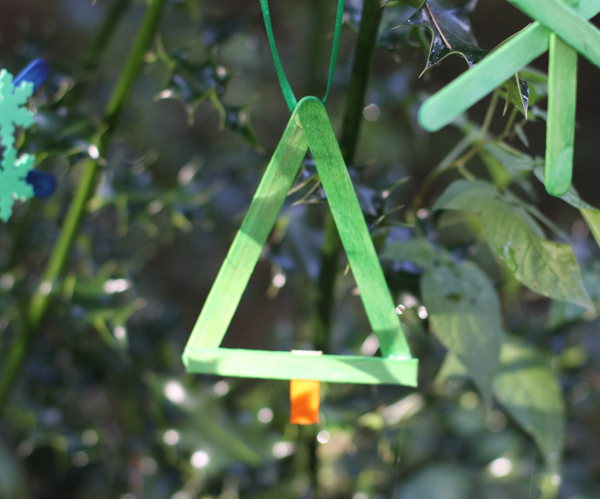
These simple popsicle stick ornaments have clean lines and look pretty and modern on a Christmas tree.
Project Materials:
- Colored popsicle sticks, $1
- Hot glue, on hand
- Scissors, on hand
- Ribbon, on hand or $1
Total: $1
To Make:
- Glue two full size green popsicle sticks together to create top of tree triangle.
- Trim a popsicle stick to fit along the bottom of the triangle and glue.
- Cut a small piece of orange popsicle stick to create trunk and glue.
- Tie a ribbon on top of tree.
5. Glittered Pine Cone Ornament
Pinecone ornaments sound too simple, but they are very pretty and sparkly, and look great hanging on the Christmas tree. This is a fun project for kids because kids love to paint — and use glitter! Well, the kids “paint” because I used pre-painted pine cones from the dollar store, and let them paint the glue on the edges of the pine cone.
Project Materials:
- Pre-painted gold pine cones, $1 for a package
- White glue, on hand
- Paint brush, on hand
- Small paper cup for glue, on hand
- Glitter, on hand or $1 and up
- Ribbon, on hand or $1 and up
Total: $1 and up
To Make:
- Cover your work surface with newspaper.
- Put some white glue in a small paper cup (or other receptacle), and let child paint glue onto the tips of the pine cone.
- Sprinkle glitter onto glue, and allow to dry.
- Hot glue a ribbon loop to the top of the pinecone. (Parents only).
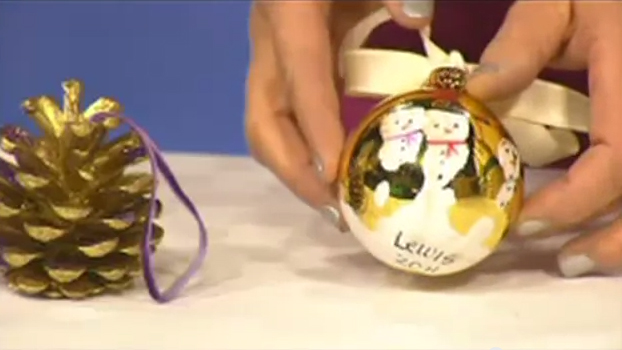
6. Snowman Handprint Ornament
The snowman handprint ornament has become an instant classic, thanks to its popularity on Pinterest! You can’t go wrong with this adorable ornament, and it’s fairly quick and easy to make. This is a great keepsake ornament to give to grandparents, but make sure to keep one for yourself too!
Project Materials:
- Colored bulb ornament, $1
- White acrylic paint, on hand or $1
- Permanent markers in black, red, and orange, on hand or $1 and up
- Ribbon, on hand or $1
- (optional) Egg carton, for a drying rack
Total: $1 and up
To Make:
- Paint child’s hand with white acrylic paint.
- Have the child grip the ornament, with fingers facing up toward the top of the ornament. Allow paint to dry (and child to wash her hands!)
- When paint is dry, for each finger, draw on snowman’s features: a hat, face (with carrot nose), scarf, and buttons. Children about six and up can do this step themselves.
- Don’t forget to write the child’s name and the year somewhere on the bulb.
- Top the ornament with a ribbon loop and bow.


