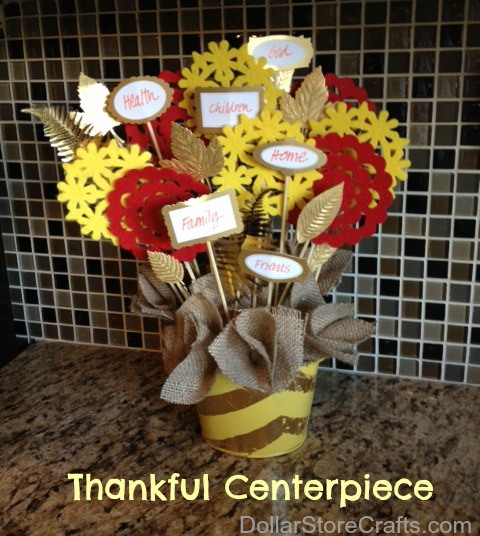
During November, I like to spend the month thinking of all the things I’m grateful for. Did you know that studies have shown that keeping track of your gratitude can positively affect your health and quality of life? Here’s a pretty way to remind yourself of all the things you have to be grateful for: a Thankful Centerpiece with a rustic yet glam theme. Read on for the tutorial!
Project Materials:
- Metal pail, $1
- Floral foam, $1
- 2 Packages of felt flower coasters, $2
- Bamboo skewers, $1
- Burlap, on hand or $1 worth
- Hot glue and glue gun, on hand
Total cost: $5
I’m participating in the 12 Months of Martha project, sponsored by Martha Stewart, so I wanted to add a Martha twist to my dollar store centerpiece. The burlap and natural skewers bring a rustic charm, while the Martha Stewart products add a touch of gold glam! I added several embellishments from Martha Stewart’s crafting collection:
- Gold leaf stickers, $5 – Find on Amazon
- Gold-framed label stickers, $5 – Find on Amazon
- Gilding sheets, about $10
- Spray adhesive or gold leaf sizing, on hand
- Clear acrylic sealer spray, $5
- Masking tape, on hand
Total: $25 for Martha Stewart supplies, see below for substitutions

Substitutions:
- Gold leaf stickers – paint dollar store faux leaves gold with acrylic paint or spray paint (cost, about $3)
- Gold leafing – substitute gold paint or spray paint (cost, $2 and up)
- Gold framed label stickers – substitute card stock, or labels from the dollar store (free and up)
- Or, skip the gold leafing and add your own additional embellishments (faux flowers, ribbon, more burlap, etc) – Free
Total savings: $15-20
Make a Rustic Glam Thanksgiving Centerpiece
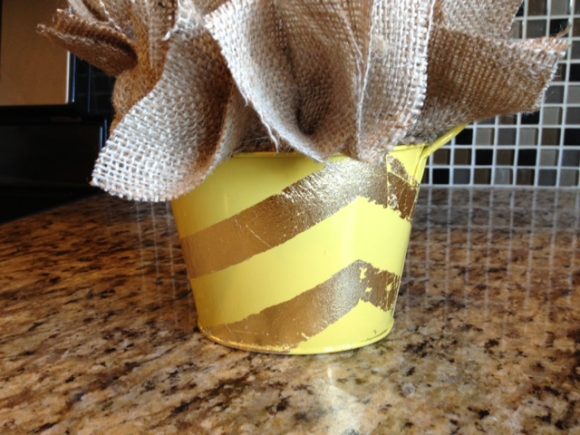
Gold-Leafing the Metal Container:
I have wanted to try gold leafing for awhile now, and this was the perfect project to try it out on! If you want to bring the cost of this project way down, just skip the gold leafing step.
1. Gather your gold leafing supplies. You need a couple things: masking tape, gold leaf sizing (or spray adhesive), gold leaf sheets, a large soft paintbrush, and clear sealant.
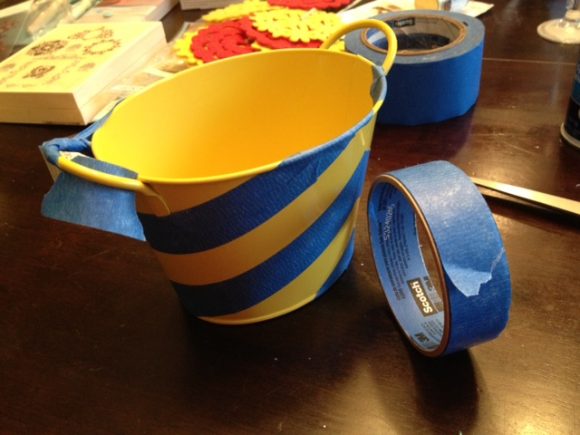
2. Mask off the desired design with masking tape. I did a single peak chevron design.
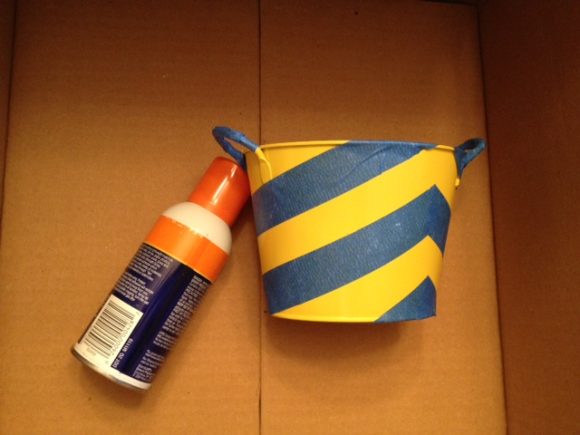
3. Apply gold leaf sizing, spray glue, or rubber cement to your container. I didn’t have gold leaf sizing, so I used spray adhesive. The glue surface should be tacky but not wet when you apply the gold leaf.

4. To apply gold leaf, place the gold leaf sheet on top of the adhesive surface. Gently push leafing down with your hands, covering all of the glue surface. It’s okay if it’s bumpy at this point.
I used 2 sheets of gold leaf for this container.
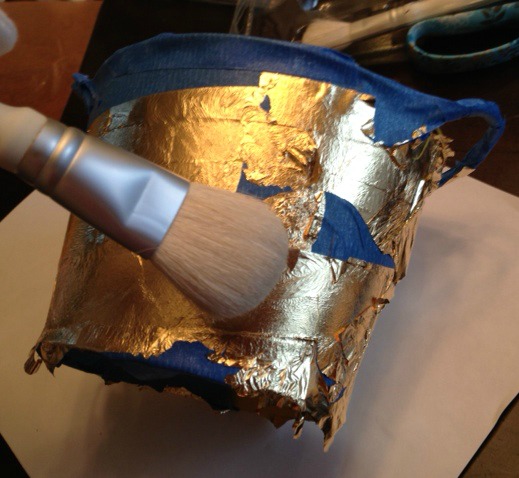
5. Next, burnish the gold leaf with a large, soft paintbrush. “Burnish” just means rub the gold leaf into the glue until it’s flat.
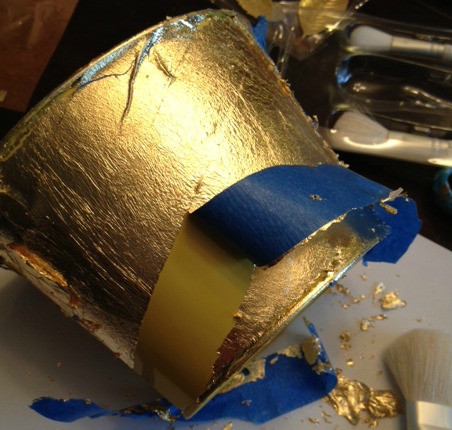
6. Remove masking tape from your project. Burnish the remaining gold leaf. Spray with clear acrylic sealer to protect the gold leaf finish.
Note: Gold leaf is not supposed to look perfect, so don’t worry if there are some pits and distresses to the finish. It’s part of the charm.
Creating the Floral Arrangement:
1. Cover your floral foam with burlap (if necessary, trim floral foam to fit in container before you start). Insert foam into container.
2. Hot glue felt flower coasters to bamboo skewers. Glue gold leaves to skewers.
3. Insert skewers into floral foam to make a floral arrangement. Tip: vary the length of the skewers to add variety and height to the arrangement. You can trim the skewers with scissors.
4. Write what you’re thankful for onto the labels. (I used Martha Stewart markers). Stick labels onto skewers. Insert into arrangement.
Tip: Allow your family to add to the arrangement by writing down what they are thankful for onto labels!
5. Fill arrangement in with burlap picks. To make, cut burlap squares, then fold square in quarters. Glue bamboo skewer to center of folded square, and pinch until hot glue is dry.
All done!


1 Comment
Paula Gale
Hi there
love the techniques – and most crafters should have a deal of the items for this project in their stash already too – or is it just me and the other hoarders lol….
While reading, I’m thinking ‘I hope she doesn’t waste the tape she just peeled off with the gold leaf on’… also, I think thats where you must have used two sheets rather than one because you also used it on your masking tape because you didn’t remove it before you started applying the gold leaf, which surprised me a little…
Had you peeled the tape off before you applied the gold leaf – it shouldn’t have adhered to the previously taped off area because it had nothing to stick to – thus saving you one sheet… however, i’m thinking – I hope she uses the tape that now has gold leaf on for another project – or that would be a total waste of the 2nd sheet… I’m sure as a thrifty crafter that you already have something in mind to use that tape on though (hopefully)!!! lol.
Loved the techniques and use of things such as the felt coasters, in a way to which they were meant to be used – always good to look at things in a different light.
Thank you for sharing your project with us
Paula x x x