
Want to make a custom-painted t-shirt right now, using stuff you probably already have on hand? You don’t need to run to the store to pick up special fabric paint! You can fix acrylic craft paint onto your fabric using something you already have in your kitchen cabinets. Can you guess what it is?
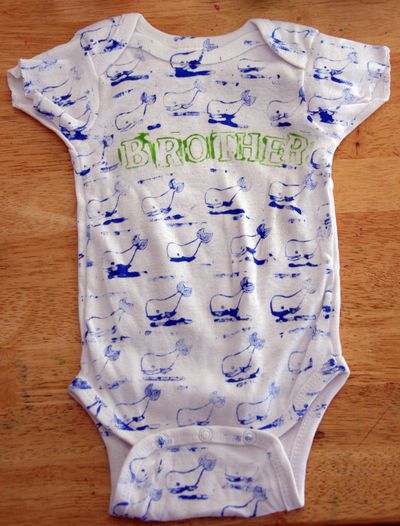
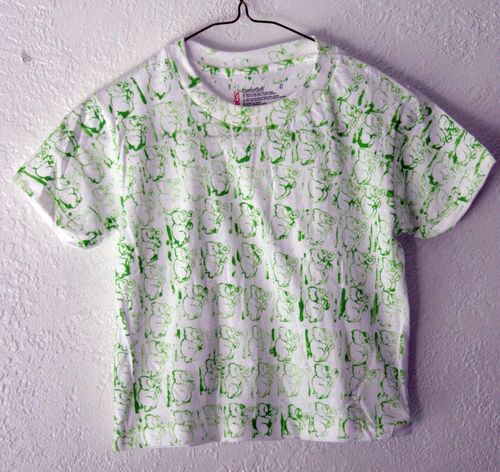
My three year-old son and I had fun decorating t-shirts with this vintage stamp set we have. We even decorated a onesie for his new brother! I like the effect of the imperfect stamping en masse. Pattern is such a great element of design – repetition makes things intentional! This shirt reminds me of some of the surf-inspired t-shirts kids were wearing in the late 80s, early 90s when I was in grade school and junior high.

You can use this technique on new clothes, or use it to spruce up stained clothes (disguise the stains under paint!) — great for kids’ clothes that have seen better days!
So have you figured out the secret ingredient yet?
A long time ago, on a thread on Craftster about stencil-making, I read a tip about using acrylic paint on fabric. The tip said you can fix acrylic paint by soaking the painted area (after it has dried) with vinegar, and then heat-setting. I have always wondered if it will actually work, so I finally tested the theory on these t-shirts, hoping that the tip was true so I could avoid a CraftFail!
Project Estimate:
- T-shirt, on hand or $1
- Acrylic craft paint, about $.50 per bottle or on hand
- Vinegar, on hand
- Stamps, on hand
- Iron or clothes dryer, on hand
Total: FREE and up
The Method:
Stamp or otherwise make a print on a t-shirt using acrylic craft paint.
Allow paint to completely dry (overnight is good!).
Soak garment in a solution of 50% vinegar/50% water. I used white distilled vinegar to avoid staining the garment.
When garment is saturated, wring out and throw it into the clothes dryer until dry to heat set, or if you prefer to iron, put a thin dishtowel over garment and iron (no steam) until dry.
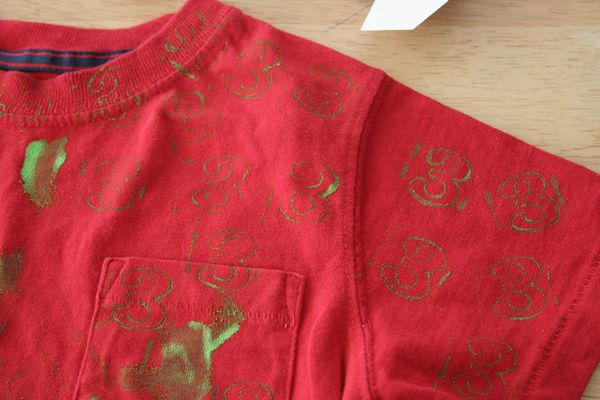
The paint should be fixed on the garment now! This worked best on white shirts for me. It seemed like the print on the red shirt faded a little after I laundered it, but then, it wasn’t very vivid to begin with (so maybe the fading was my imagination?) I’m not Consumer Reports, so I don’t know how to scientifically measure the amount of fading! :) Also, I have only laundered mine twice so far, so I don’t know if they will fade somewhat over time — so far, so good!


14 Comments
Heather H
How adorable is that onsie! I love it!
Shana
Thank You SO Much! I have a butterfly stamp I’m DYING to use on a shirt/onesie but can never bring myself to shell out the $$ for the proper ink for fabric!! Now I don’t have too!!
Vone
Back in the day when t-shirt painting was big – I used to use acrylic paint. We added a textile medium so it wasn’t as stiff. We didn’t use vinegar and just heat set and washed inside out and didn’t have big issues with fading.
christina
This is so cool. I love the Dollar store. I will definately try this techniques out and post a picture of how it turns out. Thanks for sharing!!!
Grandma Lizzie
Fun idea for a family reunion or party. Everyone could create their own unique T-shirt.
heather
Apparently, you don’t even need the vinegar (I heard from a twitter friend)… you can just heat-set and go. So we should test that and report back on our findings… sounds easy to me!
Aly
I think this would make a great craft activity to do with my kids.Thank you for sharing.
Aly
My Hodge Podge Life
Kathryn
I had never heard of this before, but will definately try this the next time I use acrylics on clothing. Thank you for sharing this tip with us!
Marrisa
OMG! How cute are those shirts! That looks like a fun and really easy project. I can not wait to try it. Thanks for posting!
pam
Love this idea for creating your own fabric designs for table cloths, curtains, pillows too!
Emily
Has anyone tried this with a regular stamp pad? I had kept this page bookmarked for weeks and finally tried it…only to re-read it carefully and realized I was supposed to use the acrylic paint that came in the little containers, not an acrylic ink pad. Well, my shirt is in the dryer now, so I’ll have to wait and see. Oops!
heather
@Emily, Let us know how it turns out!
Hope
Wonderful! Thank you for sharing. I`m going to use this at my daughter`s baby shower and have everyone who attends design their choice of onsie or bib for the baby!