 You might also enjoy our most popular posts:
Pottery-Barn Knockoff Mirror for $11
Mind-Blowing Cake Decorating Tip
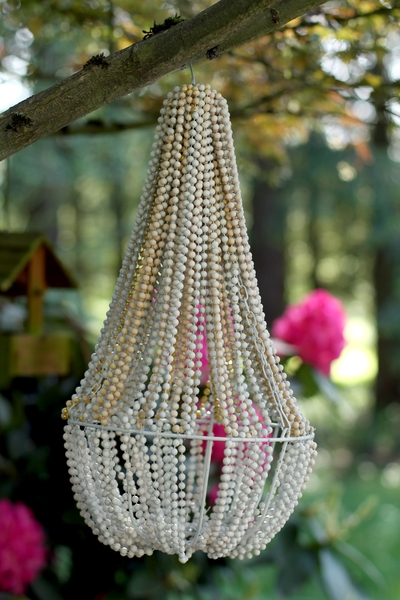
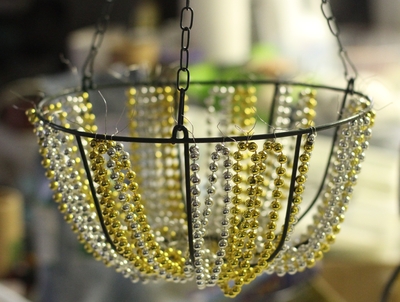
Make a Beaded Chandelier for $11
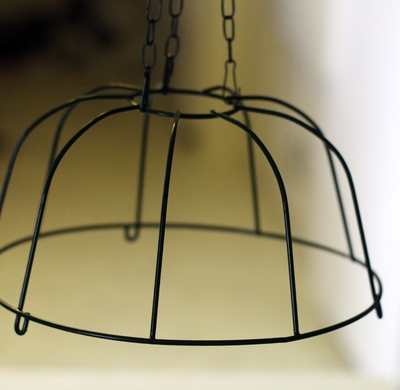
I made a beaded chandelier from dollar store stuff, and I’m so happy I get to reveal it today. I’ve been teasing the Dollar Store Crafts Facebook page with this project for a few days now, and I finally get to share it! A few months ago, Dollar Tree started selling their seasonal gardening stuff, including hanging wire baskets (and yes, they were only a dollar!) For months I had been trying to find a good base for a chandelier at the dollar store, and it wasn’t until my three year-old son called the wire baskets a “chandelier” that it clicked.
Well, two months later, the beaded chandelier is here. It really only took about three or so hours to make, but I kept running into problems (ran out of beads, twice. Ran out of spray paint, had to change diapers!), so I had to run to the dollar store more than once in order to complete it. With instructions and a plan, you’ll be able to make yours in an afternoon.
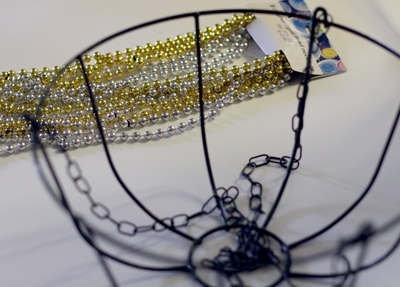
Project Materials:
- Hanging wire basket, $1
- 6 packages of Mardi Gras-style metallic beads (about 48 necklaces), $6
- Light gauge wire (floral wire will work), $1
- Spray paint, $1
- Wire cutters, on hand or $1
- Hot glue gun & sticks, on hand
- Additional embellishments, as desired
Total: $9 and up
To Make:
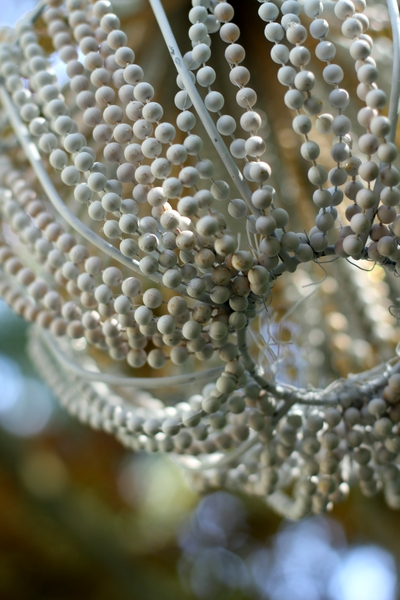
To prepare the beads: paint with white spray paint. Allow to dry, and add another coat of paint if necessary. You will be able to touch them up after the whole project is assembled.
Prepare the wire basket: spray paint the wire basket and chains. Again, you’ll be able to touch up the whole thing again after everything is assembled.
Production note: I didn’t spray paint before I assembled, but I think it’s a good idea to do so. You won’t be able to get the beads uniformly painted if you don’t paint before you assemble.
Work area: I hung the basket above my work surface so I could work on it while it was hanging like it would be when displayed. If you can finagle a way to do this, I recommend it.
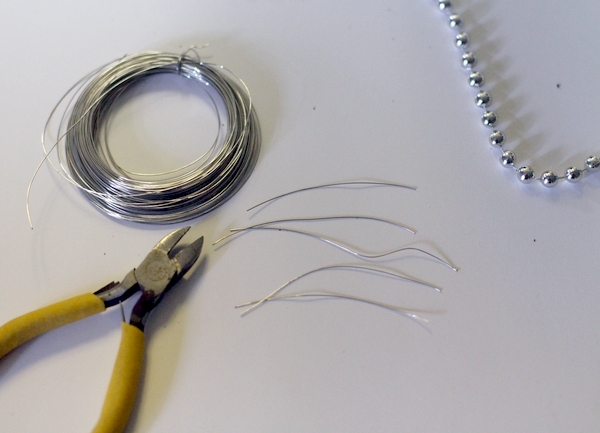
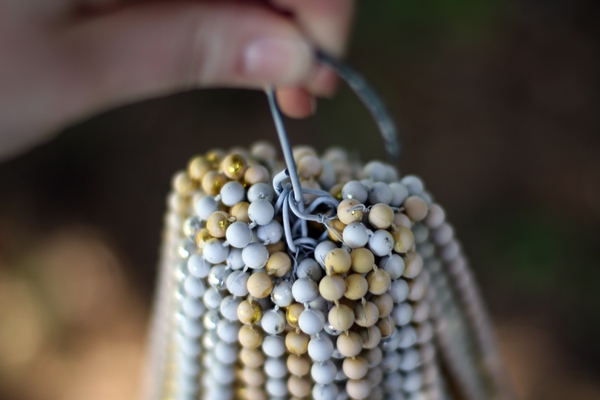
Wire: cut many pieces of light gauge wire at a length of about 2″ or so. You’ll need a couple hundred, but you can just cut 10 or so at a time, as needed.
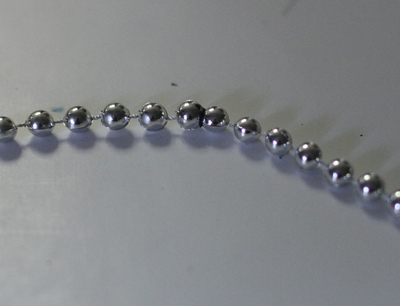

Beads: Find the spot where the two beads are fused together and break them apart. You can just pop them apart with your fingers.
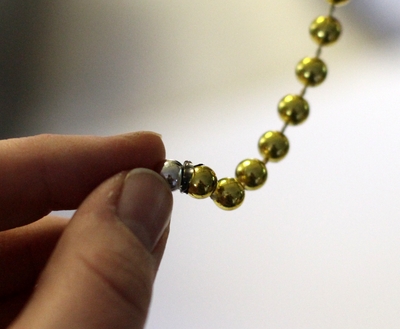
Attaching the bead necklaces together: As you wire your chandelier, you will hot glue one end of the necklace to the end of the next necklace. I recommend doing this as you go to keep everything nice and neat (and untangled). Remember to be careful when handling the hot glue!
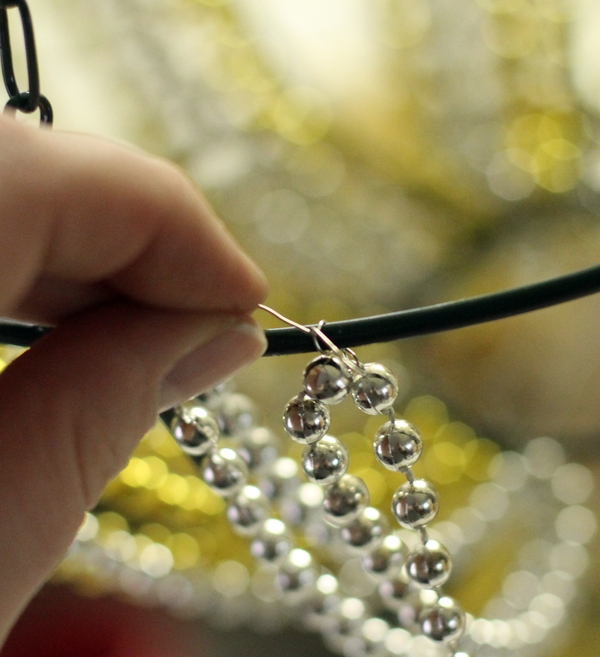
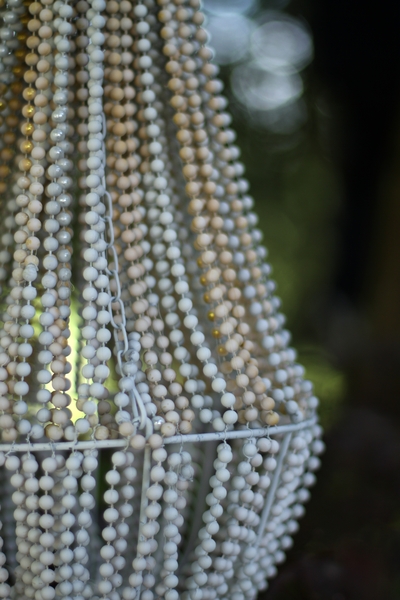
Wiring the bottom of the chandelier:
Take your first necklace, and a piece of wire. Wrap the wire securely around the thread between the first two beads and twist around once or twice to make sure the wire won’t come apart from the necklace. Then wire the necklace to the top of the wire basket form. Wrap the wire around the basket securely, and twist at least twice to make sure it’s secure. Leave the end of the wire long for now.
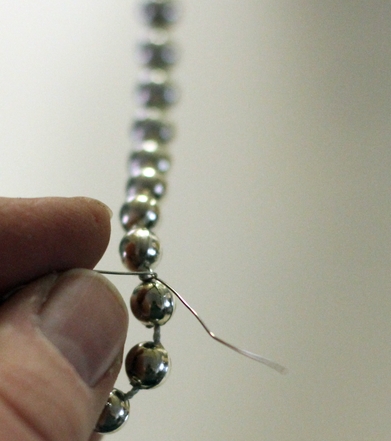
Hold the necklace up to the bottom of the basket to see where you’ll need to add the next wire. At that spot on the necklace, add the wire as instructed above, and wire to the lower frame of the wire basket.
Continue until you reach the end of the necklace, and hot glue the next necklace to the end and continue. Continue this process until the bottom of the basket is filled with beading. I wired about four sections of beads to each segment of the wire basket, and used two packages of beads to cover the whole wire basket.
At this point, you can trim the wires in the bottom hole of the basket. Make sure each one is twisted securely, then clip near the twisted area to make it look neater. Leave the tails on the top part of the basket – you will use them in the next section of the project.
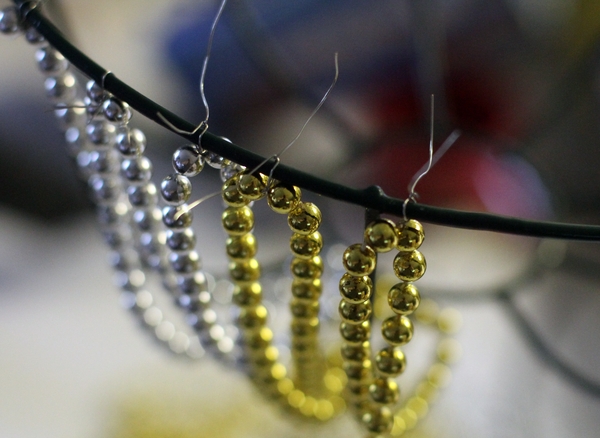
Wiring the top of the chandelier:
Production notes: Again, it is easiest if your basket is hanging while you are assembling. It takes about twice as many necklaces to bead the top of the chandelier.
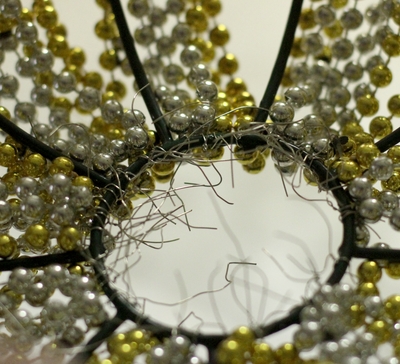
Start with a new necklace (or hot glue a new necklace to any extra beading left at the end of the bottom section), and wire it to an existing wire. Pull it up to the top of the hanging basket, where the chains meet. Take a longer piece of wire (about 4 to 6″ long), and wire the beads to the top link in one of the chains. Pull the bead back down to the basket and wire to an existing section of beading (using the tails that you left in the first part of the project).
Bring the beads back up to the top and wire to the long piece of wire. Continue wiring as instructed, attaching necklaces when needed. After about three or four segments of beads, I brought the wire tail back to the top link to secure the beads to the top.
Once you’re done wiring the whole thing, you can take it outside and touch up the spray paint in any area that got rubbed off. (I ran out of spray paint before the whole thing was as white as I wanted it to be, but I was too impatient to hold this tutorial any longer, so I went ahead and photographed!)
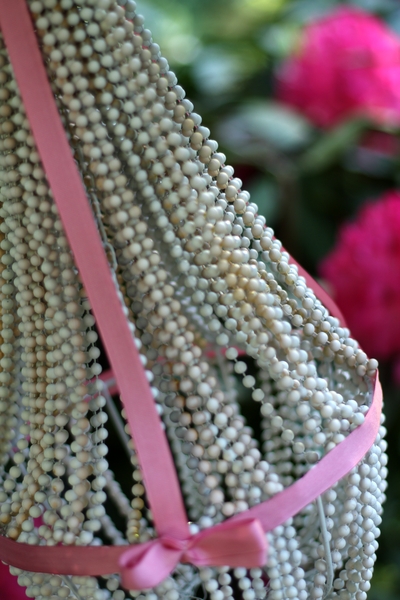
Add additional embellishments like ribbon, butterflies, bows, etc., according to your own taste and decor.
You can also turn the basket upside-down to use as the base for a chandelier, but if you decide to bead it the same way, you’ll need to add a couple of long wires at key points across the basket to keep the beading laying the right way.
Of course, these baskets are great bases for any kind of chandelier you can imagine! You might have a little trouble finding them at your dollar store now (they sell out quickly), but you can get them for about $5 at your local big-box store. I know that’s not as great a price as $1, but it’s still pretty cheap for a great chandelier base. The dollar store also has wire baskets that will work decently for chandelier bases. Try those and let me know how they work out for you!
Lighting: I didn’t add any lighting to this chandelier. I think it looks pretty cool as-is, but if I added any light, it would be with either twinkle lights inside, or a pendant light kit from a home improvement store ($10 for the kit). I’d use a halogen compact fluorescent bulb because it’s low-heat.
Comments: Most of my projects are prototypes. I show you the first draft, and I know there’s room for improvement. Please let me know what you think! Honest opinions are very welcome. I really loved hearing your input on the Copper Kitchen Wreath!


124 Comments
merideathx
“I’d use a halogen bulb because it’s low-heat”
…Noooooo! I think maybe you meant compact fluorescent. The exact definition of a halogen bulb is that it generates light though heat. Halogen gets SUPER HOT!
Natalia
Great idea! Love it! I think this would be extra sparkly beautiful if you could find the same sort of necklaces with jewel-type clear plastic beads, or, better yet, a beaded curtain, say something like this: http://www.beadedcurtainstore.com/itemdis.php?idnum=00165 or this: http://buddyhelm.com/PageMill_Resources/beadedcurtains.html (I think I saw beaded curtains at a dollar store for about $6 a while back. I don’t know if I’ll find them again though.)
What’s helpful is the lengths are already really long so less glueing, and because they are clearish the light will shine through them and sparkle.
Thanks for inspiring me!!!!
heather
@merideathx – oh yeah, you’re right…. sorry about that – I’ll correct it in the entry! Thanks for catching that.
Samantha
Awesome project. Such patience to do all that beading.
Rachel
Ooh good call with the basket! He’s so creative! Thanks so much, I’ll be linking.
Jessica
This is awesome! I love it!
Care
Heather! It’s gorgeous!! It’s a dollar store TRIUMPH!! :)
leslie
You are brilliant. I too have wanted to make a chandelier but get stuck every time while in the craft store, trying to figure it out. Thank you!
David M.
I love it! It looks so expensive and chic!
Michelle L.
Oh. My. Gourd. It is fantastic. Hanging basket: genius idea for the base. It has the most elegant shape! I love this one so much. really cute with the pink ribbons, too!
Leigh Anne
Awesome, LOVE it! Did you know this was featured on Apartment Therapy yesterday!!!!!!!!!! Ok, so you probably already know, but I’m so excited about it haha!
Becky
That is seriously the best project I’ve seen on here in awhile–it looks so much more expensive than it is!
breanna
heather!!! you are amazing and brilliant and soooooo talented!!!! I am in awe!!!!!
laura
Hey, looks lovely, I love the white.
I’ve made two chandeliers with this technique
http://style-for-style.blogspot.com/2010/04/chandelier-before-after.html
http://style-for-style.blogspot.com/2010/03/williamsburg-chandelier-diy.html
You can also use hot glue which seems easier than the wire, because the metal frame is cold it sets instantly.
erica @ decorica
That might just be the coolest DIY project I’ve ever seen. Love it!
sarita
Very Cool! I’m kind of liking the not so white look, it makes it look more antique. Very nice indeed!
Lisa Currie-Gurney
ARE YOU KIDDING ME?! THIS IS ADORABLE, AND SO AFFORDABLE ! SOOOOOOO SMART. THANK YOU FOR SHARING THIS !
HUGS FROM MAINE
Kati
Love this. Linked it up to my blog to share. Totally stopping by the Dollar Store tomorrow!
Kindle
Ok now tht I found you, I am going to have to get the ball rolling as I challenged my readers to make one of these in my High Point Furniture Market Lamps Post…OMG! You ARE the bomb! Great camera too!
Heidi
Instead of wire how about using ornament hooks from Christmas. Then you don’t have to do all that cutting.
Casey
I was going to make the one from Brassy Apple but I can’t find any hanging wire baskets at our dollar stores here, the only ones I can find are $8 and I don’t want to spend too much money but I think I’ll get one to make this one!! I love this look!
...love Maegan
um …this is BRILLIANT! I love it.
Selina
This is something im planning to make in near future for myself when i found some spare time to do it. Absolutely beautiful.
heather
i cannot believe it i am in love with this site..i’m in love love lovee with this idea…sadly for me its to late to find wire baskets like this with fall arriving..so i’ve been online trying to find a good deal on both the beads and wire hanger…i actually love the two toned hue of it..
Angie
I saw a chandelier like this made out if clay beads I was dying to buy. This is even better! Thanks for the idea, I’m going to try this.
abby
This is amazing!! I just found out about this blog today…can’t believe it took me so long to find out about it.
I am totally going to do this chandelier soon. I just love it! Using the necklaces is so smart. I would have totally stranded beads one-by-one. Thanks for saving me a weeks worth of time. :)
Sara
I’ve been looking for a cheap option for a chandelier. I’m so making these for my wedding!!!
evelyn cordova
I have been wanting to make my own chandalier for so long, but couldn’t think of a base! wow very creative…love it! very inspiring, thanks for sharing!
Christy
I love this idea. While visiting Alaska last summer I found the most awesome hanging lamp, and on sale. I vowed to go back… But didn’t get a chance. Ive been looking for something every since. I saw ur and loved it. Great bones….. I now feel confident to try and make my own. Thank you sooo much. I actually made sphere wire balls and attached flowers to them. Then hung them from the ceiling and I got all from the dollar store for 4 bucks give it a try ull love em.
Tamra
This is just gorgeous! I rather liked the subtle, cream/white shaded effect before you did the final spray paint coat. I plan to do this, but I’ll be painting half the beads bright white and the other half a creamy ivory. Lovely job!
Jen
Great tutorial, I love this! Found you at Tumblr, have a great day.
Virginia in TX
I liked the silver and gold for outside, but very sophisticated in white.
VT
Sue
Great idea! This would also be a pretty plant hanger in itself. Do the bottom as instructed & wrap the beads around the chains & fasten at the top.
lydia vance
love this idea cant wait to try it. thinking pink beads for granddaughters room.
Sallyanne McLaughlin
always love to see creative items that I haven’t seen before. The “creative solution” aspect of this chandelier is so cool. It’s like walking thru a big craft fair, seeing hundreds of common (schlock)items, then spotting something so creative, unique, or funny that it stops you in your tracks. Thanks for seeing something fresh in an unexpected place. True artistic mindset.
Kl
This is cute. But being a chandelier it needs a light. So how about a stick on light that uses batteries and stick it inside.
Andrea
AWESOME!!! LOVE IT and will make one for myself!!!!
Marie
I made this this weekend! I love it! A few notes form my experience.
My dollar store only had colored bead packs, red, blue, purple, etc. I sprayed mine first (I have an old sheet strictly for painting – this keeps them from rolling), but the beads’ color bled through the white paint. It made the beads pastel (which could be cute but not what I was looking for) so I went to Lowe’s and got white outdoor enamel. It worked perfectly, no bleeding. It was 4.25 a can. OR you could get a cheap primer and a cheap white. Also, 2 cans for sure.
Other than that this project is brilliant! I’m posting mine on my blog this week! I will definitely be bookmarking this site! Thanks
Betheny
I LOOOOOVE it! In fact, I love it so much that I did it the afternoon that I saw it and used it in my daughter’s 1st Birthday decor!! I actually didn’t even have to buy the beads because I had the exact amount of stringed pearls needed to complete one already in my stash thanks to my MIL. ;)You can check mine out at:
http://tomseth.blogspot.com/2011/04/par-tay.html
I’ve linked you up there and I also ‘shared’ it on FB and had a bunch of my cute friends ‘shared’ it on their FB’s because they just thought it was so fab.
Bridget B
Wow – This is completely awesome!! Love the transformation of the wire hanging basket!
Denise
I made a similar chandelier a couple of years ago. 3 descendingly smaller hoops and I used clear Xmas garland I got on clearance. (Wish I had tons more) But the big difference I did was use a continuous piece of wire. Wrapped it around the bead and the hoop and on to the next one. No cutting or twisting involved. Until the end of course.
Not quite sure how that would work on your small end unless you got a small metal hoop. I’ve even used embrodery hoops I pick up for 10c at yard sales.
Just a little FYI
Happy crafting
Pattie Kane
Or maybe even some solar lights inside the chandelier!!! No worries about heat or melting anything!!!
trish
Hello! I’ve popped on over from Tip Junkie–
I like the muted metallic tones, actually. Much more interesting than solid white in this case. Genius!
Becca
Thanks SO MUCH for the instructions! I was shopping for a chandelier like this one for my apartment and couldnt find anything modern, fun, and/or cheap. This was PERFECT! I made it in one afternoon, and spent $10. I am going to add more to it to give it my own flair so it will cost more in the long run, but for the $10 my plain chandelier if beautiful!
My one piece of advice to those thinking of making this chandelier: if possible, buy beads that are already the color you want to be using! I bought multicolored metallic beads and spray painted them white, and it was definitely the hardest part. If you can find beads that are already white, you will have a much easier time.
Thanks again!
heather
@becca, thanks for the tip. I’d love to see a photo of your chandelier when you’re done!
Marie
This is so awesome! I’ve been wanting something like this in my baby’s room since before she was born (she’s now 16 months old) Thanks for the great tutorial!
Marie
mylilpinkpocket.blogspot.com
Laura
Love this!! I made one for my daughter’s first birthday party… I used a wire basket I already had ( I could never get plants to grow in them anyway, lol) and, since I found this in august when hobby lobby is already (!) putting out Christmas decorations, I used their pearl garland.. $2 for 18 feet! Thanks for the inspiration!
Lindsey
Found this website today & HAD to give this project a shot. I picked up some X-mas beads at hobby lobby, some nude & copper spray paint..and went to town. I must be a bit slower than ya’ll..It’s been about three hours and I’ve just got the bottom of the basket done. I let some of the beads hang a little looser, while pulling others a bit more taught..It looks very nice thus far. I will link a picture when I’m done. (Hopefully tomorrow night!)
Lindsey
Great chandelier! Just wanted to share my slightly more cumbersome and slightly pricier DIY version of the at home beaded chandelier:
http://www.simplysalvage.com/custom-beaded-chandelier/#more-137
Thanks for the inspiration!
Lindsey @ Simply Salvage
heather
@Lindsey, Beautiful! You did a fantastic job on your chandelier!
Chris
Hey, what a lovely idea, we’ve just found a bead shop here that does recycled glass beads, which are lovely, so we’ll give one a go, nice for the garden as shown here, Thanks for the ideas x
barb
this is so pretty! Well done!
Ashlee C.
Can anyone tell me which dollar store chain you found wire hanging baskets at? I am having a hard time finding them…
Thanks!
heather
@Ashlee, They have them for a short time in the spring – they sell out fast. Keep your eye out in the next couple months!
Heather
Chanda Chapin
LOVE this… I even added a link to this project to my site. candlcountrychic.blogspot.com
Suzi
I saw this project months ago, and today at Dollar Tree they had the hanging baskets – so I guess it’s time to craft! Living in Tampa, we have a pirate invasion every year, where I easily collect 100’s of necklaces. I’ve been giving them away, but I still have bags of them. I think I will make mine all colors. Can’t wait to start.
Elva
This is amazing! we will try to do it my little girl and I, Thanks!
Anne
I think this is great, I did not see where you gave any dimensions. I want to make a very large one so I need to get an idea of how many beads to purchase. You did say you used 58 necklaces so if you will give the size, I think I can determine a ballpark figure! Thanks much, Anne
Rasha @ mychampagnetaste
I love it…I will check out my dollar store if they still have them..Im planing to do this for my bday in may..so i think from now until may the $ store will have these wire basets back in stock…I will remember to send you a picture
heather
@Anne, the basket was about 9″ across, and the chandelier (finished) measures about 21″ tall.
Stephanie
Instead of hot-gluing the necklaces together, it would be more sturdy if you fused them back together.
This can be done simply with an old butter knife and a stove. Heat the tip of the knife on the hot stove then slide the two beads down the side of the knife and then hold together for a couple seconds when they meet. presto-done! A wood burning kit, can also do the same thing, is a bit easier to use and i found one at christmas-time for about $10. (Tricks of the trade from a Louisiana girl).
Victoria
This is awesome! I’m soo excited to try it!! I also featured this on my blog here: http://www.vixenmade.com/2012/04/10-creative-diy-projects.html
Kimberly
I LOVE this idea! So cute! If I ever have a baby girl, I will make ones if these for her room! I like the white beads and I think I would keep a few silver and add some pink ribbons! So clever! Thanks for the fabulous idea!
Dave
Oh my, Heather–I hope you realize how creative you are! This is fantastic! Thanks for the awesome idea. :)
Kristin
Boo, I’m from Louisiana, so when it comes to Mardi Gras beads, we pretty much have THAT covered, hahaha. But I didn’t have enough pearl/white beads for this project. The white spraypaint idea is so simple that I never even thought of it. I’m such a cooyon. D:
On top of that, it’s such a fantastic idea for getting a little variety with the beads when it comes to color. The subtle difference in hue between each strands makes it much more appealing. Actually, it gives the look I want to go for! Soft, minty greens and snow blues. I had trouble thinking of what kind of glue to use as well, so thanks for the tips! :D You are delightful. Thanks, cher!
Susan
Making 3 of them, my questions are if I understand, you used about 16 necklaces for the bottom? I had to cut my wire much longer to wrap and didn’t have many tails at the top of basket. Do I add more wire to attach when doing the top or….then you said you used one continious wire to do the top?? Pls. Explain to me. I’m going to finish the first one this afternoon and love this idea. Took lots of paint since beads were multi colored. It is so adorable. Just need to do it correctly on top.
Thanks
Susan
heather
@Susan, there’s no wrong way to wire it. You just want to make sure it’s secure. Let me know how you end up doing it.
Jenny
Thank you so much for this DIY! I got inspired by it, and made my own chandelier. I have a blog about the crafts I make (which I want for it to be a nice website some day), so the pictures are definitely going to be uploaded.
Thanks again and don’t worry, I’m going to give you full credit for this idea! :)
Brittany
I love this idea! The result is so pretty and the materials are so inexpensive! I know this will look great in my room!
Chalk paint lady
I love this chandelier!!! I’m going to make one for my little girls room. Room is already pretty shabby chic but he really needs something hanging from the ceiling. Thank you for the dollar store ideas I will be back to see more for sure!!!
Mel
Are you able to paint them after the chandelier has been assembled?
heather
@Mel, you can, but the insides of the beads won’t get as good of coverage.
cindy
I read the tutorial twice and still didn’t think I would need that many beads, well now I am on my way to the store to pick up more beads. The next tutorial I follow of yours I will believe all the directions. I love the chandelier. I set a glass bowl inside the bottom beads and put a battery operated candle, the glow is beautiful.
katherine
this is nice…..but can you use the beads you can by on the roll?
e-bay have lots of them and in different colors……..
heather
@katherine, sure that would work!
Jackie K
After Christmas sales beaded garland and ornament hooks battery operated lights.
cindy
So cool, I have made two of them and I love them. I added a garden water valve at the top to make it easier to attach the top wires.
http://www.pinterest.com/pin/150166968799376292/ here is my second one, I painted the 2014 new Pantone color.
My white one, you can see the garden valve a little more. http://www.pinterest.com/pin/150166968798032208/
cindy
I follow all your posts
Elisha Corey
I think ornament hooks would make this project far easier to manage. I may try this with clear beads and maybe pink for my daughters’ room. I have also seen things like this done with just and extension cord and a nightlight in the center.
Elisha Corey
If you cant find the round planters, I offer two alternatives:
1.) Get 2 of the wall mounted 1/2 rounds and bolt them together.
or
2. The wheel off of a bicycle (minus the tube and spokes, which can be done with wire cutters) and craft wire. Attach three to four strands of wire and equal spaces and set the length as you would for this project. you can put a zip tie midway between the S hook and the wheel to keep the wires away from the beads.
If you are anything like me, the kids old bikes are in an out building collecting dust. The kids really get a kick out of seeing their old toys take a new purpose and think freecycling is “amazing”.