
Our most popular post of all time is the PB-Inspired Tiled Mirror, but there’s just one problem: the original tutorial for that project has been deleted from the internet. And, it used a poster frame, which adds a considerable expense if you don’t already have it on hand. Last week while I was browsing my local dollar store, I figured out a quick and easy way to get the same look, with way less trouble. To make this version of the mirror, you don’t have to know how to use any tools… just duct tape and glue. Everyone can do that, right?
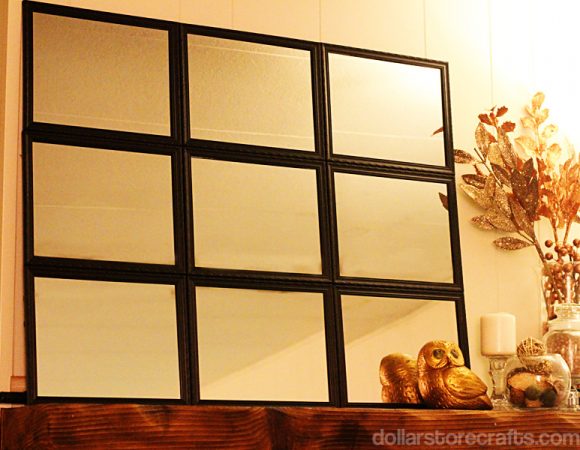
With the dollar store, you are always somewhat limited because items you find there can only be so large for $1. My solution to this is to combine small things together to make a bigger impact (like I did with this bulletin board project). That’s all we’re doing with this project! Attaching some small mirrors together to make a big one.
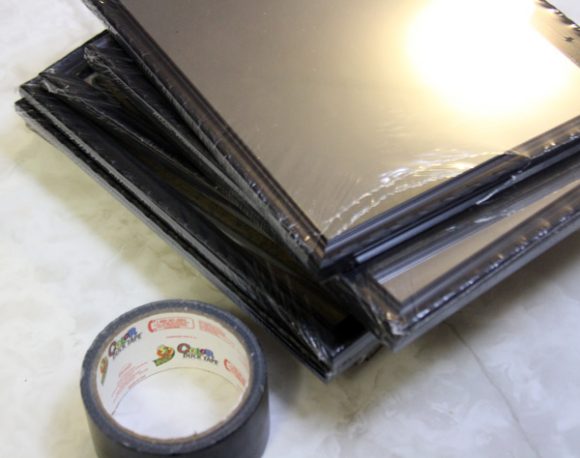
Project Materials:
- 9 framed mirrors, $9
- Duct tape, on hand
- Piece of black foam core board, $1
- Ribbon or picture-hanging wire, on hand or $1
- Craft glue, on hand
- Hot glue & glue gun, on hand
Total: $10
Make sure you choose all mirrors that are the same size – mine were about 8.5 x 11″. I also recommend selecting the same color of frame. In my case, I chose black frames.
This project is all about the duct tape. Use the tape to attach the mirrors securely together, and then you will reinforce the whole thing with the foam core board.
Part One: Attach the Mirrors to Each other With Duct Tape

1. Unwrap the mirrors. Then, line up three mirrors on your work surface, face down. Make sure they are VERY lined up, as evenly and close together as you can get.
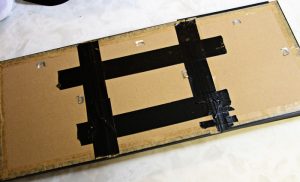
2. Add duct tape over the seams, and across the seams and all the mirrors, as shown. Basically, there is no such thing as too much tape.
Repeat for the next two rows of 3 mirrors, until you have three identically taped together rows.
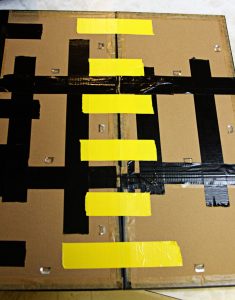
3. Line up two of your rows next to each other. Again, keep them as even and as close as you can. Tape across the seams (as shown by the yellow duct tape), and then over the seams. Attach the third row to the first two in the same way.

4. When all three rows are securely taped together across all seams, add additional reinforcing duct tape. I put a large X across the whole thing (I ran out of silver tape in this photo, but I extended the X all the way across the mirrors. I also put tape all the way around the outside perimeter of the mirrors.
Like I said, there is no such thing as too much duct tape.
Part Two: Reinforce With Foam Core Board
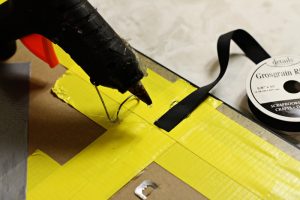
At this point, you will be adding the ribbon for hanging. Just a note, I have not tested out how strong the ribbon & hot glue combination is for hanging because I have been leaning my mirror up against the wall instead. You need to add the foam core backing to the mirrors because if you leave them as they are, they are flexible and will bend and it really compromises the duct tape joints.
1. Trim a piece of black foam core to fit the back of the mirrors. I left about one inch around the whole thing, so the foam core wasn’t right up against the edges of the mirrors.
2. Hot glue the ends of a piece of ribbon to each side of the top third of the back of the mirror. Make sure these ribbons are long enough to tie together comfortably.
3. Put craft glue on the back of the mirrors, and place the foam core board over the glue – making sure you leave the ribbon sticking out.
5. Let the foam core and glue dry completely.
6. Tie ribbons together using a square knot. Don’t leave much slack unless you want the ribbon to show when you hang it.
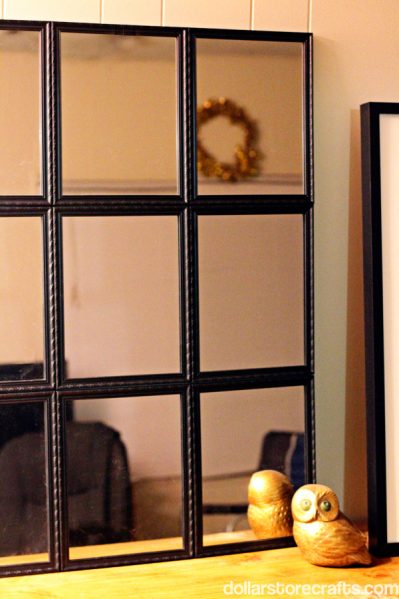
There you go! It took longer to write this up than it did to make it. I promise, it’s super easy! You can totally do this!


79 Comments
Jessica Hill
Brilliant. Love. Sharing everywhere.
Rosa Salgado
You are not going to believe it but these are the exact mirrors I used to create mine (I couldn’t find the small mirror everyone seemed to be using). The only difference is I used a glue gun no duct tape. I did this eight months ago and it is still holding on.
Sherry
Suggestion. Don’t glue the hanging ribbon to the duct tape, peel away some of the backing paper and glue and STAPLE GUN the ribbon to the wood of the frame. (If the frames are plastic, use epoxy instead of hot glue.) Then do your duct tap over the ribbon for extra security.
Glass has a lot of weight, and you certainly don’t want the assembly to fall off the wall, so overcompensate.
Alternatively, use a piece of quarter inch thick plywood instead of the fomecore, and attach hanging hardware to that.
heather
Thanks, Sherry! I love your additions. You are brilliant! :) I agree, use plywood if you are able to!
Kathryn
I really like this and it does seem easy. I might try this in my living room some time. Thanks for sharing this with us:)
Stephanie
Now THIS is my kind of project!!! My husband is a carpenter – much like the shoemaker’s children having no shoes, the carpenter’s wife is NOT allowed to touch the tools! However, I can totally duct tape without him! Now, I have to find those mirrors!
Heather's Mom
It looks great, Heather! It’s a great project, easy and beautiful. My children are so creative. I love it.
Gabrielle
LOVE LOVE LOVE! I’ve been looking for something large to hang over our piano and this would be the perfect thing to add light also. Thanks for the amazing idea!
Ali
Which dollar store did you find the framed mirrors? I can not find them any where, or online!
heather
@Ali, I got them at Dollar Tree. You can also order them online at dollartree.com. http://www.dollartree.com/floral-decor/photo-frames/mirror-with-plastic-frame/202c206c206p310226/index.pro?method=search
Titti@Shoestringpavilion
Genius! That’s all I can say. What an amazing result!
Ali
got the frames! exact ones you used. did you have any trouble getting them close together so the duct tape doesnt show through the crack of each frame? I’m having issues with this
heather
@Ali: Yes, if you look closely, you can see the duct tape through the cracks. There are a few potential solutions. Before you mount the mirror on the posterboard, fold the taped frames open so you can color the exposed duct tape with a marker. Or, if you are up for slightly more work, you can fill in the cracks with spackle and then paint it.
Anyone else have any ideas?
It doesn’t bother me at all, though – you can’t tell unless you are really studying the mirror.
heather
Ali emailed me and said: “I figured out a solution… Break the tape on all the mirror frames with your finger nail and pinch the frames together as you tape! It worked perfect! Thank you! This was a great idea!!”
Maureen
I’m confused…can you explain the solution in more detail? Thanks so much-love the project!
heather
@Maureen, basically you duct tape the mirrors together at the back, and then glue foam core board to the back to reinforce – it’s that simple!
Kim
Love this project, and I bought the mirrors at Dollar Tree, but could not find foam core large enough. Only found 22″ x 28″
heather
@kim: You could get 2 sheets of foam core and cut them down to size.
Kim
I only bought one, but think I will get another one to cut down to size to attach (with LOTS of duct tape, lol). My dollar tree didnt have foam core though so I ended up spending $6 at a drug store for it. Maybe another dollar store will have it, will see….
Mindy
@ Kim, check Walmart, target, Meijer (whatever big box stores are in your area. Foam Core should be less expensive there than at drug stores. Also, you might try Michaels/Jo-Anns/Hobby Lobby or an education store. I typically can find it there. If you have kids who are involved with 4-H, you can also check with your local 4-H office. Here in Indiana, they carry it and sell it to the kids very inexpensively (I think it’s around 2.50 for 20×30). @Heather, I love this idea! We have a large area above our couch that we have nothing hanging on and the room is rather dark in the evenings. This would be a great way to fill up that space and add some light! Thanks so much!
Aimee
Heather, this is fabulous, thanks! I’m planning a huge one for the two-story wall in our split-level entryway. That wall has been bugging me. Artwork big enough not to get lost is hundreds of dollars. This will be great.
Unfortunately, ordering the mirrors online isn’t a viable solution, as they only come in an 36-pack of assorted colors. I guess I’ll be stalking the only Dollar Tree in our area for awhile to get the 28(!) mirrors I need! :)
NINA
I made one of these years ago for my sons’ room> we had a huge livingroom in a one bedroom apartment.I needed a roomn for 3 boys to share, so i divided off enough space using a three piece entertainment system and behind them became the new bedroom .
Only thing?no windows! So I simulated one- using someting like this project. I added lathing strips (thin strips of wood)over mirror tiles (12 in a box @ home depo-)to frame the “panes”.(you can use Dowel rods split te long way as well)I used 3 across and 4 going down. I used “Liquid Nails”(clear) constrution glue (home depo=)and glued each mirror tile to a large luan board (wood paneling).Topped it off with the lathing strips to frame out the panels added hooks to hang and it was done! to emellish I added a shelf on top to the underside of the shelf I attached a curtain rod system .I added cute boys curtains and pulled to the side with tabs. Added their toys to the shelf and what a look! so cute!
Candi
“Break the tape on all the mirror frames with your finger nail and pinch the frames together as you tape! It worked perfect! Thank you! This was a great idea!!” HUH?!?!?! I am not comprehending this at all.
heather
@Candi, there’s a paper backing on the mirrors, so if you break through them you can hold the frames together tightly as you tape them.
Michelle
I just got back to the Dollar Tree and have all supplies needed for this project. I CAN’T WAIT!!!! With the economy the way it is right now there is nothing better than do it yourself projects that involve the Dollar Store. Thank you so much for sharing the details on this project. I will let you know how it works out for me :-)
Inspire Me Heather
What a great idea – it looks beautiful too! I have this linked to my mirrors post as well today, nice job!
Kelly H
I did this project and it turned out fantastic! I am moving to a new house and can’t wait to hang it in my living room! Thanks so much for the idea!
Rose :: Fine Craft Guild .com
great idea, could use ikea mirrors for this… love how the double frames make it look like a window pane. i do believe that an outside rim would further add to that ‘window’ feel. and with another layer of cardboard in that, it would strengthen the whole. anyhow, just a thought..
Karena
Heather this is amazing!! I love how this mirror turned out!!
PS most local frame shops will cut you a piece of foam core to size!
I hope you can make it over for my $100 Soft Surroundings Giveaway!
xoxo
Karena
Art by Karena
Emily
I do not have these mirrors available where I live so I have to order them online. I only want 9 mirrors for the project and from the looks of it you have to order a minimum of 36 mirrors for $36 and I definitely do not want to spend that much on mirrors when I only need 9. Is there a way I can order only 9? Help?!
Emily
OH also it looks like your only option is to get assorted colors. I just want 9 black ones. Is that possible?
heather
@Emily, if I were you I would just order the 36 and have them delivered to your local Dollar Tree (free shipping). While you’re there, open the box, pick out the mirrors you need, and then return the rest at the register before you leave.
Otherwise, no, you can’t order only 9 of them.
jessica
Really cool.. idea* it might help if you tie the ribbon or wire to the already there wall hooks on the back, before you put the foam back on. And @ heather.. if you try and return the other mirrors all dollar tree will do is give you in store credit… I know mine and the surrounding area ones do at least.
Sharon
Great idea!! For more variety you could also tape over the mirrors and spray paint the frames for another look!
Def going to try this project!
Brenda
Just a note about returning items at your local Dollar Tree. They only offer store credit and not cash back. Just something to be aware of if you want to return the frames.
Tammy
I could not wait to do this project and bought 12 mirrors. I had no idea where I was going to use this mirror; I just wanted to make it. However, my mother needed a mirror on her mantel, so she bought 12 frames also. When we got to her house, we measured her mantel and decided that we needed three rows of five mirrors turned horizontally.
I gave her three of my mirrors and I got started. Here is where the problems started. I broke one of the mirrors by putting pressure on it, but I had to throw away 3 mirrors because I pulled the frames apart trying to get to the broken one. Good thing that I had extra mirrors. The next problem:15 MIRRORS ARE NOT STABLE! Foamboard would not hold the mirrors securely. Now the mirrors are under the bed, and we are going to get a piece of quarter-inch plywood cut. We will then glue the mirrors to the plywood. Wish us luck. If I had it to do over again, I would find my measurements by just laying the mirrors out and then having plywood cut. I would then spray paint the edges of the plywood black and glue the mirrors directly to the wood one at a time. Yes, the plywood is going to add to the expense, but such a large mirror with the measurements needed (we are working with a vaulted ceiling)would be hard to find and expensive. Like I said before, WISH US LUCK that this mirror turns out okay.
crystal
What is cork board? What is it located with in the store?
Bonnie
To make the frames more stable you can: after taping one row of mirrors together…bend them back and put hot glue between each frame then open it back up before it dries. After doing each row, tape your rows together then bend them back and hot glue each column together. Then put your foam board, cork board, ply wood or what ever you end up using on. I think that will help make it a little more stable. I can’t wait to try this project. Thanks
Tammy
Thanks. I did use hot glue, and that is the reason my frames came apart as I was trying to get to the broken mirror. I have not had any wood cut yet,so the giant mirror is still under the bed. I promise I will get to it, oneday, someday, sometime. However, I did use my remaining six mirrors to make a mirror and it was a breeze. I have yet to hang it, but I will get around to that also.
Bri
I actually have some of these mirrors in brown on hand from the dollar store! But I don’t like the brown sooo I’m going to cover the mirror to protect it and spray paint the edges maroon to match my curtains :)!
Sandra
This is an awesome idea. I have a large wall on my livingroom and did not know what to do with it. Im going to try this and see how it comes out :-)
Julia
What dollar store were the mirrors found? We have a lot where I am from. Family dollar, loopys, dollar tree? Dollar general?
Julia
What dollar store were the mirrors found? We have a lot where I am from. Family dollar, loopys, dollar tree? Dollar general?
heather
@Julia, At Dollar Tree.
Nadia Cano
I just went to the dollar tree..im doing it right now and i keep thinking “there is no such a thing as too much tape” im soooo happy thanks for the idea!
Susan @ Oh My! Creative
Very clever! I am looking for some fun crafts to feature on my web site soon…would love for you to submit your mirror!
Susan @ Oh My! Creative
Jennifer
Such a great idea! Please share your projects at http://www.creativecraftsthursday.blogspot.com each and every week and check out what other creative divas are up to.
Shalaunda
Whats foam core? Can you post a picture. Thanks and great idea
Sandra
I bought a few of those mirrors and I had not idea on how to incorporate it in my living room.
Thank you so very much.
esskay
Hello Heather,
Came across this when searching for wall mirrors that will look like windows! Brilliantly simple, much more than scouring for an old window pane, separately placing individual mirrors etc.
However, I would love to make one of these and put it up on the wall. So, was wondering, since it has been over a year since you made it, how has it held up?
Did you hang it up at all?
I have to decide between this simple, and easy on the pocket solution and the more tedious window-pane route. Since, reeling from buying our first home. So, any suggestions will help, to make it sturdy enough.
BTW, am from India, where sadly the do-it-yourself is not prevalent and hence, getting even simple hardware tools such as a glue gun might be a difficult ask!
Greg
Love this idea! I Need some decor for when I get my new place. i just went to the dollar tree and found the mirrors just like you said you could. Reading the comments to have it turn out right . Going to try bending with a finger nail and gluing the frames together and might try the plywood instead of the foam core. I have a new appreciation for dollar stores , who said they just sell junk. Viva Dollar Tree!!!
Beth
This project really work for me! The house I bought had wall sconces EVERYWHERE, previuos owners either loved ’em or got ’em cheap! Anyway, I was able to create a large horizontal mirror and fit it around the sconces by leaving a mirror out of the middle row and butting another set of mirrors next to it. Lovely – it increased the light output from the sconces. Now I don’t hate them as much! Thank you!
Seaside Interiors
Thanks so much for sharing this. I love being able to have amazing little ideas like this on hand! Great job!!
Amanda
Has anyone found these at Dollar Tree recently?? Online says they are out of stock…. Just don’t want to kill myself going to 20 stores just to learn they don’t stock them anymore.
Thanks! :)
heather
@Amanda, I saw some at Dollar Tree this week, but your results may vary!
Amanda
Went to one today and found mirrors but they had a weird thin border… Do you see the ones with the thick border like in your tutorial? If yes, maybe I’ll just try different stores! Thanks!
heather
@amanda, mine had the thin black border — once you attach the mirrors together, the inner borders look thicker. Hope that helps.
Amanda
The ones I saw had borders that were shiny and rounded. No all black ones, but some gold, and some half black and half gold. Kinda eighties and not what yours look like in the pics….
RL
Tried this and it didn’t work for me at all. The glue ate into the foam board so my husband tried liquid nails and it wouldn’t stick either. Not sure what I did wrong. The instructions were pretty clear. I just gave up and used mirrors for something else.
heather
@RL – Maybe substitute cardboard for the foam core board.
Devon
They make a glue just for foam board that will not eat through it. Home Depot sells it in a tube that you can use with an adhesive gun.
http://www.homedepot.com/p/t/202020476?langId=-1&storeId=10051&catalogId=10&N=5yc1vZ4ck&R=202020476#
Lisa @ Charlie The Cavalier
Very smart! I want to try this now.
Alice Crawford
IF YOU GO TO HOME DEPOT OR LOWES YOU’LL FIND A MATERIAL THAT IS MADE OF WOOD, IT’S PROBABLY 1/8 TO 1/4 INCH THICK. WISH I COULD THINK OF WHAT IT’S CALLED BUT BE ASSURED, IT IS A WOOD PRODUCE AND WOULD WORK A LOT BETTER THAN THE FOAM CORE…AND IT’S CHEAP!!
NanCee Maynard
I used 9 mirrors duct taped them together and then laid them on used scrap floor underlay /plywood to get correct size. I cut quarter round molding same height at frames to fit securely (nailed/ liquid nails ) around mirrors on three sides, I put some glue down on plywood slid the mirrors in , finished up with last piece of quarter round. Viola. Secure. First time, I rag painted the frames for “aged look” and used old rope around the edges with enough rope at top to hang, turned out very well and gave it to a girlfriend.
heather
@NanCee – that sounds amazing! I would love to see a photo of the finished product!
Betty819
Stephanie…I had to laugh at your comments because I was a carpenter’s daughter and you didn’t dare touch Daddy’s tools, especially his hammer.
Even if he didn’t see you use it or if you think you laid it exactly as you found it, he always knew and boy, the cussing would start! Now I’m sure he didn’t have just one hammer, you would have thought he’d assigned me my own hammer so I wouldn’t have messed with his..Oh well, he lived to be 93 and his mind was still as sharp as a tack despite the stroke he suffered 3 weeks before his death.
Brenda
I’m waiting on my E6000 glue to dry, has anyone tried this glue on thick cardboard from a appliance box? Would like to know how it held while hung on a wall. I love this high class projec with the low price. Thank You For Sharing This beautiful piece.