
Thanks to Amy for guest posting once again for Dollar Store Crafts! She is an amazing crafter! – Heather
This is Amy from Mod Podge Rocks, and I’d like to present to you my decoupaged bud vase. Why did I make it? The truth is, I really wanted a cute bud vase. Sometimes my Mod Podging is out of necessity. What I love about this project is that it only cost me $1, which is unusual. I typically don’t have everything on hand, but I did for this project, and I bet you do too. The elements are simple and the results are simply fantastic.
Project Estimate:
- Small round glass vase, $1
- Scrapbook paper – 1 sheet, on hand
- Orange ribbon, 12 inches, on hand
- Gloss Mod Podge, on hand
- Paper flowers, on hand
- Buttons – five coordinating, on hand
- Craft glue, on hand
- Paint brush, on hand
- Pencil or pen, on hand
- Craft knife and mat, on hand
- Ruler, on hand
Total cost: $1 and up
Time Needed: 2 hours
To Make:

- Here’s the vase before: very plain. Before you work with glass for decoupage, you should always wash it thoroughly to remove hand smudges and oil. Dry completely.

- The first thing you are going to do is trim the paper. Yes – you are jumping right in! My vase is about 8 inches, and I wanted to have a border on the top and bottom. So I trimmed a 7 inch strip of scrapbook paper. It’s really easy. Just measure 7 inches on the top and on the bottom, and then use your craft knife to cut it.

- Now you have a strip of scrapbook paper that fits the vase vertically, but the paper is too long horizontally. You only need about 1/4″ to 1/2″ of overlap where the paper meets. What I did is roll the vase in the paper and mark where I was going to cut it.

- Then I went ahead and cut it. Note my pointy thumb to stabilize the craft knife. This is not required.

- This is where the party finally gets started! Grab your Mod Podge and start smearing with the paint brush. You are going to put down a medium-thin layer, and don’t be afraid to get the corners well. You want the paper to adhere.

- Now that your paper is covered in Mod Podge, the easiest way to get the paper onto the vase is to set it down on there and roll it. If you need to add more Mod Podge as you roll in areas that you missed, that would be okay. Roll carefully at the end so the paper meets just right, and make sure you are rolling tightly to avoid wrinkles.
Once the paper is on, start smoothing with your fingers. If Mod Podge comes out the top or bottom, it’s okay. Just wipe it away with your fingers or a paint brush. Wipe it on your husband or children. Kidding! Allow to dry for 15 – 20 minutes.

- Coat the entire outside of the paper with Mod Podge. Just go up to the edge of the paper, and maybe a little over onto the glass – we are going to cover with ribbon anyway. Let dry for 15 – 20 minutes and do another coat. Let dry.

- Time to accent with ribbon. Grab the ribbon and wrap around the top of the vase. Make sure that you have a 1/4″ to 1/2″ extra like you did with the paper. Cut the ribbon. Cut another piece of the same length for the bottom.

- Glue on the ribbon. Place a thin bead of craft glue around the top, then press the ribbon down. Seam the ribbon where you did the paper. Smooth with your fingers and wipe away any excess glue. Repeat for the bottom.
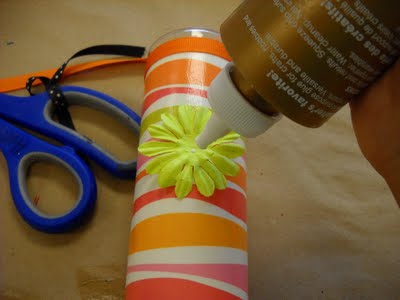
- You are at the finish. Grab the flowers and start gluing them down. I layered the flowers and worked my way around the vase. I have five layered flowers because my vase is small. You’ll want to use more for a bigger vase. When I was done gluing the flowers down, I glued buttons in the middle.
Did I mention that I’m obsessed with buttons?
That’s it – you’re done. I’m so proud of you. You now have a bright and cheery room decoration. Allow it to dry for 24 hours before using. Stick your flowers in it and go!


7 Comments
Paul Overton
Nice! That is one colorful vase!
Shana
love it! A set would make a GREAT gift!
Mod Podge Amy
It’s one of my favorite projects ever! I had so much fun making it – so quick.
Rachael
Very cute idea. A great way to custom design a perfect event. Thanks!
Tina
I totally went to the Dollar Tree just to get a vase for this project today! This was super easy and quick and will make a great gift! Thanks! Here’s mine:
http://christinashaw.com/wp-content/uploads/2011/04/2011-04-27DIYVase011a.jpg
OR
http://christinashaw.com/wp-content/uploads/2011/04/2011-04-27DIYVase016a.jpg