Still looking for a costume for your little one? Look no further than this quick and easy firefighter costume, that can be made with clothes you already have on hand. Add some duct tape in bright yellow and shiny silver, and you have a great last-minute costume for less than five bucks. I made two costumes with a lot of duct tape left over. You can use the basic duct-tape-on-plain-clothes concept to create many different types of costumes, as well, so if you’re thinking of another kind of costume, consider using these techniques to create the look you want. They’ll work for adult costumes, too!
Project Estimate:
- Duct tape, yellow and shiny silver, about $3 each (big box store) and up
- Foam letter stickers, $1
- Shirt and pants, on hand
- Scissors, on hand
- Goo Gone, $1 or on hand
Total: $7 (will make multiple costumes)
Time Needed: About 30 minutes

The Clothes:
We just used stuff we had on hand. I originally envisioned using black clothes, but we had a lot of navy blue available, so we went with that instead. I happened to have two navy blue polo shirts in a hand-me-down box. The shirts were about two sizes too big, which works really well to evoke an oversized fire jacket. The shirts were short sleeved, so I added long sleeved navy t-shirts underneath. For the pants, we used navy blue sweatpants and a pair of navy linen slacks. For the jackets, you can also use long-sleeved collared shirts, sweatshirts, t-shirts. Many different colors will work for a firefighter: red, black, yellow, golden brown (Carhartt work clothes color). Don’t be afraid to mix and match pants and shirt colors, either. Black pants will work fine with a red or yellow shirt, for example. And once the duct tape accents are applied, nearly anything you use will work just fine. Plain t-shirts and sweatpants will look just as good, I think. You can google for inspiration images for reference.
Duct Tape:
You can adjust the duct tape colors to coordinate with your clothing colors. If you have a yellow shirt, you might want to use black or red duct tape stripes. I really like the effect of the shiny silver duct tape, so if you can get it, I highly recommend it. If you can’t get it, try white or standard dull gray, or just skip it altogether.
A Tip for Cutting the Tape: If you clean your scissors with Goo Gone (or similar) before you cut the tape, it will help keep the tape from sticking to your blades as you cut. Clean off the blades with Goo Gone every few cuts to keep your cuts sharp and clean. This is optional, but will make your project much more pleasant! If you squirt a small amount of Goo Gone on a paper towel, you can just keep using the towel over and over. Also, if you don’t already own Goo Gone, it’s a great tool – it removes sticky sticker/price tag residue off of anything. You can get a tiny bottle of GG at the dollar store for a buck. (FTC, I didn’t get paid for this – I just like Goo Gone!)
Applying Duct Tape: When applying duct tape to fabric, keep the fabric stretched as flat and taut as you can when you apply the tape.
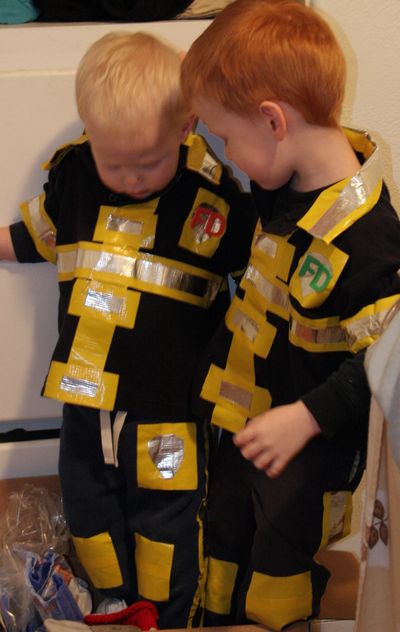
Apply base color stripes of duct tape around the collar (just cover the part that shows when it’s folded over), the sleeves, the chest (extend this stripe all the way around the back). Add 2″ strips of duct tape down the center of the garment for “fasteners” (even if your shirt is a pullover shirt, like our polos). Make sure to leave buttons undone if you have a polo shirt because the shirt gets a bit stiff with the duct tape stripes on it, so you want to leave wiggle room for the kid to get in and out of it. I also added a square patch to the left chest for a badge. Add a stripe down the outside of each pantleg, and squares for kneepads if desired. I also used a square of tape to cover up a logo that was on the top left leg of the sweatpants (I just added another badge there).
Cut silver tape in long lengths down the center of the strip. I measured out the length I needed for each stripe, attached the end to the table, then cut a short cut in the other end of the tape, held the end with my fingers and slid my sharp and Goo-Goned scissors down the length of the tape (kinda like you do for wrapping paper). Add the narrow silver strips to the base stripes. For the badge, cut a rectangle of silver, and then cut a rough heart shape (pointy at the bottom), but instead of making the top of the heart shape go down like a heart, just leave it flat in the middle. (The Goo Gone is key here, when cutting a specific shape from the tape!)
Duct tape doesn’t stick that strongly to clothing, so you will be able to easily remove the tape after you’re done with the costume. This also means you might want to keep your kiddo from wearing the costume until the big night (this will be hard, as they will want to play, eat, sleep, and live in them once they’re done!).
Finishing the Costume:
Add letter stickers to the back and badge, if desired. I put “FIRE” on the back and “FD” on the badge. My letter stickers only had one F in each color, but two E’s so I cut the second E into an F for the FD.
Finish off the costume with a pair of boots (rubber boots or snow boots will work fine!). Add duct tape stripes if desired. Black shoes will also work. Just use what you have!
I also purchased costume fire helmets from the dollar store, and firefighter accessory sets (mostly just because my three year-old really wanted a cheap plastic hatchet!). So total, I spent about $10 for two costumes.
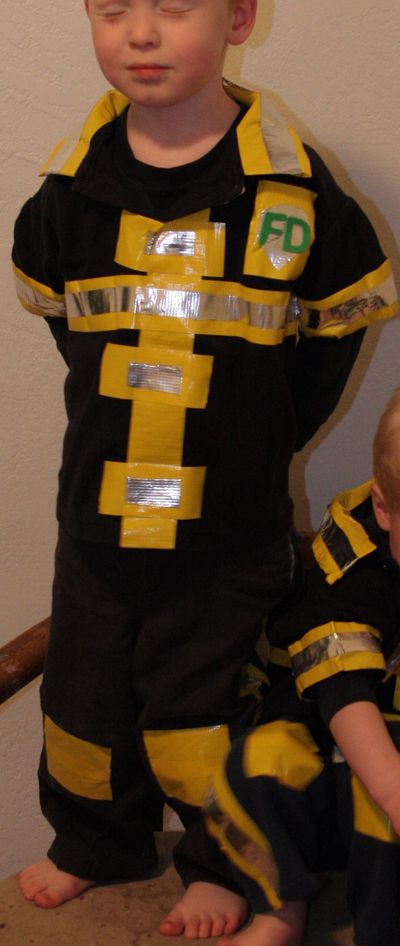
Sorry for the terrible photos! It’s been rainy and super dark in the Pacific Northwest since I made these costumes, and my sons didn’t want to cooperate when I was photographing them (this is my three year-old “smiling” for me!) These look really cute in real life. The kids and the costumes. :)


8 Comments
babyblooze liz
Clever girl, you are just too much!
Rachel
That is so creative! Thanks so much for the fun idea, I’ll be linking.
Jennifer
I have the same problem photographing my littlest one. Love the idea.
Kathy V.
Another winner Heather!
Pepper
That is great!! What a great costume!
Sister Diane
I am giggling my head off. This is brilliant! I may use duct tape to accent my Daphne (Scooby gan) costume now. Thanks for this!
Heather@EnviroMom
Love it! This is so clever! And I hear you on the dark Pacific NW days — it’s been impossible to get good photos!
Vone
Very cute. My girls are the same with the photos – never co-operate.