Thanks to my friend Lee, one of my top five most inspirational crafty peeps, who wrote this awesome tutorial. You don’t have to do any sewing (well, you do need to sew buttons on with a needle and thread, but anyone can do that — no experience required!) Check back next week for another no-sew scarf project by Lee! – Heather
By Lee Meredith, leethal.net
Plain fringed scarves are so common and cheap, but what crafter wants to wear a plain scarf like that? By adding some fun vintage buttons from your stash, you can convert a simple scarf into a cool scarflet or buttoning cowl-type accessory—so much better! I’ll show you a few different ways of constructing your new neckpiece, but depending on your particular scarf size, you may need to make some changes to make it work. Play around with what you have to work with and feel free to stray from my methods and turn it into your own design!
Project Materials:
- A scarf with fringe, $1
- Buttons (as many as you want to use), on hand
- Needle and thread
For this project, there’s no cutting involved and no machine sewing. If I ever decided I wanted to return this scarf to normal scarf mode, I can snip the buttons off, untie some knots, and have an unharmed scarf. This might be important to you if you have a scarf you really love and you don’t want to risk destroying it. But if you want to take any of these ideas further and break out the scissors and sewing machine, go for it!
 |
My first version was made with a scarf measuring about 4.5 feet by 6 inches. |
Buttoned Cowl:
To check if this style will work well with your scarf, fold the scarf in half and put it around your neck like this:
|
If your halved scarf overlaps like this around your neck, it will make a great scarflet! |
So if it’s a good size, keep it folded in half, and tie the fringe together. Start at one end, tying the end fringe strands from each scarf end to each other, then work your way up, fastening the two ends of your scarf together.
|
Tie the fringe of one end of your scarf to the fringe on the other side, one knot at a time. |
You should now have a tube, which you’ll flatten out and treat as one piece of fabric, with the fringe on one end.
|
If you want to embellish your scarflet further, you could sew the long edges together with a contrasting thread. |
Next, turn some of that fringe into your buttonholes. Decide how many buttons you want to use, and count the fringe on your scarf. Figure out how to evenly space the buttonholes, and tie pairs of fringe to each other again, but with the new knots at the tips. Each buttonhole will be a pair of fringe strands, one from each end of the scarf, tied together once at the base and again at the tips, forming a loop.
|
The easiest way to make a knot at the tip is to tie it more in the middle, then tighten it from below in the loop center, moving the knot to the top. |
Once you have your buttonholes, lay out the scarflet the way it will close around your neck, lining up the edges the way you’ll want it to fit.
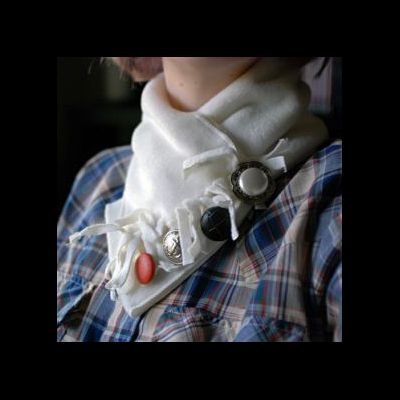
Now all you need to do is pick out your buttons and sew them on! I chose all shank-type buttons because the loop buttonholes fit around that style better. If you want to use sew-through-type buttons, make sure they are big enough so the loops won’t slip off easily.
|
Big, fat shank buttons like this vintage orange one work great with the fringe loops. |
Try on your new scarflet and admire the extreme style improvement with that small amount of work! And, of course, adding some extra embroidery, appliqué, topstitching, or any other embellishments of your choice would personalize your neckpiece further!
|
I love using huge, mismatched buttons! |


10 Comments
Jessica H.
So clever! There were like a billion of those fringed scarves at my Dollar Tree the other day. Pretty soon my car is just going to start driving itself to the dollar store since I go there so often.
Sister Diane
That fringe-into-buttonholes bit is freaking genius. Thanks, Lee!
Jessica
Cool idea!!!
Mariela
I LOVE THIS IDEA!!! I’m going to Dollar Tree today! :D Thank you so much!
Rachel
This is such a fun idea, I love it! I can’t wait to make one. I’ll be linking as well. Thanks so much to both of you!
The Everyday Minimalist
That is incredible. What an awesome idea :)
I feel like trying it now with my fringed scarf
FSGinger
To make this even MORE no-sew, my dollar store had some of those buttons that are meant to expand a waistline on pants… basically just buttons you pin on… 8 in a package for just $1. That made this whole project just $2 and TRULY no-sew!