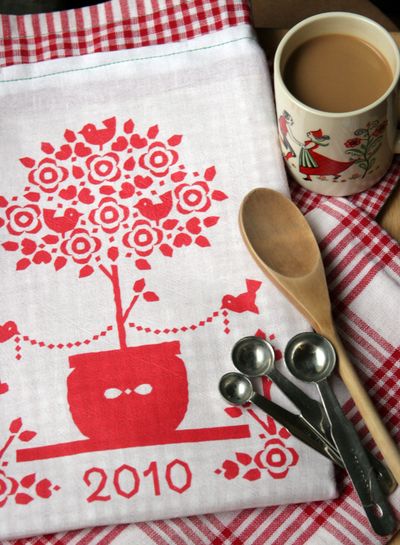
I am so excited! I love those old tea towels that have calendars printed on them, and I thought, hey, we can make one of those on Dollar Store Crafts! And then I thought, and you know who would design a FABULOUS calendar? Cathe Holden from Just Something I Made, that’s who! I first became aware of Cathe’s genius when I somehow stumbled upon her reverse-painted sign tutorial, and it totally blew my mind with its awesomeness. Then I found out that all of Cathe’s amazing creations are equally mindblowing, and I became an instant fangirl! So, I approached Cathe with my tea towel calendar project idea, and to my delight, she agreed to design the calendar!
So, I’m going to give you the instructions for making your very own 2010 tea towel calendar, and Cathe has graciously provided the accompanying printables on her website. She’s also provided a printable card graphic that matches the calendar, so your gift and card will be all coordinated! So head on over there and download them, then get printing and make some calendars. These will make amazing hostess gifts, gifts for co-workers, grandparents, or anyone who needs a little gift. The cost is pretty low per piece, and you don’t have to do much hands-on work to make a great-looking handmade gift.
Click here for Cathe’s 2010 Blog friends calendar printable
UPDATED: Download Printable for 2013 Calendar: Free Printable Calendar for 2013
Project Estimate:
- Flour sack towel or stash fabric, $1 or on hand
- 2 Iron-on transfer sheets, about $1 each
- Patterned tea towel (optional), $1
- Dowel (optional), $1
Total: $2 and up
I got iron-on transfers at my local big box store in a package of 6 for about $7.50. They are slightly less expensive if you buy a package of 12 (about $15).
You can use one flour sack towel to make two calendars (you’ll cut the flour sack towel in half, and then hem the edges), or you can use one flour sack towel calendar sewn on top of a colorful towel. I used a red and white gingham towel. It’s not very difficult, and it looks great!
When you place the calendar on the towel (prior to ironing), remember that you will be folding about 1″ over on the top to make a channel for a dowel (if you’re using a dowel for hanging).
Also, remember to iron your flour sack towel well before you begin. Because of the loose weave on the dollar store flour sack towels, the fabric isn’t very stiff and has a tendency to stretch and get wonky (see photo below for an example – the top hem is crooked!). Pins are your friend!
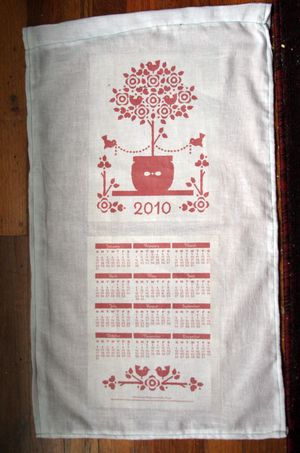
To make plain flour sack towel version:
- Cut flour sack towel in half, if desired.
- To make the channel for the dowel: Fold top of flour sack towel over approximately 1″ from top and pin in place. Sew across the pinned area, about 3/4″ from the edge. This is where you’ll slip the dowel through when you hang the calendar. Skip this step if desired… thumbtacks will work fine for hanging the calendar!
- Print out the printables onto regular iron-on transfer sheets and follow manufacturer’s directions for ironing.
Printing reminder: Make sure you choose the “mirror” setting when you print them up – so they print up backward, but will face the right direction when ironed on! Also, there are two iron-on sheets, so make sure they are facing the same direction when you iron them on (just in case we have any crafters in the audience who might be related to me and my non-detail-oriented ways!) - Iron printables onto flour sack towel or light-colored plain stash fabric.
- Fold raw edges over, and fold over again. Iron the fold in place, pin, and sew around edges. (I cut the already-hemmed edges off of my flour sack towel so I could hem both sides to match!
If you’re doing the plain flour sack towel version, you’re done!
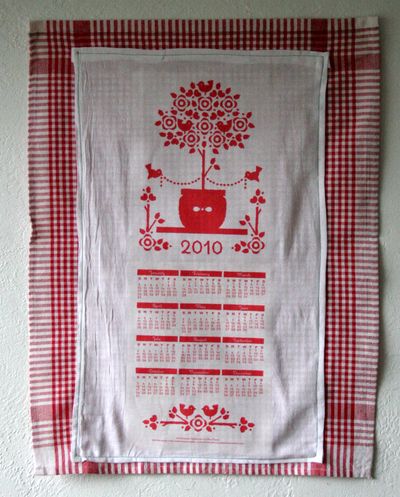
To make gingham dish towel version (steps 1-4 are the same):
- Cut flour sack towel in half.
- To make the channel for the dowel: Fold top of flour sack towel over approximately 1″ from top and pin in place. Sew across the pinned area, about 3/4″ from the edge. This is where you’ll slip the dowel through when you hang the calendar. Skip this step if desired… thumbtacks will work fine for hanging the calendar!
- Print out the printables onto regular iron-on transfer sheets and follow manufacturer’s directions for ironing.
Printing reminder: Make sure you choose the “mirror” setting when you print them up – so they print up backward, but will face the right direction when ironed on! Also, there are two iron-on sheets, so make sure they are facing the same direction when you iron them on (just in case we have any crafters in the audience who might be related to me and my non-detail-oriented ways!) - Iron printables onto flour sack towel or light-colored plain stash fabric.
- Cut flour sack towel down to fit inside the edges of your backing dish towel. Be sure to leave at least 1″ around edges of printed area for folding/hem area.
- Fold raw edges over, and fold over again. Iron the fold in place, pin to backing dish towel. Sew around edges.


22 Comments
Paul Overton
Dude! What a great idea. I have a feeling that many people in the next year are gonna be knocking on Cathe’s door for collaborations. Congrats on being first to that party. Wonderful project!
Kathy V.
What a beautiful project! It opens up doors for all kinds of possibilities with fabric art. Love it!
Care
I can hardly wait to try this! Now I know what Grandma’s getting for Christmas!
Denise
Love, love this what a great idea and gift. I will be doing this for all my sister in laws. I just love homemade gifts.
Denise
Denton, TX
Amy @ Living Locurto
This is so fun! What a great idea. I love Cathe’s design. Thanks!!
andrea
<3 love it!! XX
jenjen
That is just amazing. What a fun project!
XOOX
Jen
Beckie
Thanks for linking up. I loves it. Perfect, and pennywise. Brilliant. Great design Cathe! Amazing idea.
Rachel
FABULOUS! You two are an amazing team! I’ll be linking.
"Grama-Grama"
Am new to this site……..such good ideas….for next Christmas !!!
Ant chance 0f a 2011 Calander ???
Nancy Ward
Hi!
I recently posted an entry on my blog with a link to this tutorial.
I’d appreciate your letting me know if that’s OK.
Thanks,
Nancy Ward
http://paperfriendly.blogspot.com
Juliette
Hi. Just wondering if (I’ve never used iron on transfers before) if they’re okay to wash? Can I use the tea towel as a tea towel (you know, for drying dishes?) Thank you for letting me know. Super design. <3
tiffany
any chance you can get a 2013 calendar? i think this would be great for our secret santa at work… ours is a little backwards, all our gifts are put on a table with our names on it and u draw the name of the person you get the gift FROM! so its hard to make a gift if you don’t know who’s getting it =]
heather
@tiffany, I’ll work on it!
Arielle
I was just curious if you happened to still have the 2010 calendar file for this? I am trying to make a tea/dish towel calendar quilt and am having a heck of a time finding a 2010. I am putting them together for the year my family members were born or ones that my Mama gave to passed relatives for gifts.