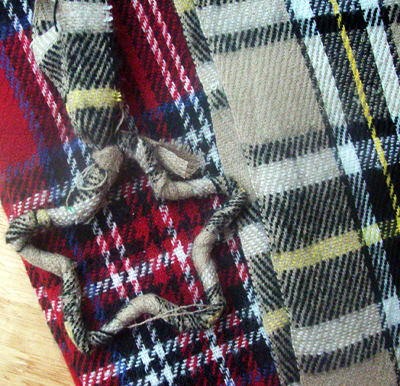
I know you’re knee-deep in breakneck crafting (or planning, or shopping) at this point in the month, but here’s a quick little project just for a bit of fun. These will only take you about 10 seconds to make, and about ten minutes to wrap; they’re fun for kids and adults alike. They were so addictive, I made about ten or so in an evening. I wrapped them with plaid scarves, but you can use anything to cover these ornaments – ribbon, fabric of any type, yarn or thread (crochet around the pipe cleaner, or wrap), etc.
What you need:
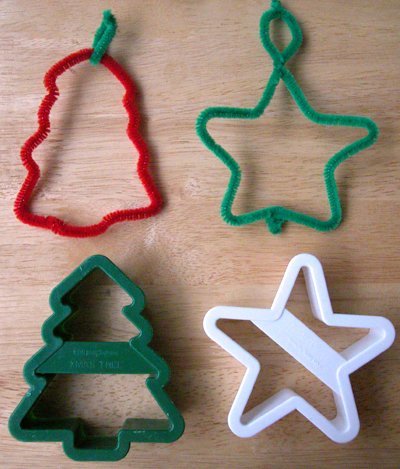
- Cookie Cutters, on hand
- Chenille stems (pipe cleaners), on hand or $1
- Plaid scarf or scrap fabric or yarn, on hand or $1
- Ribbon (optional), on hand
Total: FREE and up
Part 1: Making the Shape
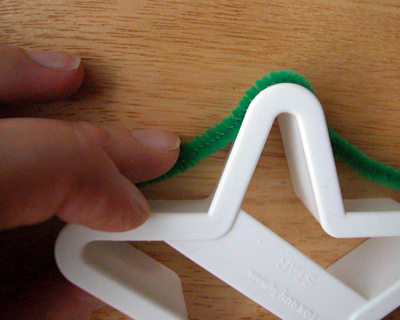
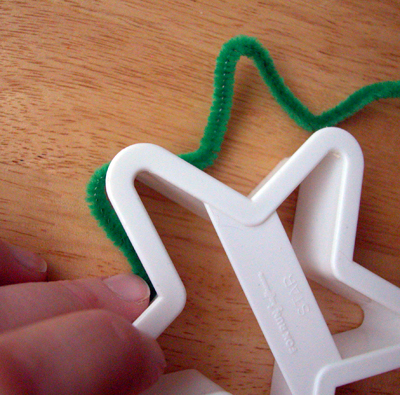
Bend a pipecleaner along the edges of a cookie cutter, paying special attention to each crease and corner of the cookie cutter. When you have bent around all edges of cookie cutter, fasten ends of pipecleaner together to finish shape. Tweak the shape of the ornament, if needed. If your cookie cutter’s sides are longer than one pipecleaner, you will want to start by bending two pipecleaners together.
Cookie cutters with definite corners and angles are better for this project, as pipe cleaners are pliable, even after they’re shaped!
Part 2: Wrapping the Ornament
Cut a narrow (1/2″ is a good width) strip all the way down the length of your scarf. Tie a knot of fabric around the shaped pipecleaner and begin to wrap the fabric around, making sure to cover the pipecleaner completely. When you finish covering the pipecleaner, tie off. Tie a strip of scarf to the ornament for hanging, or add coordinating ribbon, twine, etc.
Slip the ornament back onto the cookie cutter to give it a little shape refresher (it may have become bent out of shape during the wrapping phase!).
Tie onto a package, and give!
And if you’re the crocheting or knitting type, these look great if you do a cast-on stitch around them.





17 Comments
Gina
Thank you for this! I actually haven’t had ANY time to craft in these busy weeks, but this looks literally like 10 seconds. I’m excited to make some!
Amy's Stocking Stuffers
These are wonderful! I can just see a whole tree covered in them, with a few different (but coordinating) colors/patterns. Thanks!
Sarah
These are so fantastic! They’re a simple craft for kids to do, too!
Wendy Piersall
These are seriously AWESOME!!! :)
Christine
I love these ornaments! They look so easy and fun to make.
Thanks for the idea and happy holidays!
Christine
Julie
Oh I love these. I’m suppose to be making a couple more totes for the daycare kids Christmas gifts but I just don’t want to sew today. I can see me making a couple of these. They’d be so cute on a present especially since this year we aren’t buying gift wrap, we’re recycling newspaper and stamping on that. Thank you for sharing.
Have a very Merry Christmas!! God Bless you and yours.
Nora
So cute! Gonna make these with my daughter! Would it work to wrap the pipecleaners first? Or would that make them too stiff to bend. It just so happens I got pipe cleaners tonight!
YelliKelli
Darling! I might just do this as a quickie at our Christmas Party crafting class today! Good Stuff!
Anne Weaver
Thank you for sharing this tutorial! This looks like a great craft to do with my daughter one day after school, instead of having her parked in front of the TV or climbing the walls.
I featured your tutorial on Craft Gossip Sewing:
http://sewing.craftgossip.com/tutorial-no-sew-wrapped-fabric-ornaments/2009/12/15/
–Anne
Vicky
I love this tutorial! I’m rubbish with seweing so I was looking for something easy and cheap to do without requiring neat sewing skills.
Can’t wait to try it!