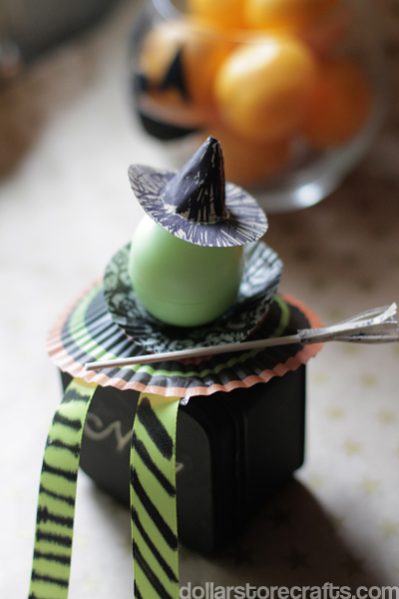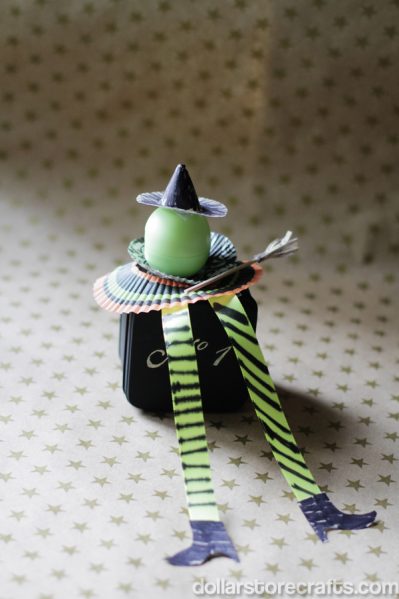
If the broom fits, fly it! This cute little witch is a sweet party favor – present it to a teacher, friend, or co-worker for a Halloween treat. This is an intermediate Halloween craft – not hard or anything, but it’s a tiny bit more fussy than my usual designs. There’s just no way around it – when you’re making a teeny witch hat, you have to fuss just a tad! Oh, and please congratulate me for avoiding the “witch craft” pun!
This Halloween craft features EOS lip balm spheres, which I like because they aren’t your typical sugary treat, and are a low-priced “nice” gift. I think they will make good teacher thank you gifts, and cost less than $3 each to make, which I think is a bargain.
Supplies: If you don’t want to use EOS spheres, how about blown eggs or candy-filled plastic Easter eggs? If you choose to use blown eggs, follow the instructions at The Artful Parent: How to Make Blown Eggs. You might have to get really lucky to find plastic Easter eggs this time of year, but maybe you have them in your stash! I left my egg faceless, but you could glue on googly eyes or draw a face on with a permanent marker.
Materials:
- Cupcake liners in Halloween designs, $1
- Card stock, on hand
- Bamboo skewer, coffee stirrer, or twig, on hand
- Ribbon, on hand or $1
- Scissors, on hand
- Glue (hot glue or tacky glue), on hand
- Clear tape, on hand
- 1 egg – I used a green EOS sphere (honeysuckle honeydew), about $2.78 at Amazon: EOS Lip Balm
Total: about $4
Instructions:
To make witch hat:
1. Trace a 2” circle on card stock. We traced around a small drinking glass. Inside the 2” circle, trace a 3/4” circle (we used a quarter as a template). Cut circles out. You should end up with a doughnut shape.
2. Trace a second 2” circle on card stock. Cut it into a half-circle. Form half-circle into a cone shape and secure with glue or tape.
3. Put cone inside doughnut’s hole and tape cone to brim (on the inside of the hat so the tape is concealed).
4. Put a bit of tape on the inside brim of the hat to stick it to the egg. (I used tape because I wanted the “costume” to be fully removable from the EOS sphere. If you are using one of the other egg options, you could just glue the hat on).

To make broom:
1. Cut a 1×2” rectangle from card stock. Cut fringe on the 2” side of the rectangle.
2. Trim bamboo skewer to 4” (or use coffee stirrer). Dab glue on one end of the skewer, then place on the wrong side of the fringed card stock. Roll card stock around skewer to form a broom. Secure with glue or tape.
Assemble the witch:
1. Flatten two cupcake liners so the decorated side is printed side up.
2. Trim around edge of one cupcake liner. Glue trimmed cupcake liner to top of the other liner to make the witch’s skirt.
3. Put a bit of tape on the bottom of the egg and place on top of the skirt.
4. If desired, add ribbon legs, taping to underside of the skirt. Draw and cut shoes out of cardstock, and glue to the ends of the ribbon.
5. Place hat on top of egg.

Note: I drew stripes on the ribbon and the ink bled. Craftfail? Maybe! What do you think?
Also, for more stability you can cut a cup from an egg carton and decorate it, then set it on top of the skirt. It will keep the egg from going AWOL if it is going to be moved around a lot.
Disclosure: I received this lip balm from the EOS company in order to make crafts with. They hired me to create crafts for them (for their own use), but I was not paid for this post. The links in the article are Amazon affiliate links.


2 Comments
Daedre
Haha! I read the title of this post and immediately thought “egg-wich” like the breakfast sandwich. Not quite the same thing!