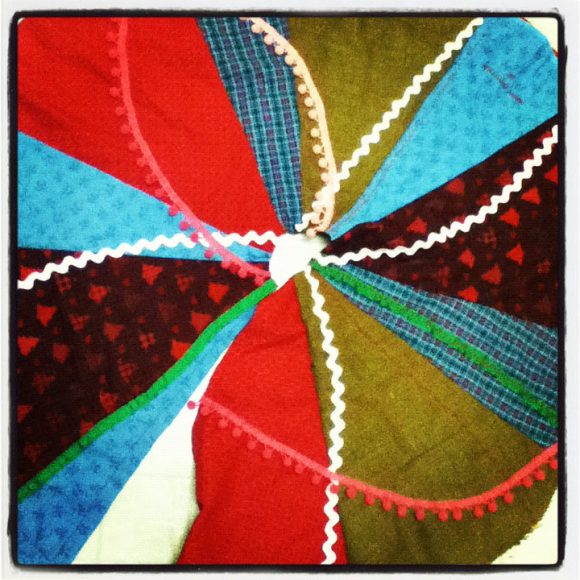
 I have had my own home for thirteen years, and I have never owned a Christmas tree skirt. Well, that’s all gonna change this year, my friends, because I just made myself a new crazy patchwork tree skirt! It all started with a felt tree skirt I got at the dollar store, which I combined with some custom overdyed Christmas fabric, burlap, ric rac, ribbon, and crazy pom-pom trim.
![]()
RIT Dye sent me a 10 pound box of dye — their full line of liquid dyes, 25 colors! I am the proud owner of an insane amount of dye now, and you can be too! I’m giving away the same package to one lucky commenter. Giveaway details at the bottom of this post. The sweepstakes is now closed! Congrats to our winner.
But back to the tree skirt! Let me tell you how I made it.

Overdyed Patchwork Christmas Tree Skirt
Project Materials:
- Dollar store tree skirt, $1
- 8 pieces of stash fabric (at least 24″ long and 12″ wide), on hand
- Rit Liquid Dye, 2 colors (I used Scarlet and Aquamarine), $3.99 each
- Assorted trim. on hand
- Sewing machine, thread, scissors
- A piece of leftover gift wrap
Total: $9
For this project, we are going to use stash fabric. You know you have some! I used four different Christmas fabrics that I had on hand. You can use any fabric, of nearly any color. The beauty of using the Rit Dye is that when you overdye the fabrics, they become color coordinated. This is a great way to use up fabric you don’t like anymore, or make coordinating fabric out of odd scraps.
If you don’t have any stash fabric, you could use old clothing (men’s cotton dress shirts would provide a lot of fabric), or flour sack towels from the dollar store.
The Rit Dye Liquid Dye line has 25 colors to choose from, but you can also mix your own color (over 500 colors, including this year’s hot fashion colors) using their ColoRit Formula Guide.
Step 1: Over-Dyeing the Fabric
You need to read all the instructions that come with your dye. The instructions below are an overview of my process, but do not cover everything.
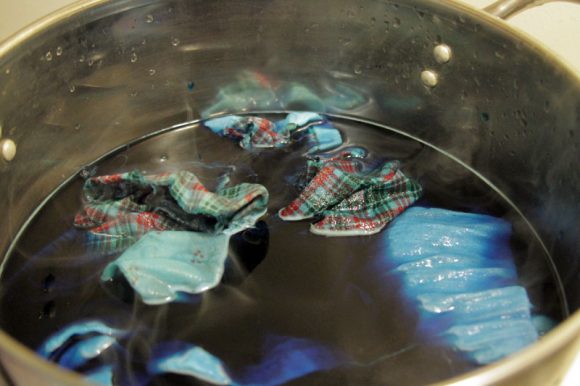
1. First, launder your fabrics if they have never been washed before. You don’t have to dry them because you’re just going to toss them into some dye anyway.
2. Read all instructions and determine how you are going to dye your fabric (in the washing machine, in the microwave, or in a pot on the stove). I chose to dye my fabric on the stove because it seemed like the most self-contained way to do it.
3. Use a pot that is only for dyeing or crafting (don’t use it for food after you have used dye in it). I have a 5 quart stock pot in my craft stash left over from my soapmaking days.
4. Heat up water on the stove, then shake your liquid dye and add your desired amount. Remember, it is better to add less than you need at first, because you can always add more later.
5. Let it cook in the hot water until the fabric reaches your desired shade of color. Remember, when it is wet it will appear several shades darker than the final result.
6. Rinse fabric out in cold water until rinse water runs clear.
7. I laundered mine in the washing machine (cold water) after this.
Step 2: Sewing the Tree Skirt
It’s been awhile since I designed a sewing project for you! If you are afraid of sewing, this is a great beginner project (you only have to sew straight lines, and no finishing needed!). If you refuse to sew, you can do this project, but just use hot glue or fabric glue to attach the fabric pieces to the tree skirt. Cover seams with ribbon or ric rac.
The basic process for sewing the skirt is sewing fabric “pie pieces” to a piece of stabilizer — we are going to use the dollar store tree skirt as a base to sew our fabric on top of. This will provide a template to keep the tree skirt, well, looking like a tree skirt, and it will also add body to the tree skirt so it’s a double layer of fabric. The process is similar to the one I used for these crazy quilt blocks. The good news is, felt is easy to sew on!
Make the Pie Piece Pattern
First, let’s make a template for our pie pieces.
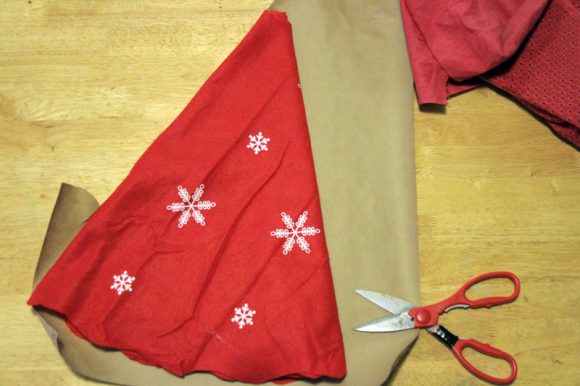
1. Fold your dollar store tree skirt into half, half again, and half again. This will give you a shape that looks kind of like a pie piece, and should be roughly 1/8 of the circle of your tree skirt.
2. Using a piece of scrap wrapping paper (I used thicker kraft wrapping paper from the dollar store), Cut out a paper pattern for your pie piece.
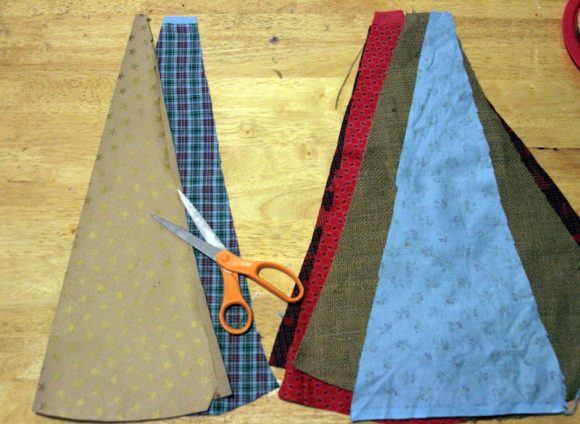
3. You need to cut 8 of these pie pieces. Some of my fabric was too narrow for these pieces, so I folded the paper template in half so it looked like a 1/16 piece of pie.
Whatever the width of your pie pieces, you need enough to add up to one complete pie!
I ended up with 6 regular pie pieces, and 4 skinny pie pieces. I ended up needing another little skinny piece at the end of the skirt, too… so it was a 1 & 1/16 pie!
Sew the Pie Pieces to the Base Tree Skirt
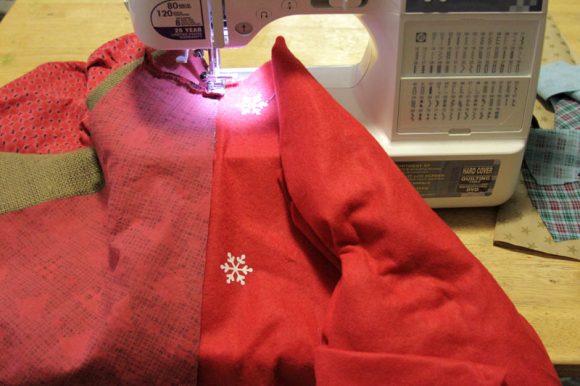
1. Lay your dollar store tree skirt base out flat on your work surface. Lay your first pie piece down, right side UP on top of the skirt, matching edge to edge. Sew a seam down the edge of the tree skirt.
Because our tree skirt has a deconstructed look, we are just going to leave the seam and raw edge of the fabric exposed.
2. From now on, we are going to be laying each pie piece face DOWN on top of the previous piece, and then sew the new seam, then flip the new pie piece over. And repeat until the skirt is completely covered with fabric pie pieces.
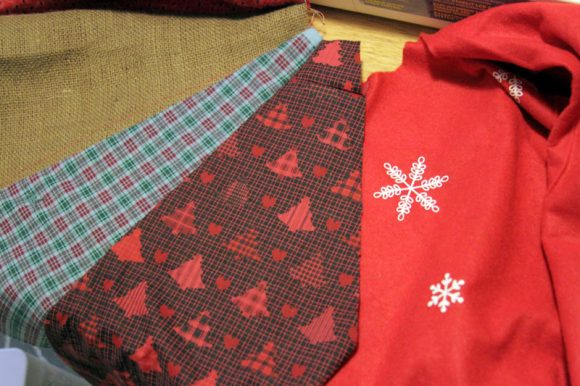
This is what it looks like after you have flipped the pie piece over so the good side is showing.
Because the burlap pieces were so stiff, I flipped them over, then sewed them down before sewing the next piece on. You can see the red thread showing from where I sewed it down. I thought it looked cool.
3. At the end of the skirt, when you’ve sewed all the pieces on, sew a final seam down on the edge of the tree skirt.
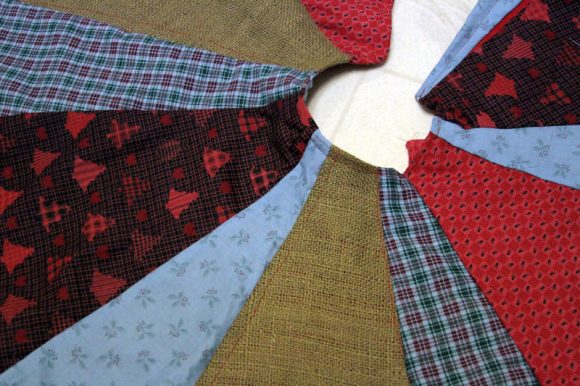
4. I also folded the “waist” part of the skirt over and sewed a topstitch just to make it look a little more finished, but you don’t have to do that. You can leave it as is, or trim it with pinking shears.
5. You can also topstitch around the bottom hem of the skirt if you like.
The skirt looks pretty good just like this, but I was so excited that the project worked exactly like I imagined (no craftfails!) that I kept going and added a bunch of crazy trim.

Whenever you do get done with the skirt, be sure to iron it!

I added a little machine embroidery, too. I added a couple lines of decorative stitching, and also “Merry Christmas 2001.”

I added crazy stripes of ball fringe. All in the name of stashbusting, I assure you!

My little model helped me get the right shot.

I had to go to my husband’s office to use their Christmas tree to get a shot of the skirt in action. (We don’t have our tree yet!). This one looks like a 1970s craft book, I think!
Dyeing this Christmas fabric was just the beginning. I have been dyeing everything that isn’t nailed down since I did this project. I have dyed tea towels, t-shirts, doilies, and some PJ pants (they were so loud before I dyed them – turquoise with hot pink peace signs! I would have LOVED them in 4th grade.)
Dye Resources:
- RitDye.com – tons of craft projects and dyeing inspiration there.
- Rit Dye Color Community on Facebook
Rit Dye Liquid Dye Giveaway!
Our giveaway is now over! Congratulations to our winner:

So, who wants to try their hand at dyeing stuff? Thanks to my sponsor Rit Dye, I am giving away the ENTIRE LINE of Rit Liquid Dyes!
One lucky reader will win 25 bottles of Rit Dye – 1 in every color available. To enter, answer this question: What would you like to refashion using Rit Dye?
1. You must comment on this post to enter to win.
Giveaway open to United States residents only, 18 and older. Ends on Thursday, December 15th, 2011 at 11:59 PM. Full rules here.
Disclosure: This post was sponsored by Rit Dye. All opinions are 100% mine.




125 Comments
Christine Miller
This is a great idea; thinking of making curtains for my house with a similar technique; we have a very eclectic paint job in our living room/kitchen; this would be a great way to spruce things up just a bit. I love these ideas. Our color scheme is perfect for a crazy looking quilt idea, and since we are on such a low budget, i have the perfect stuff to use. Thanks for the inspiration, and I would love to try dying fabric to make it work even better.
Gloria
I have a few projects on my to-do list that require dye. I’d be so happy to win this!
Garnet
I’d dye some white sheets so then I’d have fabric in various colors so I wouldn’t have to buy.
Robin (rsislandcrafts)
I would love to play with some dye to make a new tree skirt :) Such a great idea!!
Liz
I have a few shirts that ive been saying I would dye for a ling time!! And with new baby due in just a few weeks I have lots of projects to do plus I really want to do the tree skirt!!
Shannon
I would like to win this because I have projects that I would love to color coordinate. What an awesome prize!
Seeks
I have some sheets that I thrifted that I can’t wait to due and use for various sewing projects. In particular, a quilt for our bed.
Sue K.
People know I sew, and are always giving me fabric they don’t want – a lot of it is really great, but some is dated looking, or downright ugly! I confess to having a (small) drawer of ugly fabric, and it never occurred to me to over dye it and make it coordinated! I’d love to have a good supply of dye to rehabilitate my ugly fabric drawer!
Lauren
Yellow Rit dye is on my craft store shopping list, but I would make good use of all the colors!
Dawn
I have two 5-yard pieces of fabric I bought, thinking they were truly white, but they aren’t, so I couldn’t use them for the project I was planning. I would cut them, dye them various colors and make a quilt!!
Wendy
I love the tree skirt, and love using Rit dye! I would start with socks. My kids have a million white socks, and hardly any in fun colors.
Caroline
I would like to dye some fabrics for a quilt.
Dyanna
I have a 2 year old. If that wasnt enough lol I would use the fabric die to play around with her play clothes that have stains that refuse to come out!!
michelle
I have dogs and love reusing old denim to make them covers for their beds, and covers for our couch pillows that can stand the constant washing. I would love to try dying the denim lots to make scraps from different pairs match better on a single project. I would use it for all my fabric scraps from which I cut and use for projects for my 3 kids or as embellishments on recycling projects.
J. Hill
I would love to dip dye some curtains for my kitchen!
Jennifer S
If I won the RIT Dye, I’d refashion some hand me down girl’s clothing that isn’t quite the colors I would choose for my girl’s complexions.
Crystal Rood
I would refresh some clothing. Make some interesting fabrics to use for the grands clothing….
Thanks for the opp!!!
Elly
I’ve got a stack of things in my pile of clothing to refashion that desperately could use some dye! (pale pink is not my best color to wear…)
Seneca
I love this project. I have stash of fabric just waiting to be overdyed. I would love to experiment with the dye for quilting projects.
Shawn
Have a handbag, that I love, that (although the fabric has held up well structurally) is quite faded from being washed so many times. I would love to try dying it – maybe one of these boxes would be just the right color! thanks for the giveaway!
Lily
I would love to dye my bedset to give it renewed life! Everything is black and white now. Dying it would be a great way to do something new cheaply.
Lu Peters
What a great idea to change diverse fabrics and trims to a coordinated look! The tree skirt looks easy. Thanks for the tips!
Daedre
I have some plain fabric that I’d love to dye and turn into curtains for my living room.
Natalie
I’d love to introduce my kids to a faux batik with a leftover white table cloth, some white glue and these dyes! Thanks for the great giveaway!
Aj
I would love to dye some tanks to have as undershirts, and also some baby onesies for my little girl.
Rebecca H
What a wonderful idea. I really need to make a tree skirt NOW! :)
Merry Christmas!!
Stephanie N.
I would love to dye my curtains and rugs a different color.
Thanks!
Stephanie
NJ
Love all your creativity! Been a huge fan of Rit dyes forever. Used them for all sorts of things, especially tie dye. I bought some wooden beads that I’d love to dye.
Jessica
I have the remaining 2yards of fabric from my moms original wedding dress which was lost. The fabric (from 1975) has stains on it. I’m hoping to dye it and make a keepsake quilt.
Lela l. m.
My kids clothes! All boys and while the material is good the color fades & this would allow me to do that.
Christy
I have some stained sweaters that I’d like to try dyeing another color.
rebekah montague
I love, LOVE bright whites, as in bath rugs, towels, napkins, tableclothes, kids clothes, ect .. with 3 little girls, who i’m convinced are way messier than boys, all my pretty whites are dingy and stained and ugly. That’s why I love RIT dye. I can just dye, I like the washing machine method, and have a “new” table wear set or a cute kid’s shirt is pretty in a new color. I also used it when trying to find curtains for our floor to ceiling 12 foot windows .. I found cheap panels that were a horrible, weird peachy/melon color .. a couple bottles of RIT and they’re now a lovely sage-y green :D
christie nelson
such a cute tree shirt! I did the same thing with Rit and some older sheets to cover my furniture!
Jennifer
I would like to use the dye to coordinate quilt square colors. I would like to learn to make unique modern quilts in awesome colors!
Leandra
I love this, its beautiful. And who couldn’t use some dye right?
Patricia
I would love the RIT dye package!!!! I work with a color guard and we are always dying flags to get soft gradation of color.
Nora
My grandson dislikes wearing hand-me-downs, and I remember years ago dying clothes from my sister to make them “new” again. This would be a great way to upcycle thrift-shop deals whether it’s clothing, curtains or bedding. It would not only help my daughter’s budget, but would also be educational and entertaining for my grandson. He loves magic, and what better magic could there be than changing the color of your clothes.
Nikki Prindle
I have several friends expecting babies in the next month or so. I have been wanting to buy a pack of white onesies and dye them, but can’t afford to. If i win, there will be a fleet of well dressed babies entering the world!
Heather C
I need some long sleeved shirts and would love to dye some thrift store shirts I have set aside for remaking.
Virginia Burnett
Maybe the question is what I wouldn’t I dye.. I can think of tons of things, like clothes the kids have stained that I can dye for play clothes and still get some wear out of them, some white satin I have that I would love to make different colors for various projects, instead of white, and right now I could really use some red, I have a doll dress I am trying to re do, that is yellow I tried dying it with another product and now it’s orange, Yuck.. I need it to be red. I remember my mother and I dying Wicker Easter Baskets one year Purple, Blue and Pink and fixing up a bunch of baskets for kids at a local shelter, I had lovely hands after that but it was so much fun.. I find it hard to find all the colors of Dye now for some reason, it would be grand to win all the colors so I’ll know whats available. Thank for the chance and your Tree Skirt is Awesome..
Marcie
I have a few shirts I would love to dye, maybe make a tie-dye shirt for my son. Oh some kitchen towels too! The possibilities are endless!!!!
Krista
Thanks for hosting this awesome giveaway! My daughter put “red rit dye” on her Xmas list so I had to give this a go! She is a 12 yo fashion designer and she makes clothes and designs for both people and Blythe dolls. I am not sure her intended purpose for the red rit dye that she requested but I can only imagine all the things she would do if she had this whole set! I think this would be a wonderful
oportunity for her to try all kinds of methods to dye fabric. If we had all the colors we would definitly share with our friends too!
thanks again,
K
shevy
i just dyed 2 skirts in my sink with the liquid dye and i love them. the liquid dye is so easy to use now i have the urge to dye everything!
Tee
What WOULDN’T I dye with Rit Dye is the question I have for your question. Because it’s so cheap, I use A LOT of muslin for my crafts. I have to paint almost everything I make for my shows. With the dye, my work would be cut in half.
I’m giddy at the possiblities!
BTW, did you know that Rit Dye can be used on wood?
YUP
Teresia
Wow! I had no idea dyeing could turn out so cool. I have a large amount of yardage of material that has a faded streak down one edge of where it wrapped around the bolt :(. Couldn’t bear to part with it, but now I’m having visions of the possible resurrection of it for a great project — and a tree skirt is top of the list. Thank you !!
Tara
Oh my the possibilities are endless…My daughter’s bed sheets could be redone. My curtains, lots and lots of crafts, clothespins…my mind is racing now! I would love to win this!
jessicac
If I won… I want to go t-shirt crazy! I have been wanting to make some t shirt necklaces and t shirt yarn, and the white yarn I have made so far is too boring!
Dawnll
I love your skirt and the over dyeing. How fun
I would love to play with colors-I am always changing altered projects I make-there are so many things I would enjoy trying fabric, wood and everything in my way..lol
BMackey
i would use the same technique but for my stockings. i have never had a set of stockings for my entire family, and now that i know the baby making machine is done, i really want to make a set.
Holly Johnson
Great idea! I would love to try my hand at dyeing my daughters curtains to match her splatter painted wall, and I would love to try it on a lot of smaller pieces of fabric in all different colors and use them on my board books! Thanks so much for the chance to win such a great prize!
Karla
Maybe this would be a great beginners sewing project for me. Been wanting to learn.. loving this tree skirt! :)
Dana
This tree skirt is super cute! I love to upcycle! Nothing is safe from me in our house. ANYTHING I sew is from old clothing, sheets, etc. Winning the RIT dye would totally help me when I’m digging through my stash looking for that perfect color for my next project!
heidi@thecraftmonkey
Very Cool! I love the way that plaid fabric looks after you dyed it!
Kristina
Ooo, this is gorgeous! If I won the RitDye, I’d play with them in my spray bottles, and see how they react on canvas and paper. Always looking for great spray inks that don’t cost a fortune!
Bonney
I love your tree skirt idea! I have some sheets that I’ve been wanting to dye for the longest time. They need some new life!
Lady
Rit dye is awesome! I love colored tights and have a hard time finding the colors I want in my size. Never fear, white gifts always seen to be available. A little Rit dye fixes them right up. I have red, pink, blue, purple and green in my drawers right now.
Susan D.
I would use it to make alcohol inks and glimmer sprays for crafting with.
Beckie
Over dying dated fabric for a vintage worn look. I love to re-purpose items found in my home or thrift store with tea dye…using other colors would open up a world of new possibilities….let’s see, the bathroom curtains, my favorite blouse with the stain on it, my sons pants with the stain on it… Oh, what fun, I see a “too dye” party in the makings!
Jennifer
I’d probably refashion some clothes!
Monica S
I do lots of different crafts that these dyes could be used for. I have dyed fabric in the past that I just adore. That would be the first but not last thing I would do with these great dyes.
Dani J
I have three messy, messy kids. With money being so tight, I would probably use the dye to refashion some of their clothes (and mine, because you can only wash out kool-aid and chocolate handprints so many times). I’ve got tons of stuff laying around the house that is still questionable looking after laundry day that could use some sprucing up, but I’m just too darn cheap to throw away!
Erin
I would love to try to over dye some fabric. I have some pretty ugly stashed fabric (hey, when it’s a dollar you can always find a use for it) and I also have lots of stained kids clothes that could use sprucing up. Love the tree skirt!!!
Jessica young
Who loves rit dye!? I do, I do!!!!!
Ann
Very cool! My family LOVES to tie dye with RIT. In fact my husband has so many tie dye shirts I recently cut a few up and made scarfs for my kids.
Avalon Marsh
I have never dyed anything before, but it looks really cool. I would like to dye some curtains that I have and maybe a pillow cover or two. I have a feeling I would go a little overboard with so many color choices.
Amber Myers
I would love love love to win!
Keep up the great work!
Jenny
awesome! I would dye thrift store clothes.
Julia DeAngelis
This project is really cute, my christmas tree skirt looks a lot like this one but I had bought it years ago! In reference to the Rit Dye giveaway, I’m in the process of completely re-vamping my wardrobe. Rather than throwing things away and buying new things, I’m all about saving and creating my own pieces. I’m a painter but I can’t help being in love with these DIY projects so I bought myself a sewing machine for my birthday and I’m shrinking things, ripping things and completely making new outfits out of old sheets I don’t used and cloth I’ve found. Whatever I can’t really fix I’ll be donating to charity which I’ve done in the past with clothes that don’t fit. Dye is a main part of this process so winning ever color of Rit dye would help me out immensely! I’ve already used up the bit I had and kind of love the product, so help me out! Happy Holidays Everyone!
-Julia
Alicia A
Expecting baby girl…I want to dye burp cloths/cloth diapers. I also have been wanting to make some ruffle curtains out of our old white sheets but wanted to dye those. LOTS and LOTS of projects! What a fun giveaway!
Jessie
I love how 1970s it looks. Nothing can go wrong with ball fringe!! <3
Catherine
Your pajama pants comment made me snort. ;)
I don’t know that I’d refashion anything – – but I do have an ombre dress idea that I’d like to sew up.
Thanks for the chance & to Rit for a generous giveaway!
Deseree
I’ve been wanting to dye the fabric on my dining room chairs. We given the set, and the color of the seats are just not my taste, they’ve got a great texture that I don’t want to loose, but at an ugly champagne color. I would love to be able to choose a different color for them.
Sherelle
I have this great idea for upcycling newspaper for wrapping papper!
I’m going to dye it, so I would love to win the RIT dyes. And to top it off, I will be using old VHS tape as the ribbon, thanks to a Danny Seo idea from a couple of years ago.
Thanks for the opportunity, love your blog!
Jenna Z
I have a TON of old, soft t-shirts I’ve been meaning to dye and make into new refashioned shirts and baby sleep sacks!
Charlotte Glaves
I LOVE to dye with Rit & this tree skirt is so darn cute! I like to upcycle..& boy do I have the clothes & fabric stash to do it, thanks for all the ideas!
Debra L
I would love to refashion my sheets. I can never find the colors I wan!
Heather R.
There are so many, many things that I could use the dyes for- for starters, half of my wardrobe could use it! Then there’s my kids, and the many, many fabric-based projects that they’d like to do- they’ve been expirimenting with freezer-paper stenciling, and overdyeing really gives bleach-stenciled shirts an extra POP! There’s also old sheets to repurpose, a tree skirt would be great, some home decoration projects that could use a jump-start, including my sofa slipcovers….my entire LIFE would be greatly enriched with a case of Rit dye, frankly!
Thanks for the tute on the tree skirt- I need one, badly. :)
Panya
I can’t find a scarf in the right shade of brown to match a couple of outfits I wear, so I think I’d dye a bunch of scarves!
Aarika
I have a dream to make knotted rugs for all of the kids’ rooms in my sister’s new house. RIT would help a lot!
Melinda W
I love RIT dye! There are some clothes I’d like to refashion and I’d also like to make drapes and runners….
Teresa M
I’d use the Rit dye to make a quilt for my mother. She’s always wanted one based on “You Are My Sunshine,” the song she used to put me to sleep as a baby.
catie
i’d love to dye some faded curtains i have! what a great giveaway!
Silvia
I have some sweaters that could really use some freshing up. Thanks for the giveaway!
Katie
I would LOVE to re-purpose some of my hubby’s worn out dress shirts!
Amber
I have never use RIT Dye before, I’d love to try it out!
Debra
I have so many stained/old/yucky-colored baby onesies that I would love to dye and update! Hope I win!
Beth Anne
I would love to have this product for some quilts I want to make…I’ve used the dye in the past for costumes and they always came out nice
Lulu
The cushions on my patio chairs are looking kind of raggedy. I’d like to refashion them using a gel-glue batik method I read about recently. Rit dye is exactly what I need!
INFUSEDgoods
Oh man, what a great prize! I would dye some wood frames from the dollar store or the thrift store. Then I would just need to think what to put in the frames!
Nancy's Couture
I had never thought to die a Christmas tree skirt! Oh the fun I could have with a bunch of dyes!
Kate Thompson
I would dye my bedspread! One side is red, which I like, but the other is a pastel mustard yellow…. Not bad, but not my thing. I would also dye a bunch of my stash fabric to make coordinating curtains for my dad’s office — poor guy can’t make a decision!
Lauren K
I like to use fit dye to dye onesies to make unique embellished onesies as gifts!
Cindy G.
I have some throw rugs in yellow, brown and white stripes that I’d love to try to overdye! In green, for the first one… I’m not sure what color I’d use for the second one. I’d also like to try the technique on some thrift store shirts. Sometimes I find a shirt in a great style, but the color just isn’t me, so this could be the soultion!
Elizabeth
My teenage daughters and I have so many projects going right now – twine, string, t-shirts, their hair :( , and I am an encaustic painter who has some batik going on as well! Would LOVE it.
Sheramy
I scored several long-sleeve, short-sleeve and sleeveless denim shirts at the thrift store for only $1 each!!!! Now I need to dye each one a different color before I emblish them with embroidery, patchwork, buttons, trim and ribbon. Happy Holidays everyone!
Katie from Sew Woodsy
I love your tree skirt! I’d love to dye a table cloth for the holidays!!!
erika
I like to dye clothespins with Rit Dye. Lots of other projects in mind to.
Amber
I use rit dyes often.
Currently I need to dye a pair of jeans, I often dye shirts because white shirts bore me, I make my own photography backdrops using rit dye. I even sometimes teach a craft class at a nonprofit home for mentally challenged and they love when we get to dye clothing.
Linda A.
I have used Rit to overdye a light beige print sundress. It turned out a beautiful bright peach with lilac print. I have also used Rit to overdye some beautiful floral sheets–they’re a beautiful coral now, and plan to make a summer dress from those. I need more dye, now!
April
I’d love to refashion some clothes, and I’d use the RIt dye to get the fabrics the correct colors:)
steff
id like to makeover some old jeans with RIT!
Sue
I love all the ideas on here! They are to “dye” for! Am a big crafter and would love to have the kit! Merry Christmas to all!
Tokio
I love Rit dyes! I’m currently making sets of shibori tea towels for christmas with them, but I’d love to try a bigger project…i have an oversized tablecloth that I’d love to make more colorful!
Crystal
I would love to dye all various things. I have been into making all the presents I’m giving this out this year and have many ideas using Rit. I remember using it with my grandma when I was a kid to make tie dye everything.
Christie
I want to make more tie-dye onesies!
Bev
It would be fun to experiment on different tea towels, and to brighten up old white t shirts, socks, etc… loved the tree skirt idea, and Love the Dollar Store!
Rachel
I want to teach my 3 year-old the joys of tie-dying with RIT dye! Aaah, the girl scout camp memories come flooding back…
GM
Tie-dyed stockings would be awesome!
sandy
I have some old t-shirts I’d love to dye!
Amy
What a fun thing to win!!! I would re-fashion the curtains in my boy’s room and spruce up some of the kids clothes! Tie-dye would be fun, too!
Thanks for a chance at winning.
Merry Christmas! :)
Tiffany Watson
I have yards and yards and yards of white tulle from my cousin’s wedding. I plan on making my daughter and another cousin her age tutu’s with some of it but am hesitate with two 2 year olds wearing white!! This would allow me to make them tutus in many, many colors of the rainbow! How awesomely fun for the Princess’ of the family! They’re the only two girls in the family who lives around here under the age of 13 and are both surrounded by all boy cousins or brothers all of the time. My girl is pretty rough and tumble but loves loves loves to wear girlie clothes and absolutely adores the one tutu she currently has.
Tiffany Watson
oh! just to add onto my previous comment because I just thought of this, I’ve been searching for affordable fashion tights for said 2 year old. And WOW can they get expensive!! It would be great to dye some of the ones I found that were inexpensive and make my own!!
Amber Becht
I have a bunch of old clothes from my mother in law that I would love to refashion, the clothes are very crazy 70s shades that need a bit of updating!
Jennifer Roseland
Dyes are fantastice for extending the life of my work wardrobe as I am on an extremely tight clothing budget. Several stained items become like new again in fantastic new colors.
tyler
My curtains!! And some pillow covers!
Carrie
I need the dye to update my curtains and pillow cases! I would also probably tiedye some shirts since we live in Austin,TX and all ;)
RoChele
My little sister has been begging to make some more tye-dye clothing since her art class made t-shirts this year. This would be perfect and just in time for her birthday!
Donna
I have been wanting to try my had at dying for quite a while now. Love this tree skirt idea. Great tute! And it would be great to win the line of dyes. Thanks for the chance.
Rachel
I’d love to finally put some color onto the white canvas curtains in my 4 year old daughter’s room! White + preschooler = recipe for disaster ;)
Heather
I upcycle my kids’ worn out clothing (the stuff that isn’t good enough to be passes on to other kids) into animal toys, which I donate to a local non-profit. I would like to use be able to use all the fabric (minus the worn bits), instead of relegating the obviously stained pieces to the cleaning supply bin. Over dyeing would allow me to turn ugly stains into interesting patterns.
Libby Simpson
Love your tree skirt! I would dye fabrics for quilts and other sewing projects, and I have a tablecloth that needs a new life, and some curtains, and sheets…loads of things just waiting for new color.
Jess P
I want to dye some clothes
Kira
My sister is about to have her third child. Rit Dye would come in handy making those old hand-me-down clothes look like new!
hannah b.
=[ I wanted to enter! I love Rit!