This is a Sponsored post written by me on behalf of iBulb for SocialSpark. All opinions are 100% mine.
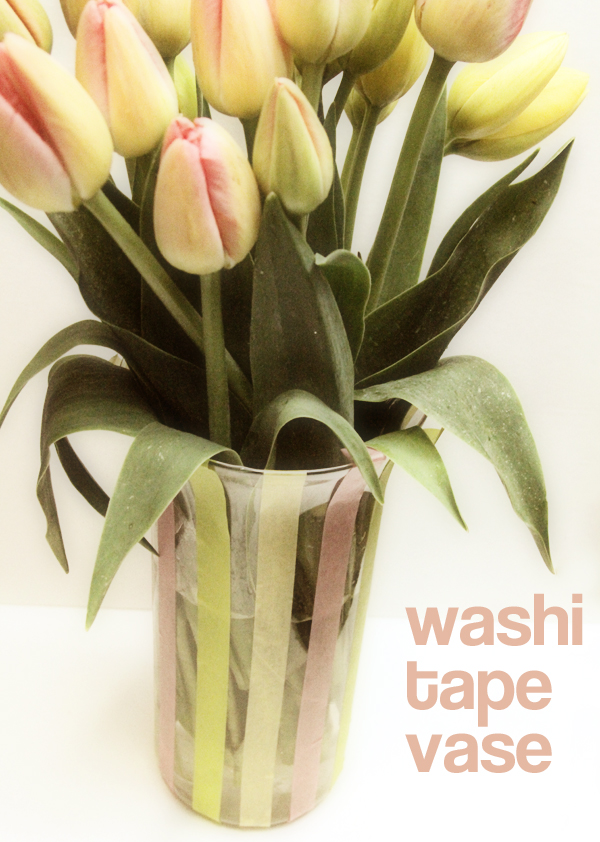
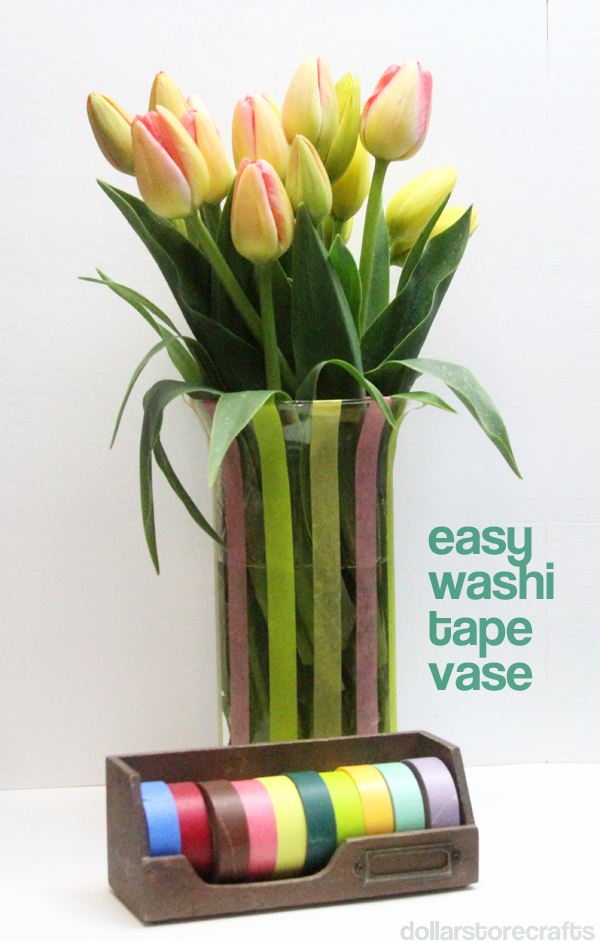
I simple things, like a quick and easy striped vase project, or a pretty bouquet of tulips. But what I REALLY love is taking a dollar store vase and turning it into a visually stunning piece of decor in just five minutes. The key to this clever project? Colored masking tape, also known as “washi tape.”
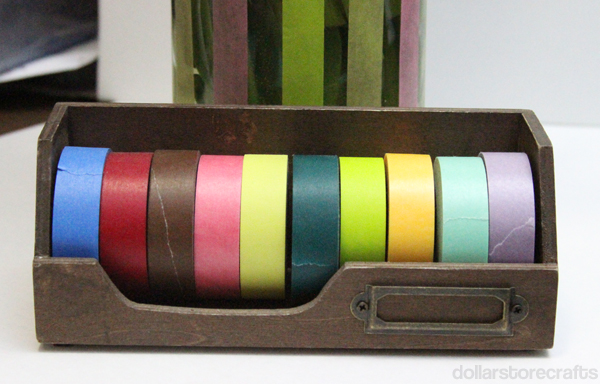
Washi tape is an easy-to-use decorative masking tape that comes in a rainbow of colors, and even in pretty decorative patterns. You can stick it to just about anything for a quick and easy way to add style. And, washi tape is removable, so you don’t have to worry about permanently altering whatever you stick it to.
You can find washi tape at the Japanese dollar store, or on Etsy.
For this project, you will need:
- A large vase, $1
- 3 colors of washi tape, about $2 each
- A bunch of tulips, $7.50
Total: $14.50
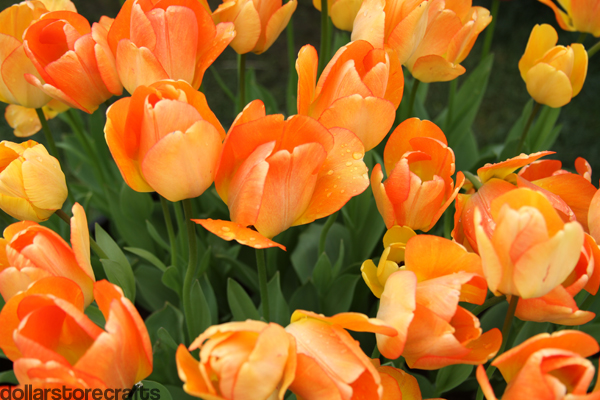
Let’s talk about the tulips! I love this time of year because tulips are one of my absolute favorite flowers. I live in farm country, so I went to the Wooden Shoe Tulip Farm in Woodburn, Oregon and bought fresh-cut tulips.
I went to the farm, but you don’t have to go out of your way to find tulips. You can find cut tulips at your local florist, or grocery store.
I am always thrilled to receive flowers of any variety from the men (and boys) in my life, but tulips have forever been my first choice. At the farm, I had each of my three sons choose a bunch of tulips for me (and then I picked my own as well!)
Tulips are a great gift for your mom or sweetheart, because they stay bright and beautiful for about a week, but there’s no upkeep involved. When I got home, I snipped the ends of my tulips off, and put them in water. Simple.
Speaking of simple, let me show you how to make this easy washi tape vase!
How to Make the Washi Tape Vase:
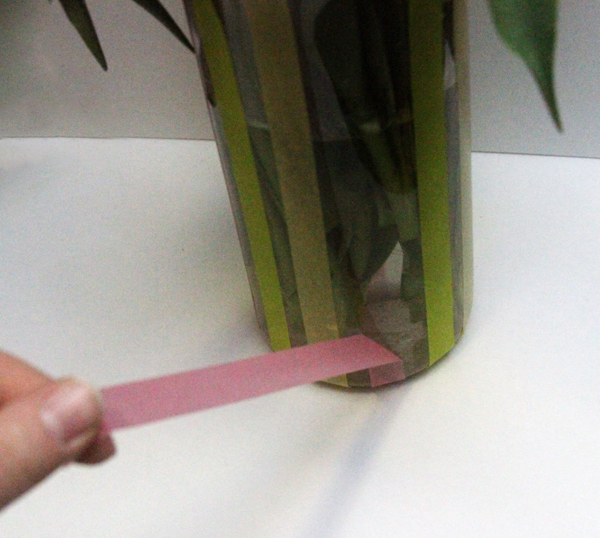
1. Choose three colors of washi tape that compliment your tulip colors. (I used pink, spring green, and orange).
2. Start at the top of the vase with the first color of tape (pink). Anchor about half an inch of tape inside the vase, and then pull the tape all the way down to the bottom of the vase, smoothing as you pull the tape down.
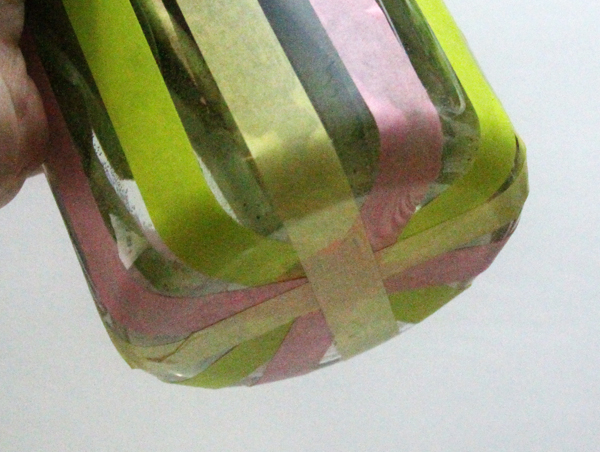
3. Lift the vase, and pull the washi tape all the way under the vase and let it come back out the other side.
4. Pull the tape up to the top of the vase, and then fold it over the edge of the vase, leaving about half an inch of tape at the top to anchor the stripe.
5. Secure the tape over the lip of the vase.
6. Repeat this step with the same color of tape (pink), about halfway between the two existing pink stripes.
7. Fill in the remaining space by taping stripes evenly between the pink stripes.
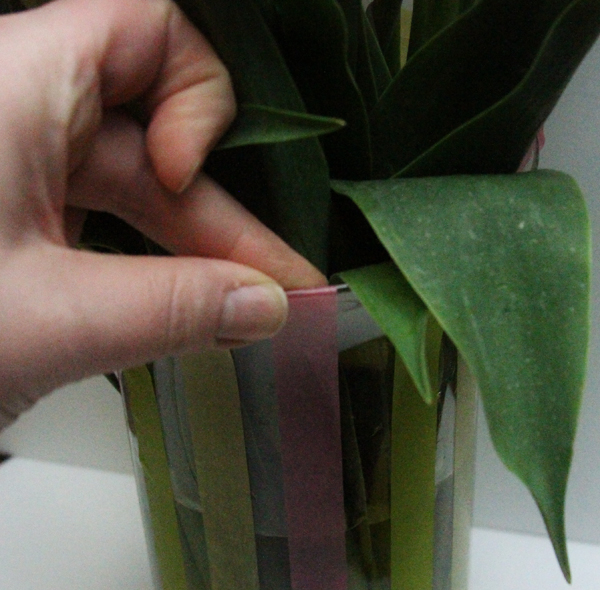
8. Fill vase with water and tulips, and you’re done.
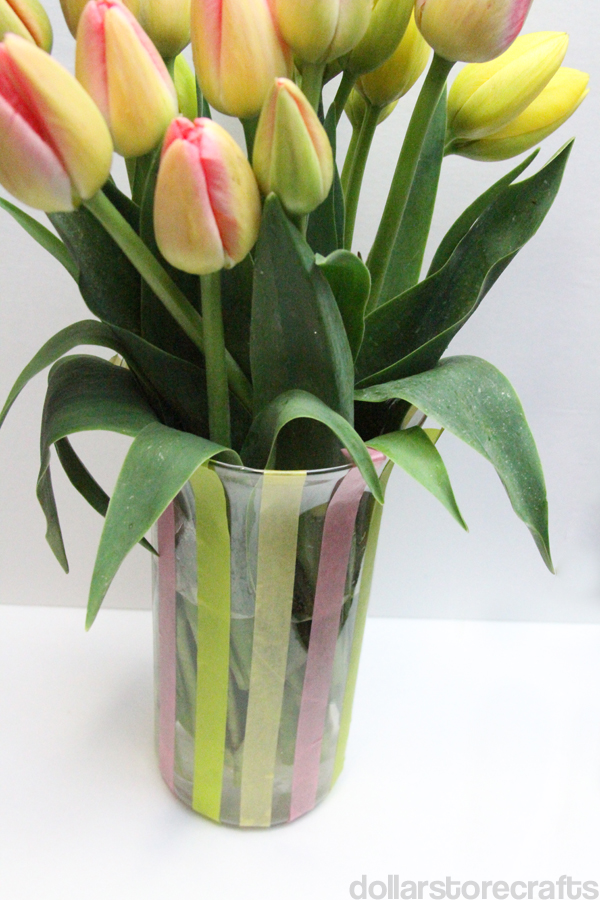
When you’re done with your flower arrangement, you can remove the washi tape or leave it on the vase. With the washi tape method, you can have a custom decorated vase every time you get a new bouquet of flowers!

Gift Card Giveaway!
- 2 lucky readers can win a $25 gift card to the craft store of their choice (Hobby Lobby, Michael’s or Jo-Ann Fabrics).
Method of Entry: Leave a comment on this blog post to let me know what project you would make if you won.
- You MUST leave your email address in the comment (in the email field is fine!) as well as which store you would prefer to have the gift card for (Hobby Lobby, Michael’s or Jo-ann Fabrics).
**IZEA will select the 2 winners at random on May 1, 2012**


109 Comments
Faith K
What a beautiful vase! And what a great giveaway! At the moment, I’m into making things with felt. My little girl hair clips are a big hit. A $25 GC to Joann fabric would go a long way in helping me to keep crafting. Good luck, everyone!
carrie
I would get a nice necklace bevel and chain to put a photo of my children in! Been wanting to make one of those for awhile. ?
Donna
Love Washi Tapes and they are really easy to home-make. A gift card from Jo-Ann would be super. Right now I am sporaticaly working on a wedding album for my grandson. Better get busy as their 1st anniversary is in July I have only 2 pages complete and many in my mind waiting to be put together. LOL
Mary Lou
I would make a keepsake frame with pictures, scrapbooking paper charms and other chatchkies and love for my friend Wanda’s daughter Asecleah’s as a first anniversary present. If I had a gift card I could save my cash for mailing it to her.
Elisha
Those photographs are gorgeous! The tulips look so vibrant, like they are popping right out of the picture!
~*~
If I was lucky enough to win (Michael’s!) I would probably pick up some Modge Podge and fancy scrap book paper to update the top of my desk.
I would also pick up some supplies to help me create those anthro inspired zoo party necklaces you posted a while ago. I loved those!
And finally, you know how you can hang pictures from string with clothes pins? I want to make my own line but with felt stars on it, like a bunting and then I could stick pictures between them.
I have so many ideas!
Andy Muckler
I love washi tape, but where/what is a Japanese dollar store??? And Michaels,please!
Em
I would love to get a gift card for JoAnn’s. I need to recover my dining room chairs that came from
a thrift shop-$25 towards new fabric would be great.
Em
Washi tape is so convenient-I would use it to accent plant pot holders that I have, or on picture frames-
to add a touch of color-so many uses!
Dale
Michaels! If I won, I would be picking up supplies for seating cards for my upcoming wedding. [email protected]
Amy
I love Michaels! And I love this website. I would make the Blowing Dandelion Shirt craft you posted on 4/10/12- I love that design. I would also get some more beads and jewelry supplies to add to my collection!
tammy b
i’d be thrilled to win a gc to any of the 3….i’m in a terrarium mode and it would buy me a container or two!
rachel
I’ve been itching to make a wreath for summer. My house door is looking sad! I’d like a Michael’s card.
Kati
I’d love to get some washi tape! I haven’t been able to purchase any…I’m sure Micheal’s has some! :)
KarenElissa
I’d probably get some drawing supplies, that has been my latest obsession!
Amy
I love your blog. You have such amazing ideas and i learn new tricks every time I read (who knew what Washi Tape was).
If I won a gift card to Michaels I would pick up some soft chiffon and make a pettiskirt for my little 18 month old.
Sarah S
I’d love a Michael’s gift card to help me organize my office/craft room.
Susan R.
This is a great idea for any vase of a simple design. And tulips are my favorites, too! I have a clear rectangular vase that would be perfect for this — all I need is the washi tape! thanks.
Kathrynn
I would like to make a spring/summer wreath for my wall, the one I have up now is a red berry wreath that is more winter than spring.
Aarika
I would use a Michael’s gift card to make stepping stones with my nephews.
jenni cook
i’d love a giftcard to michaels. i want to try making chainmail jewelry, and would love a jumpring mandrel.crimping pliers would be great too! or maybe stamps and ink pads, i’ve been doing a lot of shrinky dinks lately. or a stamp cleaning pad…so many possibilities!
Stephanie
I would love a gift card from JoAnns! I would make scrapbook layouts because scrapping is my passion/addiction :)
Katherine
I would probably make some sort of personalized name art for each of my boys for their room. We are lucky enough to have all 3 of those stores in our city, but my favorite is Hobby Lobby.
Connie | Daydream In Color
I’d love a Michael’s gift card! I can never walk in there without spending money. I’ve been really into jewelry findings lately, so I’d probably spend it on some special ones to make new jewelry pieces for my summer wardrobe!
Sara
This would be awesome to win! Right now I’m trying to come up with some great invitation ideas for my boyfriends 25th birthday in June! This would help me get some inspiration and really get started!
Rose
O so many. I have gobs of patterns to try, to choose one would be difficult.
Sue
Gee, if I won I’d probably do a project involving a frame. The Washi Tape on a frame could be fun. I really like the look of this vase and may give that a shot, as well. If I’m lucky enough to win, I’d like a gift card to Hobby Lobby. Thanks.
Donna
I am new to crafting but I would use the washi tape to make beautiful trivets for mother’s day gifts. I would also decorate my computer keyboard to give it some pop!!! If I owned my home, I would also make wall art. We have only a Michael’s in our area.
Jill T.
I would probably buy scrapping supplies, but I have been wanting to finger paint with my girls… maybe do a hand print project. I would love a Michael’s gift card.
Love the washi vase!
buggalcrafts
Hummm, so many projects – so little money! I’d love to win this and go “sale-ing” which to me is going in and finding as many projects as you can and then staying up for days until you complete them! Who knows what my next project will be until I find inspiration!
Megan
I would go to joanns and probably buy some fabric…. not sure what i would make, possibly a summer dress for myself!
Maureen
Joanns had some yarn I really like so I have a sweater pattern in mind and it would go towards that.
Coleen
I dying to try Washi tape! There are a trillion projects on Pinterest I want to try. But the one thing I would definitely do is use it to decorate plain wood or cardboard boxes. I would definitely want my gift card to Jo-ann’s I love to sew and I would probably do a flat iron case as well as my Washi tape project.
[email protected]
Shannon
I would buy supplies to make jewelry from Hobby Lobby.
Courtney Mac
Would love a gift card from the HobLob; am about to start an overhaul of my sons shared bedroom! Thanks so much!!
Michelle L.
I love how you picked up the tulip colors in your stripes. Great simple-peasy project!
wintu nancy
I would probably want to shop at Joann’s for notions. Am making a number of zippered earbud pouches and need zippers. All those little things you need for projects really add up!
Stefeni
What a great idea! I love Jo Ann’s. I’m expecting a baby so yarn is what I’d buy to knit or crochet little booties or blankies!
Jen VG
I looooove Hobby Lobby… hmm if I had a gift card I would probably buy some card making or cake decorating supplies… oh or some painting stuff, or a some drawing materials…. oh my. lol
Jen VG
Panya
I think I’d get supplies at Michael’s to make some toys for the cat we just adopted! :-)
Jessie C.
I’d like make new pillow cases and get new paints for the living room.
tcarolinep at gmail dot com
love2dream
Micheals. I have been ripping out the vines under my deck and making wreaths out of them. I’d buy some pretty ribbon and flowers to decorate them for different seasons.
Solducky
Michael’s would be great, and I would love to make decorations for my daughter’s upcoming birthday party!
soluckyducky at gmail dot com
Heather
I would get yarn. I’m a knitter. :) Not sure what I’d make, though.
Michelle H.
I’d love to make my first quilt; if I won, I’d buy some great fabric and my first would be for my teenage daughter.
I’d love a gift card to Jo-ann Fabrics, thank you.
MelodyJ
I would make crochet and knitted jewelry.
melodyj(at)gmail(dot)com
Lois
Would LOVE a Michael’s gift card to buy some epoxy for making my own cake stand :) thanks for hosting this guveaway!
Crystal R.
OoOooooooo….there would be washi tape all over everything in my house. LOL I would use it for anything and everything. Hobby Lobby is my store of choice….its the closest…LOL
Thanks
Crystal R.
bowlergirl61(at)yahoo(dot)com
Kat
Wow! Thanks for the giveaway! I think that I would make the anthro inspired ribbon necklace that you recently posted.
Kathy Ekema
I am new to this site…I am DUTCH so I absolutely LOVE the tulips! The vase decor is a nice idea I could use.
Mami2jcn
I would choose Hobby Lobby and I would make a wreath for my front door.
CraftasaurusRex
oooooh I would love a Michaels gift card…i have been wanting to get some of their unfinished wood shelves and use them to make a windowsill garden for my big south facing window…i WOULD just set plants directly on the sill, but i have a Spazzy-Cat-Child who really loves knocking them over, so some kind of containment unit would be beneficial to my plants survival…
Livivua Chandler
I would like to make a mothers day bouquet for my aunt who does not have any children herself. I would like hobby lobby- love that store!
Sarah
I’d love a GC to Hobby Lobby. I’d use it to buy stuff to make some nursery decor projects I have in mind!
Anne H
I would make some cards and Michael’s just expanded their paper crafts areas….its kizmet! :)
Kathryn
I would pick Hobby Lobby and would try the washi tape to make some jewelery projects.
Lora W.
I saw a cute banner that is made with pretty washi tapes. i would make that if I won. My local craft store is Michael’s. Thanks for the giveaway!
Lora W.
imnstitches(at)hotmail(dot)com
Emillie
I would buy sewing supplies! Would love a Hobby Lobby giftcard!
hisprincess886 at yahoo dot com
Jessica Williams
The vases are beautiful! I can REALLY use a $25 gift card to hobby lobby! I am having a beach wedding, then beach themed reception back in St. Louis. Hobby lobby has amazing wedding crafts that will help stretch our small budget!!! Thanks for this opportunity!
anash
i would make some new window decor for my kids room, and i would choose michaels! Thanks for a super giveaway!
Emily Drake
I’d love to win a Michael’s gift card. I want to do a frame wall in my dining room and a gift card would definitely help purchase supplies. Thanks for the chance to win! emily joy drake at gmail dot com
christin
I would love to make my daughter and I matching dresses but cute fabric is so high right now. So I would like for mine to be to HobbyLobby!
Ellen M.
I do some sewing and I’m just starting to quilt, so a gift card to Joann Fabrics would be great – you can never have too much fabric!! Thanks for the chance to win!
AnneK
If I won a gift card, I would pick up a couple of picture frames to hang up some altered book pages that I just finished. I have 3 old dictionary pages with vintage sewing related prints on them for my craft room.
Itala Milan
Awesome vase! I found you on pinterest and can’t wait to try done if your projects’ would love to win a gift card to michael’s. Thanks for the giveaway!
Kylie
Not to be “oh so not original” but I’d make exactly what you show. The Washi tulip vase. I’d more likely chose hot pink tulips and vase with black tape possibly embellished with hot fix clear rhinestones. If I can get my hands on this tape it’s be perfect for the plastic foldable vase sold at DollarTree and to be sent to our soldiers overseas, in a place like Afghanistan ( where my husband just got back from) who couldn’t use a colorful flower bouquet to remind em of home?
Vanessa
I love the vase idea!
If i win the gift card i would love to go to micheals and gt the fabric and little details to fjnish ny daughters bedroom! She is 7 months old and I am doing her room from scratch!
Kylie Hahn
Thats what I get for letting my 2 year old distract me LOL If my family was to win a giftcard, itd have to be Michaels. Ive never heard of Hobby Lobby other than online (reading in blogs) and closes JoAnns is 100 miles away :( But we have a MICHAELS! and its for sure my home away from home….
PART 2 of 2 (unexpectly)
*Part 1 of 2 is within previous posts somewhere.
Ann
Michael’s is my favorite for crafts, Joann’s for fabrics – how do I decide – I think Michael’s has more variety so I will go with them! thanks
linda blanton
I would love a gift card to Joann’s!!! I need some scrapbooking paper and some felt and interfacing. This is a cool idea on the vase, too!
Christal
Love your craft ideas! I would love to win a gift card from Jo-Ann Fabrics. My daughter and I are learning to sew and we would buy fabric!
Nancy
Joann’s, please! Love all your fun projects!
Shana Feggeler
What a great tutorial! I love washi tape but haven’t splurged to buy any yet!
If I won a Hobby Lobby GC, I’d use it to buy materials to make magnetic chore charts for my kids
Or to get items to make stuff to keep them busy on our road trip to Disney! I’m also on a chalkboard paint kick!
Darleen Kurisko
I would love a Michael’s gift card! Kids have only 6 weeks of school left, I’d love to get some summer craft supplies!
Joan Kruse
It’s hard to say exactly which project I would make because I am currently in charge of the church’s craft table for the fall Holiday Market and I am always making something for the sale. I would choose Joann’s because they are closer and have fabric. I have made fabric toddler balls, baby diaper changing pads, bracelets, aprons, microwave potholders, snowman sidewalk salt containers and many other items. As you can see, most of these require fabric.
Kim
I would make a painted frame and some beaded bracelets with a Michael’s gift card. What a beautiful vase you made. Thanks for the chance to win.
Pamela Murray
Well gee…I guess I better be making something for Mother’s Day but what?! I bet a $25 gift card to Michaels would help!
Rhadonda
I have not tried Washi tape yet, it looks fun so i am not sure what i would try but your vase is awesome. Thanks. Hobby lobby is all i have in my area.
Gayle
I would love to win a gift card to JoAnn Fabrics. I practically live there anyway and have been wanting to try my hand at some scrap booking projects. I would buy some paper punches. Love your blog and seeing all the wonderful items you share.
Nicole H.
I just got some 12×12 albums and would love to buy some clever inserts – my twins think all pictures of them exist only digitally. I think i would pick Michael’s only because I buy so many different supplies there! Thanks for the giveaway!
Tammy C
I think my mom would love the tulip vase idea. If I won, I would want a Hobby Lobby gift card. Thank you! [email protected]
Sonia
I love the great ideas you share for making things out of inexpensive items! What a great idea to use washi to decorate things. We always want to have things that coordinate in our homes, whether in decorating or storage, or whatever. This tape could just be an answer for someone! Thanks for sharing.
Jami Cobb
I’m wanting to make some appliqued onesies for my soon to arrive daughter, so I would pick Joann-Fabrics! Jadco123 at gmail.com
Cynthia
Cute! Living on the tight budget that I have, $25 to Michaels would definitely help with my Christmas gift/crafts!
Marie
I would love a Joann’s or michael’s GC. I would buy some of this neat tape.
Thanks!
Marie
Shellie
I would love to buy some microfiber fleece to make a no-sew blanket for my 83 yr old grandma. She loved the one I made for my son!
Thanks!
Marlene
My first great-grandson is due in June. A gift card from Jo-Ann Fabrics would be put to good use, so many wonderful things to make!!!!!
jane denny
Would love to win, I’d head to Michael’s to buy jewelry supplies!
Rox
Hobby lobby would be my choice. I am into making my own cards!
Love this simple vase idea!
Kathrynn
I think I would make the Washi Tape vase or a quilt so a gift card from Jo-Ann Fabrics would be great.
Roberta
I love your site. I would like a Michaels gift card to make more jewelry for the soda bottle jewelry holder!
Rhona
I would love to try Washi tape for decorating plain gift wrap. Michael’s would be my gift card of choice.
Stephanie
I really want to make something using chalkboard paint. I’d choose Michael’s for my gift card. Thanks for the giveaway!
Savannah
I have been making a lot of friendship bracelets, I would like to add studs or charms to them.
Love the vase, I really need to get some os that washi tape.
Anastasia Allen
This is such a neat idea. I’m going to look for this tape here in Alaska :) If I got a (Joann’s) gift card, I would use it to buy more materials for my daughter to make bracelets for charity with. She loves the environment and were making bracelets to sell this summer to help animals and the environment. We’re still picking out the charity because apparently you have to jump through million hoops in order to say the money is going to a specific charity and using their name!!! The materials are getting pricey, e-bay is helpful, but getting some free materials would be wonderful!
Kristi
I bought some old stools that I am wanting to spruce up. I am going to paint them and then add a nice fabric too the seat. I would like to get a Joanns Fabric gift card since fabric is so expensive. :)
Chrissy
Just discovered your site, I love it! I’d like the Hobby Lobby gift card to make napkin rings! Hoping to make a set for myself and my mom for Mother’s Day. Thanks for the chance!
Kathy
If I won a Michael’s gift card, I would love to make tons of polymer clay projects!
Amanda
I love this vase idea! I’ve always wanted to work with washi tape.. I’ve been seeing it everywhere and it looks super easy to use.
I’d love a GC for Hobby Lobby. I just got hitched and I have a bunch of thank you cards to make! <3
kendra leeworthy
Some more fabric from Hobby Lobby! Summer is upon us and my son is requesting an endless supply of shorts and pajamas :)
Teressa Cope
Thanks for hosting the give-away! I would love to win a GC to Hobby Lobby! I would use it to buy t-shirts, fabric paint and stamps to use in a fun school’s out project for my boys. Love the site. Thanks, again.
Ellie
I would make my own photo canvases with styrofoam! I could really use some materials from Hobby Lobby!!!
Nina
hi i just stumbled upon washi tape ideas over at my bff pinterest …… No other friend Ive ever had gave me so many ideas like pinterest in luv… But I hadnt really heard of this tape and I begin to explore and stumbled upon your sassy vase … I want to grab some of this tape asap watch out kids m ommy has a new obession brewing …. Im gonna make a craft room in my house its a empty room in the basement Im so excited it jsut dawned on me that I had that space to make my own so I would use the Michaels gift card towards the making of new creative space …thanx for sharing your creative ideas with all us dyi junkies ..
Nancy
I would love to make a vase, similar to yours! Washi tape is so much fun to use in mixed media projects. I shop at Hobby Lobby-maybe too often!
Jan Hawkes
Where I live there are no Hobby Lobby’s but I’ll be in Texas and Kansas soon and I know I can find one!
Lately I’ve been experimenting with steampunk designs. I just love the recycled Victorian look. That’s where my gift card would go!
Jenny
I would make anything metal related. I really getting into this upcycling thing!
Michelle C
I need some “art” prints for my newly painted living room walls!!
Viviana
Jo-ann Fabrics, definitively! I don’t have many fabric stores around here, and well, my hubby’s birthday is coming up soon and I would love to make him something special!