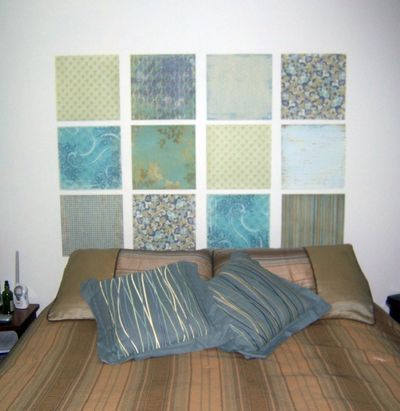
Reader Jessica H. has done a lot of great dollar store crafting, including this neat mosaic headboard she made for her bed inspired by Alexa’s Mosaic Wall Installation, a project featured on DSC in April. The reason I’m showing you this particular mosaic headboard, though, is because Jessica modified it to make it a little more sturdy by adding peel-and-stick linoleum tiles to the scrapbooking paper, which I thought was a neat trick! [click here for Jessica’s photo album of dollar store crafts]Jessica says:
I used 12×12 scrapbook paper ($0.50-$1 ea.) and $0.28 linoleum tiles from Home Depot to make this “headboard” for our room. Just peel off the backing from the tiles, stick on the scrapbook paper, and nail to the wall! Cost: Less than $20
I have seen this type of linoleum tile in packs of four at the dollar store, too! You can also sometimes find scrapbooking paper in packages there, too, so the cost could end up being even lower than the estimate here. But because you are dealing with decor (and matching your bedroom), it might be more cost effective and make you happier to choose the individual sheets of scrapbooking paper at the craft store so you can get something that really coordinates well.
Project Estimate:
- 12 sheets of 12×12 scrapbooking paper, $.50 each, $6 total
- 12 linoleum tiles, $.28 each, $3.36 each
- Nails, on hand
Total cost: $9.36


11 Comments
pam
This is a totally cool idea! The thought occurred to me that you could make this usingold, vintage family photos (protected of course) or even an ever changing group of favorite scenic or travel or seasonal images! I haven’t worked out how but I bet YOU can!
KatherinaAlfonso
Sometimes it’s really that simple, isn’t it? I feel a little stupid for not thinking of this myself/earlier, though.
Mariela
I am about to move into my first home! And I’ll be making this for my guest bedroom! I already bought the scrapbook papers I want to use! I’m so excited I can’t wait to finish the room!
Jessica H.
I am glad you guys liked this idea! I had a lot of fun putting it together.
I finally started my own blog and will post this idea there soon.
madincrafts.blogspot.com
Kelly H
I’ve done something like this in the past. I took apart a pretty calendar of black and white photos of Paris. I just stuck them on the wall with photo mounting stickers. It didn’t stay up long, but it’s a great idea and I’ll try it again (maybe with different papers like the example!) with better mounting. :)
ms t
i actually used printed computer paper that i taped together into 6x 16″ squares. total cost: less than $0.28! i don’t understand how putting peel-n-stick tiles on the back make the paper sturdier as the paper is still on the top & unprotected? did you use mod podge or something?
Susie
I’ve done this before and while it’s a great idea and works for awhile unfortunately the glue on the tiles starts to eat through the paper. My clever wall art had to be taken down.