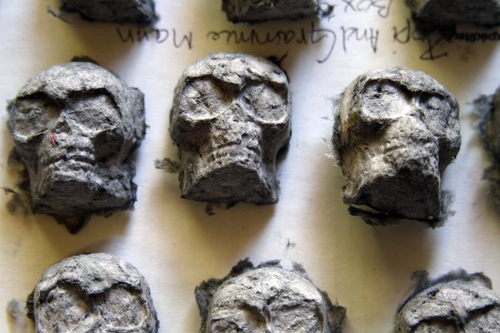
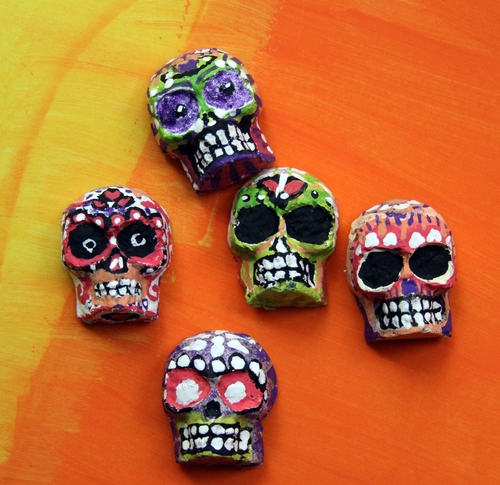
This week, I made molded papier-mache skulls with a dollar store silicone ice cube tray. Making molded papier-mache is a pretty simple process, and you can make it with stuff you have on hand. It’s not a quick process though–I found that it takes a few days to cure the molded papier-mache. I am very happy with how versatile the silicone ice cube tray mold has been; it’s a lot of fun. So far, we have made:
I even have a few more ideas for using the mold, and I have heard from several of you who have used them for other projects as well. But now, back to the molded papier-mache project.
Project Materials:
- Newspaper, on hand
- White glue, on hand or $1
- Silicone ice cube tray, $1
Total: $1 and up
Papier-Mache Pulp Recipe:
I got my recipe for papier-mache from Do It Yourself magazine (I have really been enjoying this magazine, by the way!). To make it:
- Tear up newspaper into small pieces. I picked up a free local paper and used the whole thing (about 32 pages).
- Pour boiling water over the newspaper and let it soak for an hour. Make sure you use a disposable bowl or recycled plastic container, or something you don’t care about, because a lot of ink comes off the paper. Make sure all paper is covered with water.
- Drain water and mix soggy paper into small pieces with a hand mixer. The instructions said to use your fingers to break up the paper into smaller pieces, but I tried it for five minutes and it was slow going, plus my fingers got all covered in ink. The hand mixer made the job much easier!
- Make a mixture of 4 teaspoons of glue to 1 teaspoon of water. Pour over the paper pulp and mix with your hand mixer. Be sure to wash the beaters immediately after you’re done with them. If you need more glue mixture, the ratio is 4:1.

To make the molded skulls:
- Spray the mold with non-stick spray.
- Push the papier-mache mixture into the mold. Pack it as tightly as you can down in the detailed area of the mold.
- Fill in the entire mold with papier-mache. WARNING: this will take awhile to dry, even for these tiny 1″ ice cube molds. I left mine in the mold for two days before removing them (and even then, they were totally soggy).
- After a couple days, unmold the skulls, then allow to dry until they are light and totally dried out. This might take a week. I don’t know because I did the following step:
- Dry in your oven at 150° F for 2 or more hours, until dry. I used my toaster oven on the convection setting for 2.5 hours.
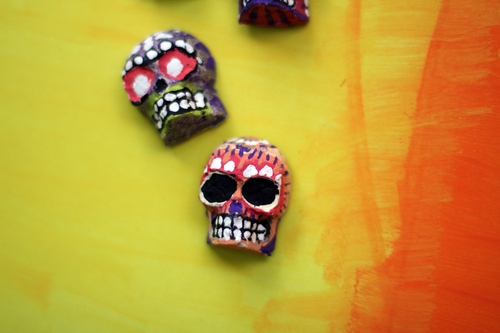
When the skulls are completely dry, trim off excess papier-mache with scissors (I used kitchen shears) and sand with sandpaper, if a smoother finish is desired. Decorate however you like. I painted mine with acrylic craft paint.
Tips for painting with craft paint:
- You can paint the papier-mache sculpture with an undercoat of paint or just decorate the papier-mache directly. Mine was muddy gray, so I opted to paint my skulls with white and antique white craft paint.
- The papier-mache is, by nature, rough and bumpy. Don’t expect it to be easy to achieve superfine painting detail.
- Wet your brush and mix with acrylic paint. You’ll need a bit of water mixed with your paint to get adequate glide over the bumpy surface (and the water will help you cover all the crevices easily).
- If you make a mistake, just wait for the mistake to dry and paint over it. Super easy.
- In fact, the way I found to make better detail was to paint my color in layers (specifically the teeth). Paint the black outline first (let it dry), and then dab white for teeth. When the paint dries, touch up any spots that need to be cleaned up.
- If it doesn’t look as good as you want it to, just keep adding layers of paint until you like it!
- Add some glitter or metallic paint for a little special something (I used a few coats of Plaid Extreme Glitter paint on a couple of my skulls).
- I tried to use a permanent marker to decorate my skulls, but I didn’t like the effect. Maybe you will get better results than I did!
So this is project #4 with these molds, and I still have a bunch of ideas. I’m trying to do as many of them as I can before Halloween arrives, but of course, all these projects work with any silicone mold, so keep these techniques in mind for other events.
Now, what should I make with these little guys?


16 Comments
Amy
Love it! Very dia de los muertos
Annie
We don’t really do skulls at our house, but I am going to do this with the pumpkin version I found in the same bin at my DT! These will be too cute!!
Jeri
That is really cool!
Mer
Heather,
These are fabulous.
I am going to try this with the tray you sent me. :o)
Mer in FL
Amanda
CRAYONS!!!! skull crayons would be so fun!
n.
i like this becos the sugar skulls it would be a pity to eat them and lose the art, and it would be creepy to keep them becos it might draw bugs.
so this is a more permanent ornament, i like that.
Tabitha
I made some with sculpey that turned out really nice too. Love the paint job on yours!
Jaime
Oo I like it! I’m thinking they might be kinda cool in a DT hurricane on the mantle. OK, I’ll go ahead and get the molds now. lol
Michelle L.
Whee! J’adore! Heather, I have been loving all the skull creations, but this is my absolute favorite! Thanks for the great tute!
Elisha
(that person’s idea to make skull crayons sounds awesome!)
Another method to quicken the drying process is to only use a few layers – essentially making the skull hollow. It would dry a lot faster. You could then fill it with plastic bags or some other light recyclable and put the final layer of paper mache on the back.
It would make the thing lighter and it would be ready to paint faster. n_n
Susan W
Paperclay would work also (and be very smooth).
Jean H
I have bought many of these kinds of trays at various “dollar” places, are they safe for hot “stuff” hot wax, etc? what would you NOT put in them? don’t worry i know once they go craft they don’t go back (to food).
Rachel
These are fabulous! Thanks for the great idea, I’ll be linking.
polwig
What a great idea… I tried to once put plaster of paris into my kids play dough molds and that did not work that well… this however is perfect, well provided they come out as nicely as yours.
Audrey Mislan
Great Idea!!! I hadn’t thought of using the silicone ice cube trays to make this type of thing. Wonder if the silicone bakeware would work the same way. Thanks for the wonderful idea.