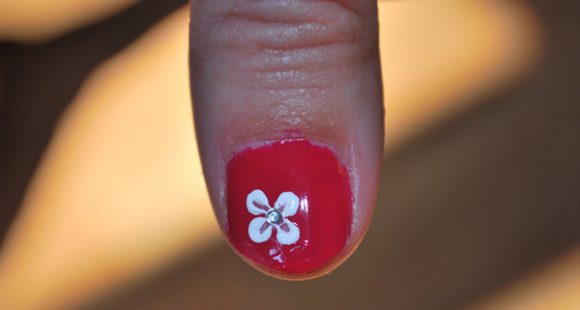
A couple weeks ago, I featured Megan’s Newspaper Nails tutorial, a simple nail design idea using a transferred image from newspaper. You really enjoyed the idea, so I invited Megan to create another tutorial exclusively for Dollar Store Crafts! Today she’s going to teach us how to make a simple flower fingernail. You can often find nail polish supplies at the dollar store, from nail files and emery boards to nail polish and top coats.
Flower Nail Polish Tutorial
by Megan at www.razberriez.com
A simple flower is a very popular design when you got to the nail salon, but did you know you can easily make a flower design on your nails yourself? It’s quick, easy and looks great!
You will need the following:
- Base coat ( I used CND Stickey )
- Nail polish of your choice ( Essie’s Exotic )
- White nail polish ( Art Club 01 White )
- Top Coat ( Sally Hansen Mega Shine )
- Bobby Pin
- Toothpick
- Scrap piece of paper
- Silver glitter polish or rhinestone

How to make the flower:
- Apply a base coat – This step is crucial to ensure that your nail polish won’t chip, stain your nails, or peel off when its dry. For best results, apply a thin and even coat. Allow to dry for 2 minutes.
- Choose a nail polish. Any nail polish will work for this design, as long as white is able to show up on it. I used a raspberry pink color, which I have found makes the flower really pop. Blues, greens, pinks, and purples would look exceptionally good with this design.
- Drop a small amount of nail polish onto the piece of scrap paper. This step is pretty self-explanatory.Start off by using a small piece of scrap paper and simply drop a pea sized amount of white nail polish onto the paper.
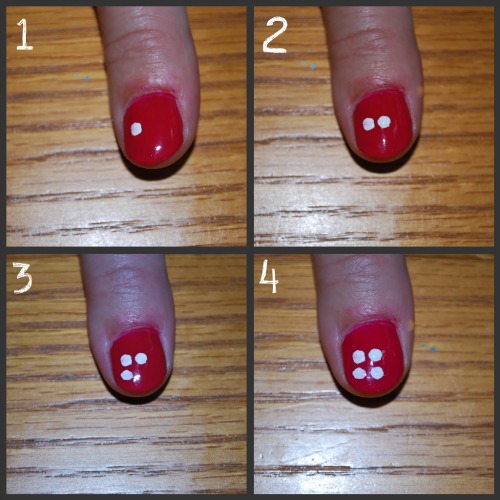
- Begin the design. As you can see from the pictures, I used the end of a bobby pin to create the 4 dots. I started by dipping the round end of the bobby pin, into the white. I then, made a small dot on the left side of my nail. Dip the pin back into the white, and repeat, this time make a dot right across from the previous one, then one underneath, and one beside it.Make sure to evenly space the dots. When your done doing this, it should almost look like a square.
- Create the flower. Anything from a toothpick, to a pin, to a ballpoint pen will work for this step. Once the dots have gotten slightly tacky ( 10-15 seconds ), put the tip of the toothpick into the center of your first dot, and carefully drag it into the middle of the 4 dots. Repeat with the other 3 dots until you have created what looks like a flower.
- Add a decorative center. I used a small rhinestone for this step, but silver glitter polish or another color will work also. If you are using a rhinestone, dab a little bit of topcoat into the center and place the rhinestone down. Otherwise, just dab your glitter into the middle of your flower.
- Use a topcoat. To finish off the design, apply your favorite topcoat. This will help seal in the design and prevent the rhinestone from coming off.
Get creative! Add a stem or leaf with a little green polish or try double loading your dotting tool with two shades for a cool effect!


2 Comments
Chelsea
Awesome! I’ve recently gotten more into nail art (it’s a way fun creative outlet when you live, breathe and eat making stuff for a living.) I found some LA Colors nail design polish (with the super fine brush) at Family dollar for 1.99, then was super stoked to find tons more colors at Dollar Tree the other day! You can also use a clean liquid eyeliner brush to create designs if you want to use a color you already have. Right now I have what I’ve named “Orange Crush” toenails. :)