Let your nails show your Valentine spirit with a simple statement heart! Painting hearts on your nails might look difficult first but there are a few tricks that will make it look like you spent a lot of money at the salon. Read on for instructions on how to create a nail polish heart.
Project Materials:
- Nail polish base color, on hand or $1
- Coordinating nail polish, on hand or $1
- Base and top coat nail polish, on hand or $1 each
- Toothpick, on hand
Total: FREE or $4 and up
You can find an array of nail polish and manicure supplies at the dollar store. Check out my review of how dollar store nail polish compares to brand-name polishes.
About the supplies:
- Any Nail Polish – Pink, Red, White, whatever you would like.
- A toothpick – They work the best for creating hearts
- A coordinating polish- This will be the color of the heart, make sure it will show up on the base color you choose.
- A small piece of paper– You will need this to place the nail polish on when you create the heart.
- Base & Top Coat- Both of these polishes will help seal in the design and make it last longer.

Before you begin: *Apply your base coat. This will give the nail polish something to stick to, allowing the design to last longer and preventing chipping.*
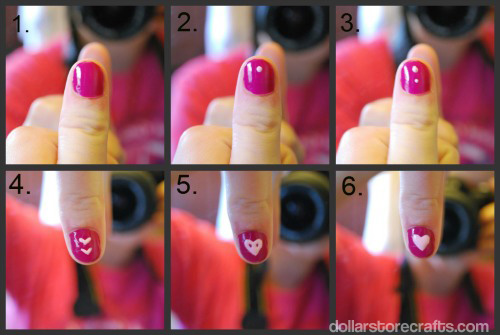
- Apply 2 coats of your base color. I used a bright fuchsia polish (Forever 21’s Fuchsia) on my nails and let it dry for about 3 minutes in between coats. I figured this was an appropriate color to use underneath the heart design.
- Place a small dot near the tip of your nail. Use the other nail polish (I used Butter London’s Teddy Girl) and put a few drops of it on a small piece of paper. Then, taking a toothpick place a small dot near the tip of your nail.This is the bottom of the heart.
- Place a small dot right above the other dot. Use the same method as you did for step 2, just place it slightly above the last one. This will be the top “v” part of the heart.
- Create 2 small V’s from the dots. Use the toothpick to draw a small V from each dot. You are making the top and bottom part of the heart.
- Make the outline of the heart. Start by connecting the 2 V’s by drawing a line down the middle of them, then connect the top part of the top V to the top part of the bottom V. Look at the picture above for help.
- Fill in your heart. Use the remaining polish to fix any mistakes and fill in the middle of the heart. Wait about 10 minutes and then apply your favorite top coat.
All done! Get creative with your hearts by adding a rhinestone, glitter, hearts of different sizes and colors or other effects.
 Megan blogs about makeup, nails, learning how to look great on a budget and keeping up with the latest styles at her site razberriez.com. She is the fingernail fashion contributor for Dollar Store Crafts.


1 Comment